Last January, I walked out to my coop at 6 AM and found my chickens clustered around a solid block of ice where their water should have been. The temperature had dropped to 15°F overnight, and I learned the hard way that standard waterers freeze fast in extreme cold.
If you’re facing frozen chicken water this winter and don’t have electricity at your coop, you’re not alone—and there are proven solutions that help.
In this guide, I’ve organized 16 DIY chicken winter water solutions by effectiveness tiers, so you know exactly which ones to trust for your climate, from Michigan to Montana. Beyond keeping water from freezing, winterizing your entire chicken coop ensures your flock stays comfortable all winter. If you are new to this, it is also worth reviewing common mistakes first-time chicken keepers make to avoid other cold-weather pitfalls.
Important Reality Check:
If you live in regions with sustained temperatures below 15°F (like northern Minnesota, Montana, or Maine), no off-grid method will keep water consistently unfrozen. Professional advice from Nutrena Feeds confirms that in severe winters, keeping water flowing often requires reliable heat sources.
You’ll likely need to either bring fresh water multiple times daily, invest in a heated waterer with electricity, or use a combination approach. Many experienced northern chicken keepers rely on heated dog bowls or heated bases as the only truly reliable solution. Before installing permanent electrical heating, always check backyard chicken regulations in your state.
Why Keeping Chicken Water from Freezing Matters
Chickens need constant access to fresh water to maintain egg production and overall health, even in winter. According to guidelines from Michigan State University Extension and supported by recent 2020 research on poultry hydration, hens require approximately one pint of water per day in winter conditions. Dehydration can occur within hours when water sources freeze solid.
Without adequate hydration, chickens experience decreased egg production, stress, and winter health issues like frostbite on combs and wattles. It is vital to monitor your flock’s health regularly during these cold snaps to catch signs of dehydration early.
Important Safety Warning: Never add antifreeze, rubbing alcohol, or high amounts of salt directly to your chickens’ drinking water. These substances are toxic to poultry and can cause serious harm or death. This guide only covers safe, natural methods.
Tier 1: Actually Effective Off-Grid Methods
These are your best bets for delaying freezing in temperatures down to 20°F without electricity.
1. Black Rubber Tub Method

The black rubber tub method is the gold standard for off-grid water. While it isn’t a miracle cure for sub-zero nights, it significantly outperforms metal or plastic containers.
How It Works: According to testing by Fresh Eggs Daily, black rubber absorbs solar radiation throughout the day. Even more importantly, the wide surface area helps prevent the water from freezing as fast as it would in a narrow metal waterer. The rubber retains heat longer, keeping water accessible for more hours of the day.
Step-by-Step Instructions:
- Select the Tub: Choose a black rubber livestock tub (3-5 gallon capacity works well for small flocks).
- Find the Sun: Position the tub in the sunniest area of your run—optimal coop placement for maximum sunlight is key for this method to work.
- Fill Daily: Fill with room-temperature water each morning.
- Positioning: Place the tub on a south-facing side for maximum sun exposure.
- Monitor: Check for ice formation in the late afternoon and adjust position if needed.
Materials Needed:
- Black rubber livestock tub ($15-25 at farm supply stores like Tractor Supply).
- Level ground or platform in a sunny location.
Pros & Cons:
- Pros: No electricity cost, extremely durable (lasts 5+ years), easy to break ice out (flexible rubber).
- Cons: Requires daily monitoring in severe cold, needs direct sunlight to be fully effective.
I’ve used this method for three winters in Virginia. On sunny days around 25°F, my flock has liquid water until late afternoon. However, on cloudy days or when temps drop into the teens, I still have to go out and break the ice or refill the tub. The rubber makes this chore much easier than dealing with frozen metal founts.
Pro tip from BackYard Chickens forums: If your tub does freeze, pour a cup of warm water over the outside of the rubber tub—the ice will slide right out without needing to haul it back to the house to thaw. This makes morning chores much faster.
2. Horizontal Nipple Waterer System (The Upgrade)
While not preventing freezing entirely without heat, horizontal nipple waterers significantly outperform open containers in cold weather, offering a cleaner, more freeze-resistant solution.
How It Works: According to extensive user reports on BackYard Chickens forums, horizontal nipples feature an O-ring seal that stays submerged in warmer water inside the reservoir, making them much more freeze-resistant than vertical nipples or open waterers. Lil’Clucker notes that transitioning to nipples “significantly reduces the chance of ice formation compared to waterer cups” because it eliminates the large exposed surface area that freezes first.
Step-by-Step Instructions:
- Select Container: Use a food-grade 5-gallon bucket or large PVC pipe.
- Drill Holes: Drill holes about 2 inches from the bottom using an 11/32″ drill bit (or size recommended by manufacturer).
- Install: Screw the horizontal nipples directly into the plastic (most are self-tapping).
- Position: Place the bucket on cinder blocks so the nipples are at the chickens’ eye level.
Materials Needed:
- 5-gallon plastic bucket with lid.
- Horizontal poultry nipples (approx. $10 for a pack).
- Drill.
Pros & Cons:
- Pros: Drastically reduces exposed surface area, water stays clean (no shavings/poop), effective down to 15°F with insulation.
- Cons: Chickens may need training if used to bowls, nipples can freeze in extreme wind (requires wind protection).
I switched to a 5-gallon bucket with horizontal nipples inside my wind-protected coop. While the open bowl outside froze solid at 20°F, the nipple bucket remained liquid. I only had to tap the nipples once to break a tiny ice film, and the water flowed freely.
3. Wind-Protected Water Station (The Force Multiplier)
Wind protection isn’t a standalone solution, but it dramatically improves every other method’s effectiveness.
How It Works: According to Buff Clucks, wind chill accelerates freezing significantly. By placing the waterer inside the coop or behind a windbreak, you remove the “stripping” effect of cold wind pulling heat away from the water surface.
Step-by-Step Instructions:
- Identify Wind Direction: Determine the prevailing winter wind direction (usually North or West).
- Build a Barrier: Use plywood, old doors, or heavy duty tarps to create a “U” shape or corner.
- Place Waterer: Set your water container deep into this sheltered corner.
- Check Drafts: Ensure there are no gaps at the bottom where cold air can rush in.
Materials Needed:
- Plywood sheets, pallets, or heavy-duty tarp.
- Fasteners (zip ties or screws).
Pros & Cons:
- Pros: Makes all other methods work better, reduces chicken stress from wind chill.
- Cons: Can create damp spots if not ventilated properly, requires materials to build.
I moved my black rubber tub from the center of the run to a corner shielded by plywood. Even on windy 20°F days, the water stayed liquid about 2 hours longer than when it was fully exposed to the wind.
4. Insulated Container with Straw Packing
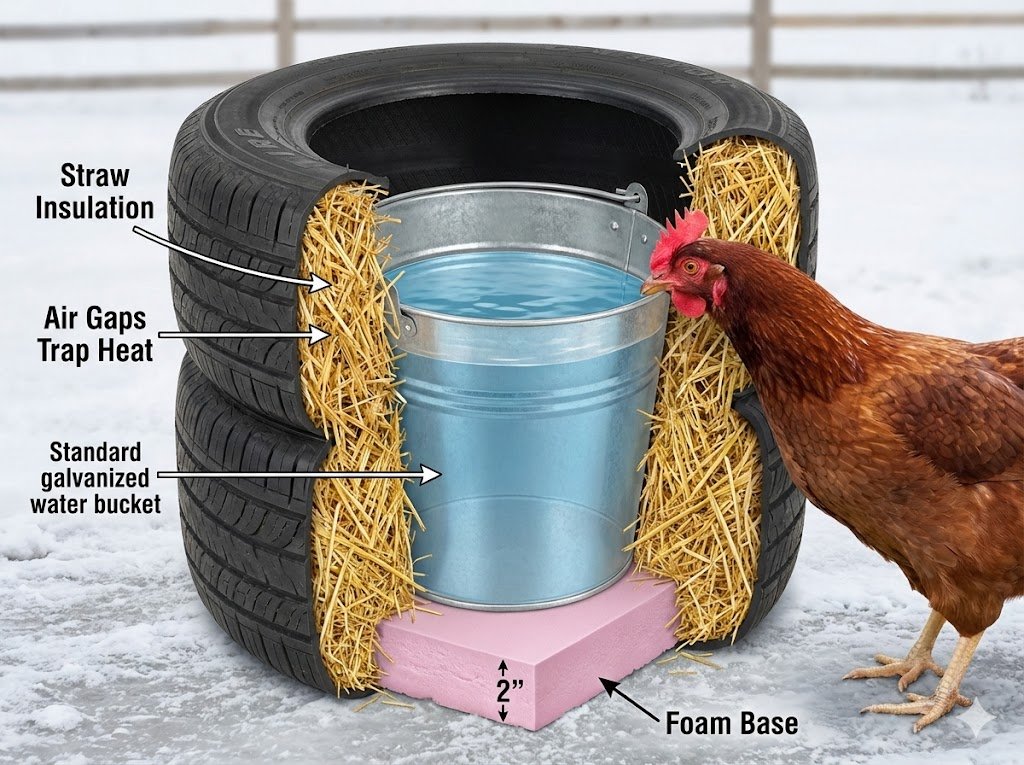
Insulation is key to DIY chicken winter water solutions. You can create a “thermos” effect for your water bucket.
How It Works: Straw traps air, which is an excellent insulator. By packing straw around your water bucket, you slow down the heat loss, keeping the water liquid for hours longer than an exposed bucket.
Step-by-Step Instructions:
- Prepare Base: Take a large tire or a larger bucket (muck bucket).
- Insert Waterer: Place your primary water bucket inside the larger container.
- Pack Insulation: Pack the gap between the two tightly with straw, hay, or even dry leaves.
- Insulate Bottom: Place a piece of wood or styrofoam underneath the bucket to insulate it from the cold ground.
Materials Needed:
- One large container (old tire or muck tub).
- One smaller water bucket.
- Insulating material (straw, hay).
Pros & Cons:
- Pros: Uses cheap/free materials, difficult for chickens to tip over.
- Cons: Straw can get wet and messy, needs occasional replenishing.
In my coop, I use an old car tire filled with straw to hold the water bucket. It keeps the bucket from tipping over and provides just enough insulation to get us through the morning chores without a solid freeze.
5. The “Double Bucket” Vacuum Method
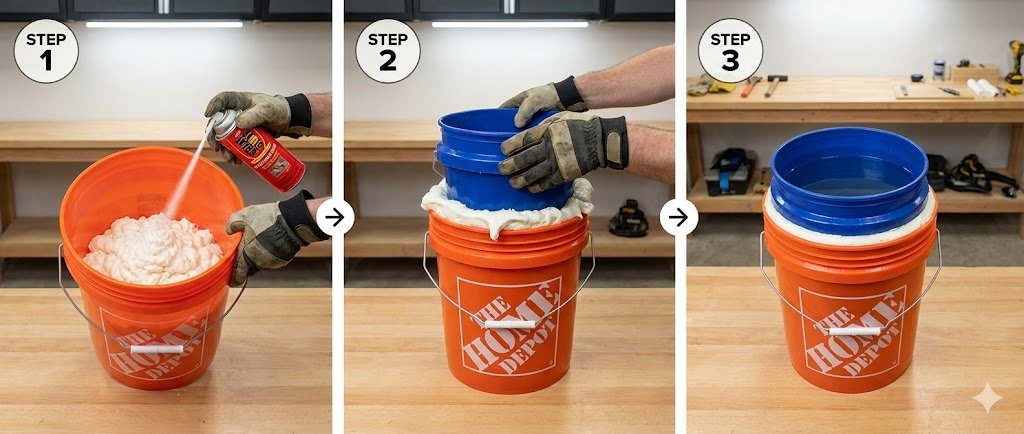
This is a more advanced version of the insulated container, utilizing air gaps. A popular strategy on the BackYard Chickens Forum.
How It Works: Air is a poor conductor of cold. By nesting a small bucket inside a large bucket and filling the gap with spray foam, you create a barrier against the cold, much like a travel coffee mug.
Step-by-Step Instructions:
- Prepare Buckets: Clean one 5-gallon bucket and one 3-gallon bucket.
- Apply Foam: Spray expanding foam insulation (Great Stuff) into the bottom of the 5-gallon bucket.
- Nest Buckets: Press the 3-gallon bucket firmly inside the 5-gallon bucket.
- Fill Gaps: Fill the side gaps between the buckets with more foam.
- Cure: Let dry for 24 hours, cut off excess foam, and fill the inner bucket with water.
Materials Needed:
- One 5-gallon bucket.
- One 3-gallon bucket.
- Can of expanding spray foam.
Pros & Cons:
- Pros: Highly effective insulation, portable, cleanable.
- Cons: Requires purchase of spray foam, permanent modification of buckets.
A neighbor of mine uses this for her remote coop. She fills it with warm water in the morning, and the insulation keeps it drinkable until her evening check, even when temps hit 20°F.
6. Buried Container Partially Underground
This uses the earth’s natural temperature regulation.
How It Works: The ground stays warmer than the air in winter (geothermal energy). By burying a tub halfway, the earth insulates the water from the bottom and sides.
Step-by-Step Instructions:
- Dig Hole: Dig a hole slightly wider than your water tub.
- Set Height: Place the tub so the rim is 3-4 inches above ground level (to prevent dirt from getting in).
- Backfill: Pack dirt tightly around the sides of the tub.
- Cover Edges: Add a layer of straw around the exposed rim for extra insulation.
Materials Needed:
- Shovel.
- Water tub.
- Straw (optional).
Pros & Cons:
- Pros: Leverages free geothermal heat, impossible to tip over.
- Cons: Labor intensive to install, surface is still exposed to cold air, hard to clean out.
I tried this in a permanent run. While it did keep the bottom of the water unfrozen longer, cleaning the mud out of it was a hassle. It works best if you have a dedicated spot that doesn’t get muddy.
7. Thermal Mass with Hot Water Bottles
This requires a bit more labor but is highly effective for cold mornings.
How It Works: You place a large sealed jug of boiling hot water into the water tub. The heat radiates from the jug into the drinking water, keeping it warm for several hours.
Why Hot Water Bottles Work When Saltwater Bottles Don’t This method adds actual heat energy to your water system, unlike saltwater bottles which simply stay liquid at lower temperatures without warming anything around them. Think of it like putting a warm rock in your water versus putting an ice cube that melts slowly—one adds warmth, the other just displaces volume.
Step-by-Step Instructions:
- Heat Water: Boil water in a kettle or pot.
- Fill Jug: Carefully pour into a thick plastic gallon jug (milk jugs work, but thicker juice jugs are better).
- Seal: Tighten the cap securely.
- Submerge: Place the hot jug directly into the chicken water trough.
- Replace: Swap out with a fresh hot jug every 4-5 hours.
Materials Needed:
- Heavy-duty plastic jug (gallon size).
- Source of boiling water.
Pros & Cons:
- Pros: Actively warms the water, uses household items.
- Cons: Temporary solution (lasts 3-5 hours), requires multiple trips to the coop.
During a polar vortex in Michigan, I used gallon milk jugs filled with hot tap water. I dropped one in the trough at 8 AM, and the water stayed liquid until noon, even when it was 10°F outside. I had to replace the jugs again at lunch.
8. Warm Water Rotation
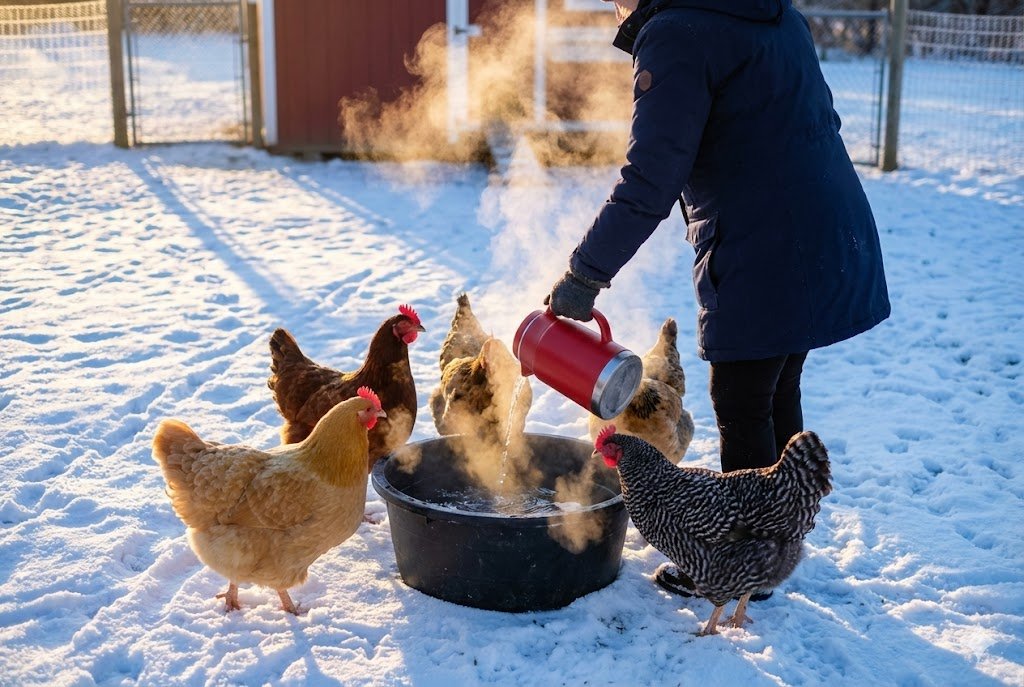
Sometimes the simplest method is the best, though it requires effort.
How It Works: Simply bring warm water out to the coop twice a day. This raises the thermal starting point of the water, meaning it takes longer to reach freezing temperature.
Step-by-Step Instructions:
- Morning Routine: Fill a pitcher with warm tap water (not boiling) first thing in the morning.
- Refill: Empty any ice from the coop bowl and fill with the warm water.
- Afternoon Check: Repeat the process around 2 PM or whenever ice starts forming.
Materials Needed:
- Large pitcher or bucket.
- Access to warm tap water.
Pros & Cons:
- Pros: Boosts chicken morale/body heat, zero cost, 100% reliable.
- Cons: Labor intensive, requires you to be home.
When I’m home on weekends, this is my go-to. It boosts the flock’s morale and ensures they drink enough. Warm water also helps them regulate their body temperature better than ice-cold water.
9. Schedule-Based Water Rotation
If you have two waterers, swap them.
How It Works: Keep one waterer inside your warm house and one in the coop. Every morning and evening, swap them. The waterer from inside is warm and takes hours to freeze.
Step-by-Step Instructions:
- Buy Two: Purchase two identical waterers.
- Rotation: Keep Waterer A in the coop and Waterer B inside your house.
- Morning Swap: Take Waterer B out to the coop. Bring Waterer A inside to thaw/clean.
- Evening Swap: Repeat the process before chickens roost (if needed) or the next morning.
Materials Needed:
- Two identical chicken waterers.
Pros & Cons:
- Pros: Zero ongoing cost, guarantees liquid water at start of day.
- Cons: Carrying waterers back and forth is heavy work.
I used this method with 3-gallon founts. It worked perfectly, but carrying 25 lbs of water across an icy yard every morning got tiring after a month.
Tier 2: Helpful in Mild Climates Only (28-32°F)
These methods help optimize your setup but won’t stop freezing on their own in serious cold.
10. Deep Rubber Tub vs. Shallow Container
Size matters when it comes to thermodynamics.
How It Works: A large volume of water takes much longer to freeze than a shallow pan. Use the deepest tub feasible for your flock size.
Step-by-Step Instructions:
- Assess Flock: Determine if your chickens are large enough to reach over a tall rim.
- Select Tub: Buy a deep 15-gallon rubber tub instead of a shallow pan.
- Add Steps: If you have bantams or smaller birds, place a cinder block inside and outside the tub to act as stairs.
Materials Needed:
- Deep 15-gallon rubber tub.
- Cinder blocks (optional).
Pros & Cons:
- Pros: Slower freezing rate, holds more water.
- Cons: Harder to clean/dump out, risk of drowning for chicks (use steps!).
I switched from a shallow dog bowl to a deep tub. The dog bowl froze in 2 hours at 30°F. The deep tub lasted 6 hours before forming a surface crust.
11. Passive Solar Box (Greenhouse Effect)
You can build a passive solar heater using old windows.
How It Works: Build a small wooden box with a glass top (like a cold frame). Place the waterer inside. The glass traps the sun’s heat, keeping the interior significantly warmer than the outside air on sunny days.
Step-by-Step Instructions:
- Build Frame: Construct a 3-sided wooden box painted black.
- Add Glazing: Place an old window or plexiglass on top/front, angled toward the sun.
- Access: Leave a side opening just big enough for a chicken to enter and drink.
- Position: Face the glass South.
Materials Needed:
- Scrap wood (plywood).
- Old window sash or Plexiglass sheet.
- Black paint.
Pros & Cons:
- Pros: Free heat energy, good project for DIYers.
- Cons: Only works when sunny, can be tricky to clean inside.
My neighbor built one of these using an old storm window. On sunny 25°F days, the water inside never froze. On cloudy days, it froze just like everything else.
12. The “Sunroom” Setup
If you have a clear plastic tarp, wrap a corner of your chicken run.
How It Works: This creates a greenhouse effect for a specific section of the run. Place the waterer inside this wrapped corner. The ambient temperature inside the plastic can be 10-15 degrees warmer than outside on a sunny day.
Step-by-Step Instructions:
- Select Corner: Choose the sunniest corner of your run.
- Wrap: Staple heavy clear plastic sheeting (6mil) to the run walls from top to bottom.
- Seal: Ensure edges are tight to block wind.
- Place Water: Put the waterer inside this “greenhouse” zone.
Materials Needed:
- Clear plastic sheeting (6mil).
- Staple gun or zip ties.
Pros & Cons:
- Pros: Warms the chickens too, blocks wind, dry ground.
- Cons: Plastic can tear in high winds, can get too hot in spring.
I wrap the bottom 3 feet of my run every winter. The chickens love hanging out in the sunbeams there, and the water stays liquid longer than when it’s out in the open run.
13. Black Plastic Wrap Base
If you use a metal waterer, you can hack it to absorb sun.
How It Works: Wrap the base of the metal waterer in black plastic or black duct tape. As noted by Buff Clucks, this changes the reflective metal surface (which repels sun heat) into a dark surface that absorbs heat.
Step-by-Step Instructions:
- Clean Base: Dry the metal base of your fount.
- Wrap: Tightly wrap black electrical tape or heavy-duty black duct tape around the exterior of the base.
- Position: Place in direct sunlight.
Materials Needed:
- Black duct tape or electrical tape.
Pros & Cons:
- Pros: Cheap modification for existing gear.
- Cons: Less effective than rubber, tape peels off eventually.
Real-World Experience: I tried this on a galvanized fount. It helped slightly on very sunny days, but the metal still conducted the cold from the ground too fast. It’s better than nothing, but not by much.
Tier 3: Popular But Proven Ineffective (The Myths)
You will see these recommended online, but science and testing show they don’t work well.
14. The Ping Pong Ball Myth (Read Before Trying)
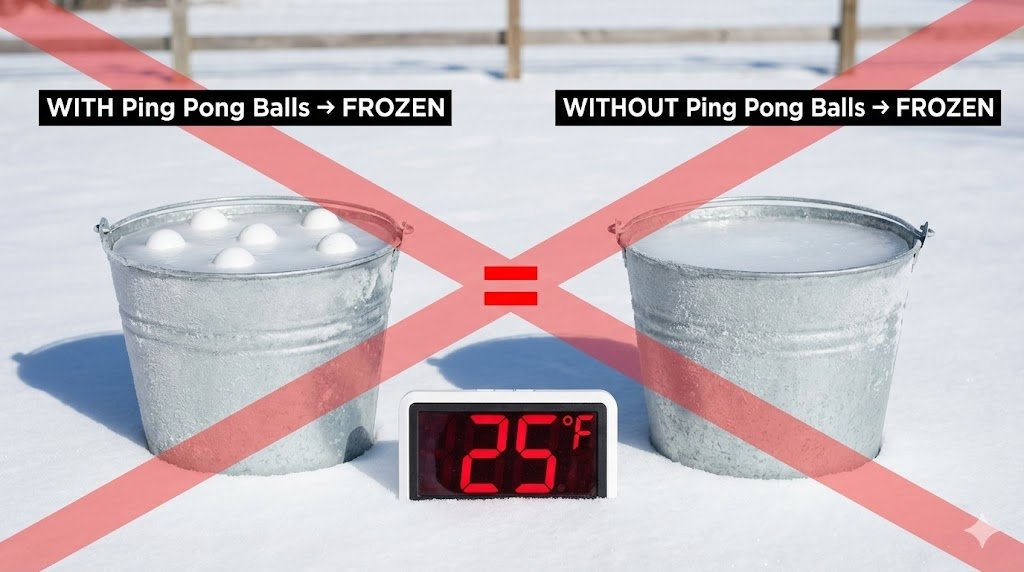
If you are wondering, “will ping pong balls keep water from freezing?” the answer is generally no.
How It Works (The Theory vs Reality): The theory is that wind pushes the balls, creating ripples. Reality: Randy’s controlled experiment proves they do not slow ice formation.
Step-by-Step Instructions (If you insist on trying):
- Fill water tub.
- Float 3-4 ping pong balls on surface.
- Watch them freeze into the ice.
Materials Needed:
- Ping pong balls.
Pros & Cons:
- Pros: Cheap visual cue (if they aren’t moving, water is frozen).
- Cons: Ineffective, chickens peck them, annoying to remove from ice.
I tried this my first year. The balls just froze in place. It was actually harder to break the ice because I was trying not to crush the balls.
15. Saltwater Bottle System (Use with Caution)
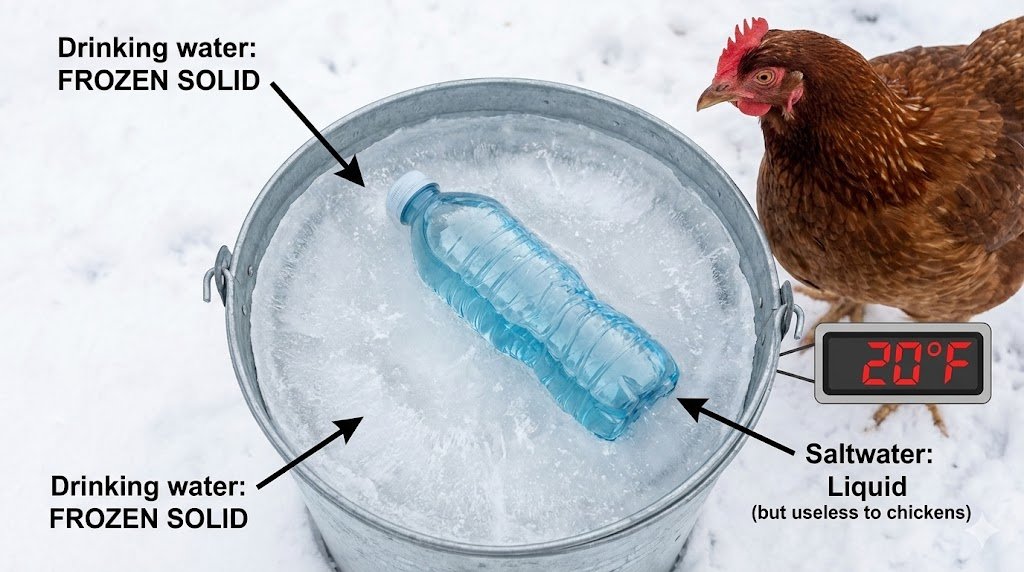
A common question is, “what can you put in a water bucket to keep it from freezing?”
How It Works (The Theory vs Reality):
Theory: Saltwater freezes at a lower temp.
Reality: A bottle of saltwater at 29°F is still 29°F. It does not release heat. Fresh Eggs Daily found buckets with saltwater bottles sometimes froze faster.
Step-by-Step Instructions:
- Mix 1/2 cup salt with warm water in a small bottle.
- Seal tightly (glue the cap).
- Place in water bucket.
Materials Needed:
- Small plastic bottle.
- Salt.
Pros & Cons:
- Pros: Displaces some water volume.
- Cons: Ineffective, danger of salt toxicity if bottle leaks.
I tested this alongside a regular bucket. Both froze solid overnight at 25°F. The saltwater bottle was liquid inside, but encased in a block of ice.
Tier 4: Methods Requiring Batteries
If you are off-grid but have batteries, this is an option.
16. Battery Powered Aerator
If you are completely off-grid but willing to use batteries, look for aerators.
How It Works (The Science of Movement): Grubbly Farms notes that “Moving water does not freeze as quickly as still water.” An aerator creates continuous circulation, bringing warmer water from the bottom to the surface.
Step-by-Step Instructions:
- Setup: Clip the aerator unit to the side of the bucket (keep it dry).
- Run Line: Drop the air stone/tube into the water.
- Secure: Use a zip tie or clip to ensure the tube stays at the bottom and chickens don’t peck it out.
- Power On: Turn it on and ensure bubbles are rising.
Materials Needed:
- Battery-operated bait aerator ($15-20).
- D-cell batteries.
Pros & Cons:
- Pros: Active prevention of ice through physics.
- Cons: High Running Cost (batteries die in 3-5 days), tubing can freeze if moisture gets inside.
This worked great for me for exactly 4 days until the batteries died. It kept a hole open in the ice at 15°F. However, buying batteries constantly became too expensive, so I switched to the black rubber tub method.
Bonus Strategy: Leverage Coop Warmth
All off-grid water methods work better if your coop stays slightly warmer than the outside air.
- Deep Litter Method: Grubbly Farms suggests using the deep litter method—allowing bedding to build up and compost on the floor—to generate natural heat from the ground up. The deep litter method can raise floor temperatures by several degrees through composting action, which helps if you place waterers on the ground inside the coop. However, this warmth is localized to the floor area and won’t prevent surface water from freezing in outdoor runs.
- Body Heat: According to Lil’Clucker, “Active chickens generate body heat, which helps keep the coop warmer overall.” Ensuring your coop is draft-free (while maintaining high-up ventilation for moisture) helps retain this body heat, keeping ambient temperatures higher and delaying water freezing.
Common Questions About Winterizing Chicken Water
Here are answers to the most frequent search questions regarding winter poultry care.
Q: Does adding rubbing alcohol to water keep it from freezing?
No, you should never add rubbing alcohol to your chickens’ drinking water. While rubbing alcohol does lower the freezing point, it is extremely toxic to chickens and can cause severe illness or death.
According to veterinary guidelines from The Pioneer Chicks, you should stick to insulated containers or thermal mass techniques. Instead, consider safe supplements like apple cider vinegar. Apple cider vinegar can be safely added to chicken water and provides a minor anti-freeze benefit (lowering the freezing point to about 28°F instead of 32°F according to Powerblanket), though this only helps in very mild conditions. It’s better known for providing immune support during winter stress.
Q: How do you winterize a chicken coop without electricity?
Winterizing involves insulating walls, using the “deep litter method” for warmth, and ensuring proper ventilation without drafts. For water specifically, combine solar heating (black tubs) with insulation (straw packing) to keep water accessible.
Q: Will beet juice keep my chicken’s water from freezing?
No, beet juice is not an effective antifreeze. There is no scientific evidence that beet juice prevents freezing significantly. Furthermore, adding substances to the water can alter the taste, causing chickens to drink less. Hydration is critical in winter, so keep the water plain and fresh.
Q: Do ping pong balls really work?
Despite being widely shared online, controlled experiments by Randy’s Chicken Blog show ping pong balls do not slow ice formation. The researcher tested identical buckets with and without ping pong balls and found no difference in freezing rates. While some chicken keepers report minor benefits when temperatures barely dip below freezing, scientific testing doesn’t support this method’s effectiveness.
Q: Does the saltwater bottle method work?
The saltwater bottle method has been tested by multiple chicken keepers with disappointing results. Fresh Eggs Daily found that buckets with saltwater bottles sometimes froze faster than control buckets.
While the saltwater inside the bottle stays liquid (due to salt lowering its freezing point), this doesn’t prevent the surrounding drinking water from freezing. Meyer Hatchery confirms this only works in extremely mild winters where temps rarely drop below freezing. For most winter climates, this method is unreliable.
Best Methods for Your Situation
Not every method works for every climate. Use this table to decide what is best for your region.
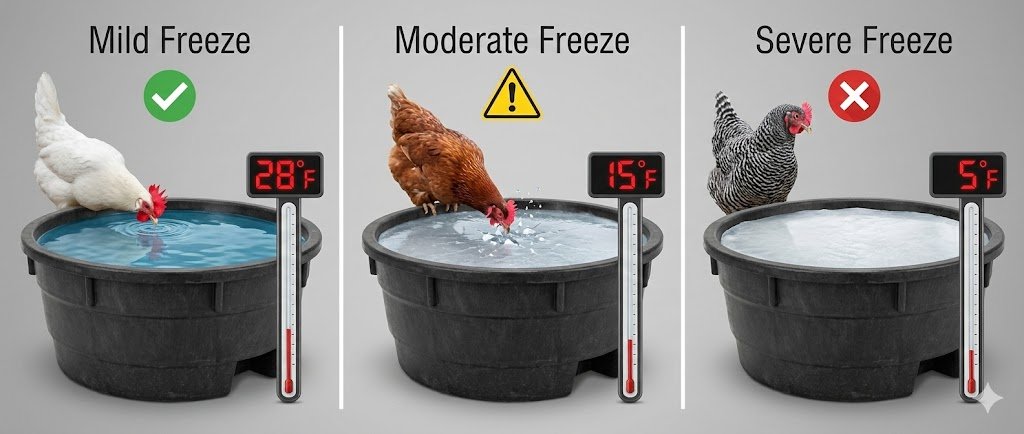
| Temperature Range | Reality Check | Best Off-Grid Option |
|---|---|---|
| 28-32°F | Off-grid methods can work | Black rubber tub + sun exposure |
| 20-27°F | Limited effectiveness, requires multiple checks | Insulated black tub + frequent refills |
| 10-19°F | Off-grid methods fail, manual intervention needed | Bring warm water 3-4x daily |
| Below 10°F | Electricity or constant human intervention required | Heated base or hourly water changes |
Your Next Steps
Ready to stop breaking ice every morning? Here is your plan:
- Assess your situation: Check your forecast. If you are expecting sub-zero temps, prepare to carry warm water.
- Start with Tier 1: Go buy a black rubber tub ($15) or horizontal nipples. It’s the best investment you can make for winter, even if just to reduce the frequency of ice-breaking.
- Gather materials: Find an old tire or some straw to insulate your backup bucket.
- Monitor: Check the water twice daily during the first week of freezing temps. You might also consider automatic coop doors for winter convenience, which can keep heat in a bit longer in the mornings.
Keeping chicken water from freezing without electricity is achievable using the right combination of methods for your climate. Whether you’re in Michigan dealing with sub-zero temperatures or Virginia experiencing milder freezing conditions, these proven techniques help ensure your flock stays hydrated all winter. Start with the black rubber tub method if you’re new to winter chicken keeping, then experiment with additional techniques as you learn what works best for your setup. For our friends across the pond, be sure to check our guide on keeping chickens in the UK for specific local advice.
Related Winter Chicken Care Articles
- Complete Winterizing Chicken Coop Guide
- How to Prevent Frostbite on Chicken Combs
- Essential Chicken Health Check Guide
- Mistakes Every First-Time Chicken Keeper Makes
- How to Set Up a Chicken First Aid Kit at Home
- What to Feed Chickens During a Heatwave

Oladepo Babatunde is the founder of ChickenStarter.com. He is a backyard chicken keeper and educator who specializes in helping beginners raise healthy flocks, particularly in warm climates. His expertise comes from years of hands-on experience building coops, treating common chicken ailments, and solving flock management issues. His own happy hens are a testament to his methods, laying 25-30 eggs weekly.