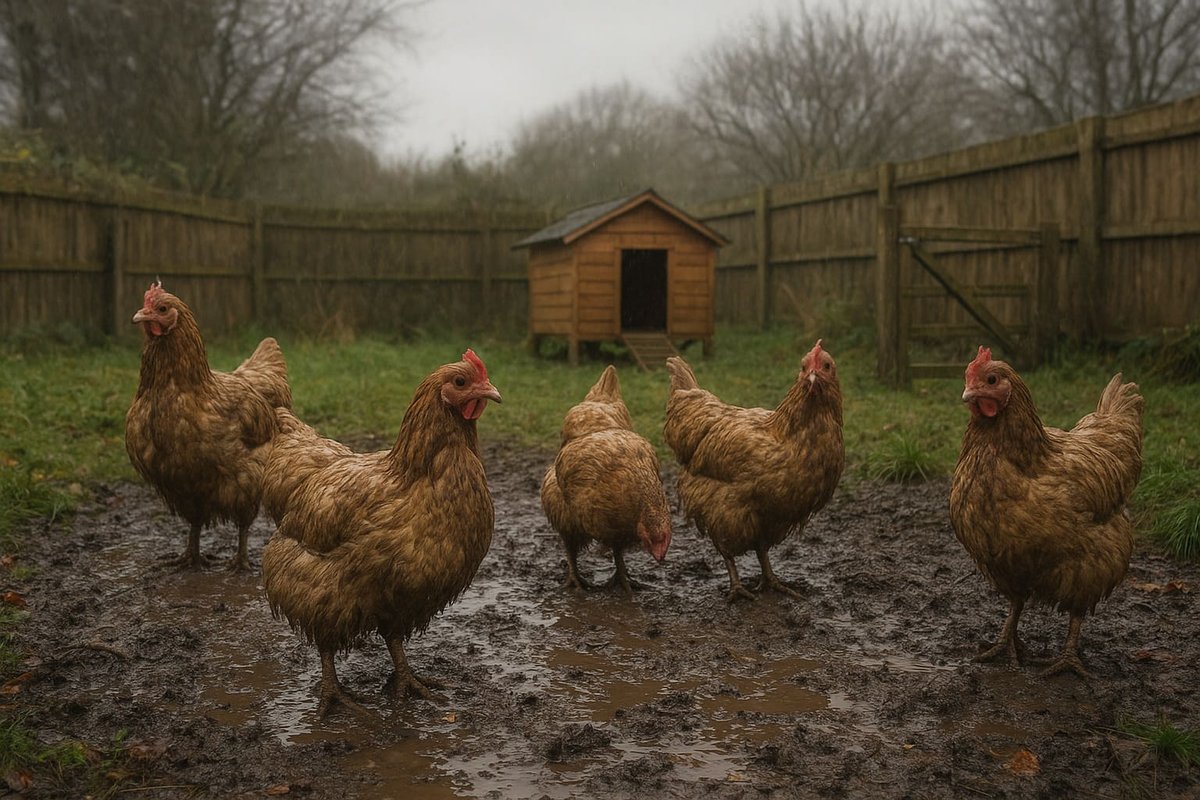
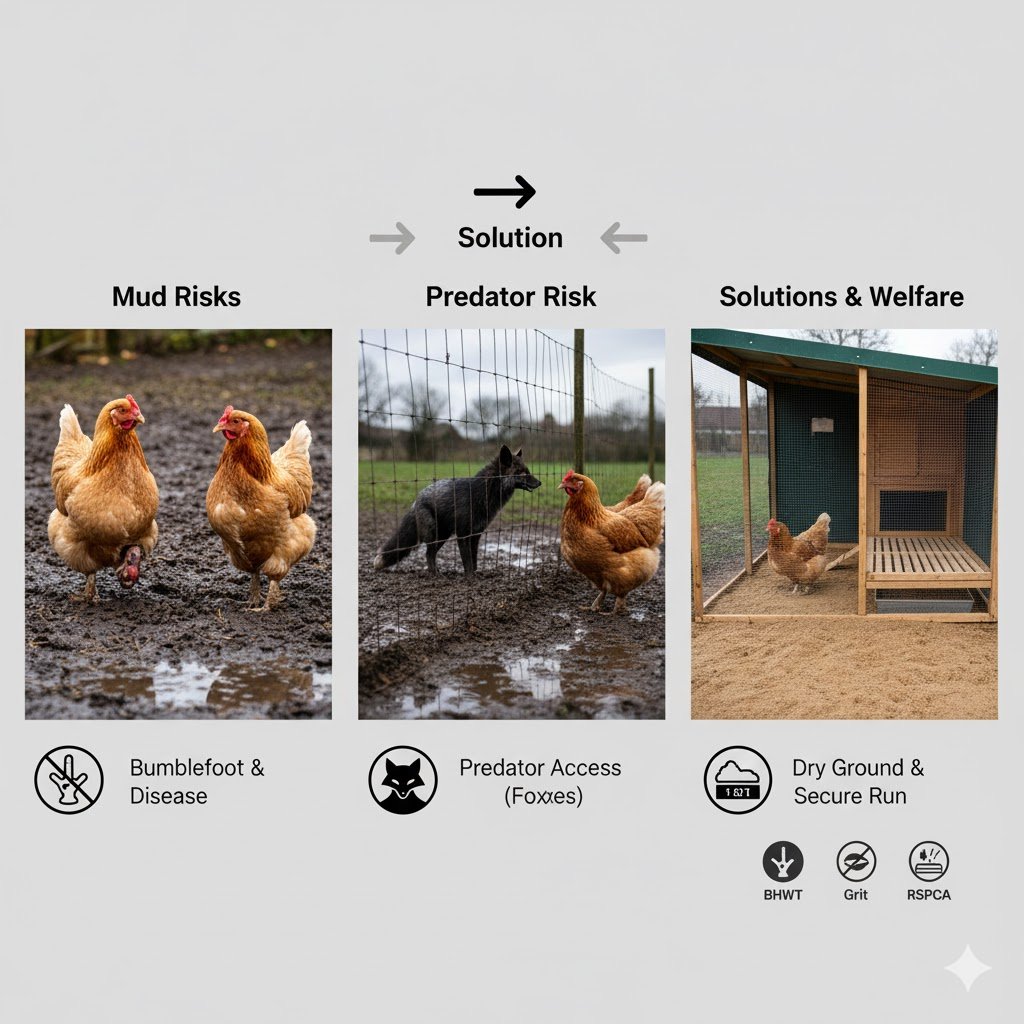
If you’re a UK backyard chicken owner, you know the feeling. That endless drizzle starts, and before you know it, your lovely chicken run has turned into a muddy, gloopy mess. It’s a sight that makes your heart sink, leading to mucky feathers, dirty eggs, and real health woes for your flock like bumblefoot. Last winter in my Manchester garden, the run turned into a proper swamp after weeks of rain, and I knew I had to find a lasting fix.
Keeping your hens on dry ground isn’t just about tidiness; it’s a matter of welfare. Under the Animal Welfare Act 2006, we have a duty to protect our animals from pain and suffering, and letting them live in a constant mud bath doesn’t cut it. Plus, with the RSPCA‘s 2025 standards emphasising dry, clean environments, and DEFRA‘s ongoing advice about biosecurity for things like avian influenza, a dry run is non-negotiable. The good news is, sorting it out doesn’t have to be complicated or break the bank.
In this guide, we’ll walk through 7 ways to fix a muddy chicken run, with UK winter-proof solutions that actually work. We’ll cover what to put down in a muddy chicken run, explore the best ground cover for a muddy chicken run, and look at the cheapest ways to get the job done. I’ve kept hens in rainy Yorkshire and Manchester for over five years, and these are the tried-and-tested methods that saved my flock from the slop.
Disclaimer: This guide offers practical advice based on personal experience and research. Always check your local bylaws before making major changes and consult the RSPCA or the British Hen Welfare Trust (BHWT) for the latest welfare advice.
Way 1: Add Coarse Sand – How to Dry a Muddy Chicken Run and the Best Flooring for a Muddy Chicken Run
Ever wondered how to dry out a wet chicken run fast? My go-to answer is always sand. Not the fine, clumpy stuff from a kid’s play pit, but coarse construction sand. It’s one of the cheapest and most effective fixes I’ve ever used. The magic of sand is its brilliant drainage; water just runs straight through it, leaving the surface dry for your hens’ feet in just a few hours. It’s a game-changer!
What Should You Put in the Bottom of a Chicken Run?
For a quick fix, sand is fantastic. It acts as a brilliant base layer that stops puddles from forming. Your chickens will also love dust-bathing in it, which is a natural way for them to keep mites at bay. It’s a win-win.
Choosing the Right Kind of Sand
This is the most important step! Using the wrong sand will create a sludgy, concrete-like mess.
- Best Choice: Coarse or Sharp Sand. This is the type used for construction and paving. It has larger, irregular particles that allow water to drain through freely. You can find this at any UK builder’s merchant like Travis Perkins or Jewson.
- Avoid: Play Sand or Builder’s Sand. These have fine, uniform particles that compact easily when wet. Instead of draining, they hold water and become a nightmare to clean.
How Do You Firm Up a Muddy Ground?
Sand is your best friend for firming up soggy ground. It mixes with the top layer of soil and creates a stable, non-squelchy surface. Here’s how you do it:
Step-by-Step Instructions:
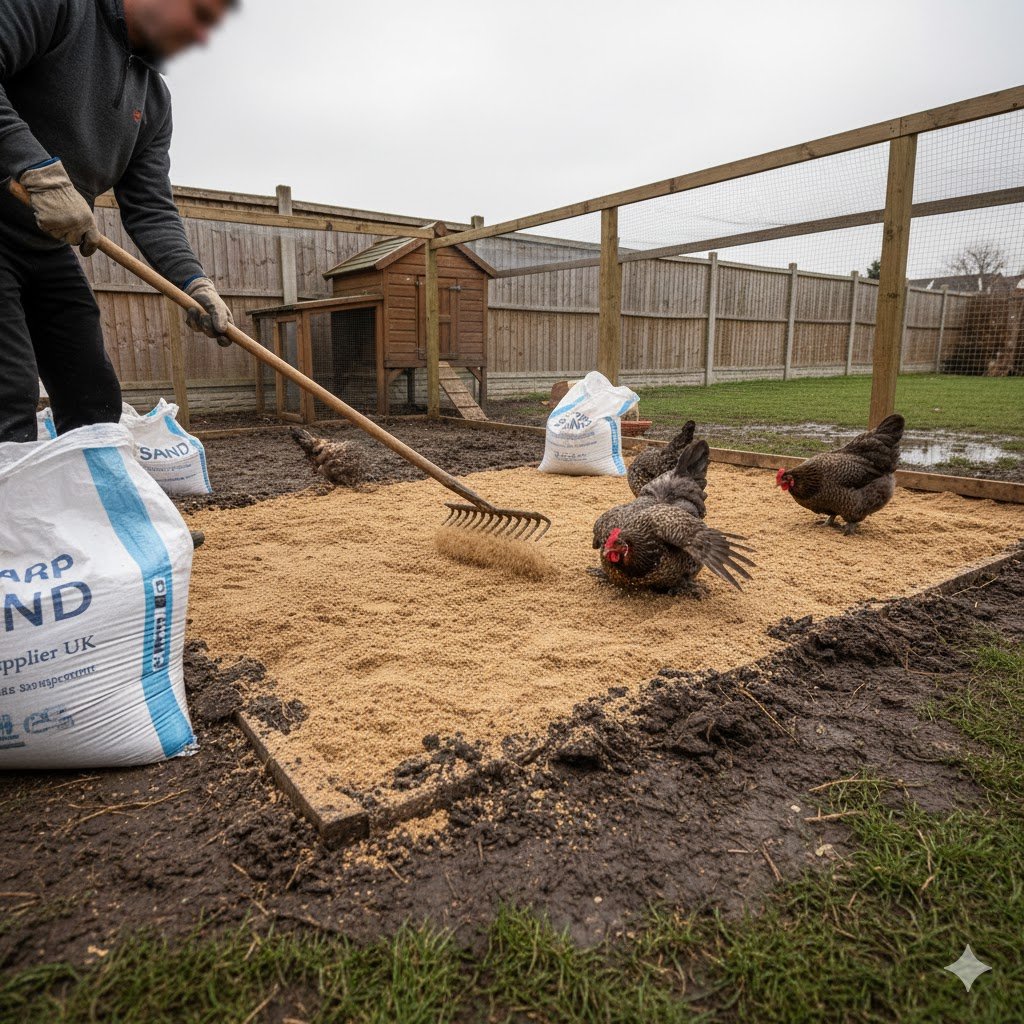
- Clear the Area: First, rake out as much of the sloppy mud and wet debris as you can. Scrape away the top 5cm (2 inches) of the most saturated mud to get to a firmer base.
- Level It Out: Use a shovel to roughly level the ground. If you have particularly bad drainage, try to create a slight slope (a gradient of 1-2%) to encourage water to run off.
- Spread the Sand: Add a layer of 10-15cm (4-6 inches) of coarse construction sand. For a typical 2×3 metre run, you’ll likely need about 10-15 bags (25kg each).
- Add a Topper (Optional): For extra comfort, especially in winter, you can scatter a light layer of straw on top.
Sand Maintenance: Keeping it Clean and Fresh
The key to success with sand is keeping it clean. Think of it like a giant litter tray.
- Daily Scooping: At least once a day, use a cat litter scoop or a fine-tined rake to remove droppings. This takes less than five minutes and prevents any nasty smells or bacteria build-up.
- Annual Top-Up: Over the year, you’ll lose some sand through scooping. Plan to top it up with a few fresh bags every 6-12 months to maintain the depth.
Pros & Cons:
- Pros: Very cheap, excellent drainage, easy to clean by scooping, and hens love it for dust baths. It’s a great example of absorbent chicken bedding.
- Cons: Can get a bit dusty in dry summer spells (just give it a light mist with a hose) and might need topping up annually.
Cost: Approximately £20-£50 for an average-sized backyard run. This makes it one of the cheapest ways to fix a muddy yard.
| Feature | Sand | Muddy Dirt |
|---|---|---|
| Drainage | Excellent (water passes through) | Poor (water pools on top) |
| Drying Time | Fast (1-3 hours) | Very Slow (days) |
| Hen Health | Good for feet, allows dust bathing | Risks bumblefoot and parasites |
Sand is a brilliant and affordable starting point for most keepers, offering a quick and noticeable improvement. However, if you’re battling truly waterlogged ground or heavy clay, you might need a more heavy-duty solution, which brings us to gravel.
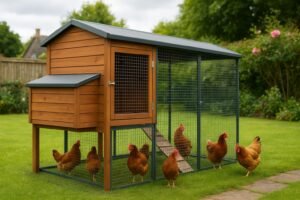
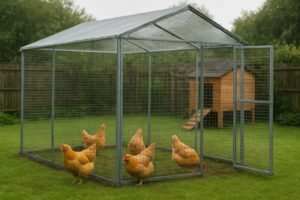
Way 2: Lay Gravel – Can I Put Gravel in My Chicken Run? And the Best Material for Chicken Run Floor
If you’re looking for a more permanent, long-term fix, then gravel is an amazing option. When I set up my run in a particularly boggy corner of my garden in Scotland, gravel was the only thing that stopped the mud for good. It creates a French drain effect, where water percolates down through the stones and away from the surface, keeping your winter-proof hen enclosure perfectly dry.
What Is Good to Put Down in a Chicken Run?
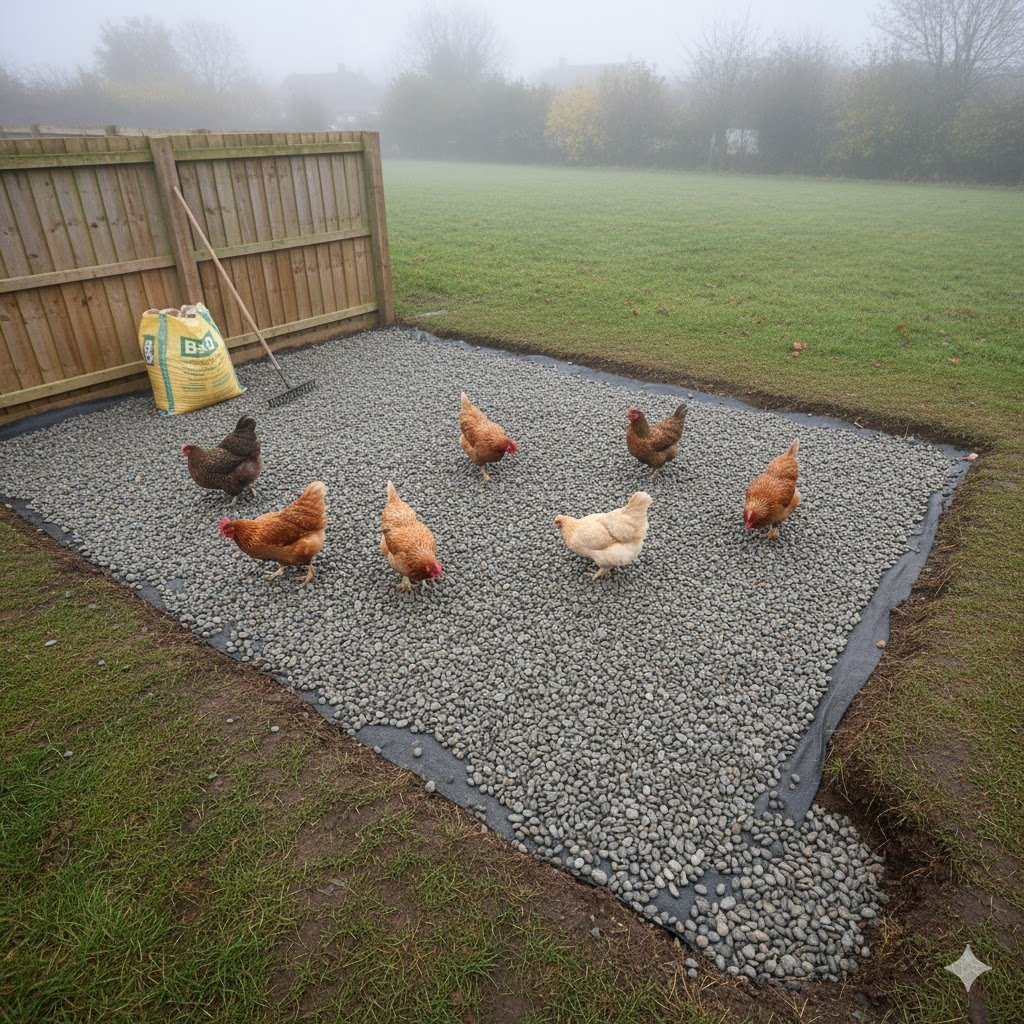
Pea gravel (about 1-2cm in size) is ideal. It’s small and rounded, so it’s gentle on chicken feet. It’s one of the best materials to put down in a chicken run because it lasts for years and requires very little maintenance.
Is Gravel Really Safe for Chickens?
This is a common worry, but yes, it is safe when you use the right type. Adult chickens are smart enough to differentiate between gravel and the soluble grit they need for digestion. They might peck at it curiously at first but will quickly lose interest. The key is to always provide a separate container of proper poultry grit so they aren’t tempted to eat the stones. Pea gravel is the safest choice due to its rounded shape and size.
Tackling Heavy Clay Soil with Gravel
Many UK gardens, including mine, are cursed with heavy clay soil that holds water like a bathtub. Gravel is the perfect antidote. By digging out 10-15cm of the clay and replacing it with a geotextile membrane and a deep layer of gravel, you are essentially building a giant soakaway. The membrane stops the clay from swallowing your gravel, ensuring the drainage path stays clear for years.
How to Keep a Chicken Run from Getting Muddy
A gravel base is one of the most effective drainage solutions for chicken runs. Here’s how to install it properly:
Step-by-Step Instructions:
- Dig Down: Mark out your run area and dig down about 10cm (4 inches). It’s hard work but worth it for a permanent fix.
- Add a Membrane: Lay a heavy-duty geotextile weed fabric down. This is crucial as it stops the gravel from mixing with the soil below while still allowing water to drain. Overlap the edges by at least 15cm to prevent weeds from sneaking through.
- Pour the Gravel: Add your pea gravel, which you can buy in bulk bags from places like B&Q or local garden centres in the UK. Aim for a depth of around 10cm.
- Rake Smooth: Rake it all level. Some people like to add rubber matting or a sand pit in one corner for a softer area.
Cleaning and Maintaining a Gravel Run
Gravel is incredibly low-maintenance.
- Hose Down: Every few weeks, simply hose the gravel down. The water will wash the droppings through the stones and into the soil below, where they will break down naturally.
- Rake and Level: Use a rake to level out any high or low spots created by the chickens’ scratching.
- Leaf Blowing: In autumn, a leaf blower makes short work of removing fallen leaves and debris.
Pros & Cons:
- Pros: Extremely durable (lasts 5+ years), zero mud, and provides fantastic drainage.
- Cons: Higher upfront cost, more work to install, and some hens might peck at it initially (they soon get bored!).
| Gravel Type | Best For | Why? |
|---|---|---|
| Pea Gravel | UK clay soils, hen comfort | Rounded edges are safe for feet, drains well |
| Crushed Stone | Better avoided in chicken runs | Sharp edges can cause foot injuries |
Gravel provides an unbeatable permanent drainage solution, but some keepers prefer a softer, more natural feel underfoot. If that sounds like you, wood chips offer a fantastic middle ground between drainage and comfort.
Way 3: Use Wood Chips or Bark – What to Put Down in a Muddy Chicken Run? And Chicken Run Bedding Basics
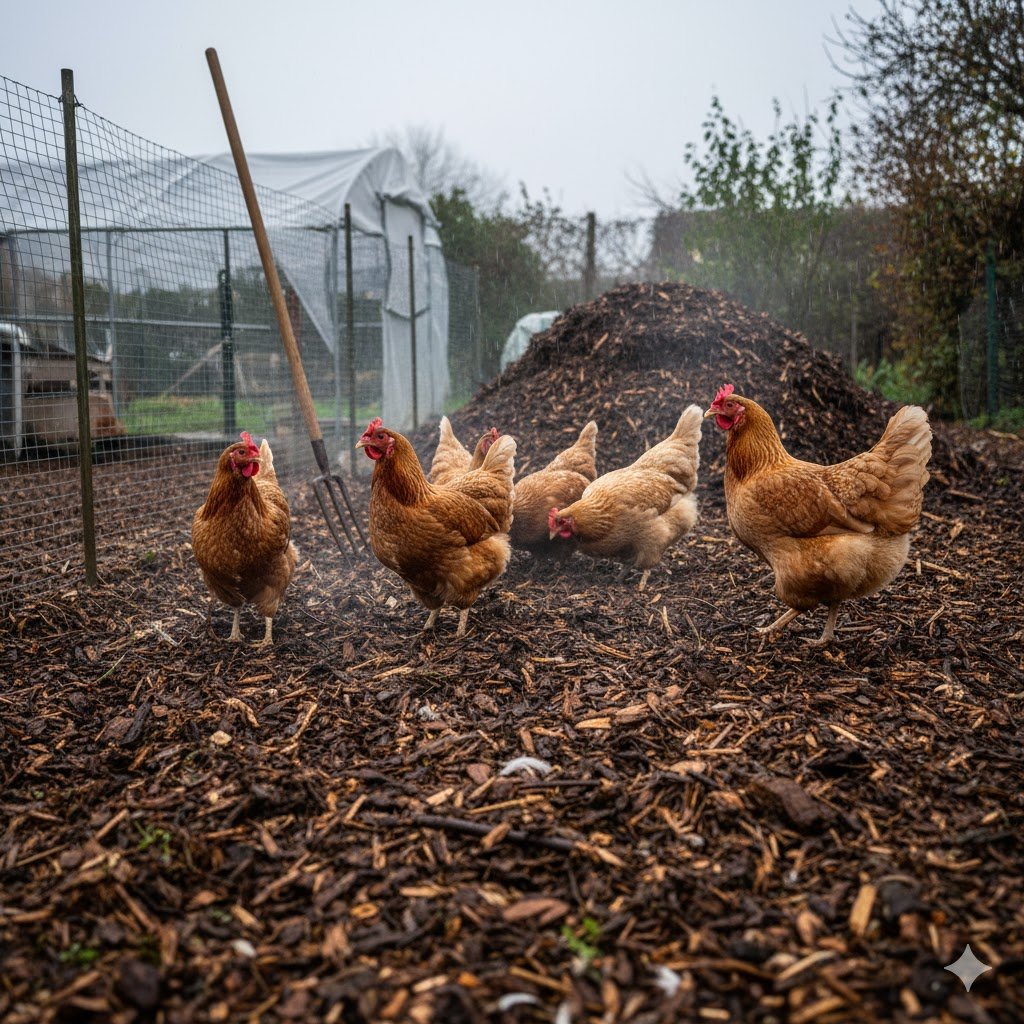
For a natural, earthy feel, you can’t beat wood chips or bark. This is my favourite method for creating a healthy, compost-like environment that my hens absolutely love scratching around in. It’s a fantastic way to practice the deep litter method UK style. Best of all, you can often get untreated hardwood chips for free or very cheap from local tree surgeons.
What Is the Best Bedding to Put in a Chicken Run?
Hardwood chips are arguably the best bedding for a muddy chicken run because they are absorbent, break down slowly, and are soft on chicken feet. They smell lovely and woody, too!
Sourcing Safe Wood Chips in the UK
It’s vital to use the right kind of wood chips.
- Do Use: Untreated hardwood chips (like beech, oak, or fruit woods) are best. They break down slowly and are less likely to splinter.
- Don’t Use: Avoid treated wood (which contains chemicals), pine or cedar shavings (the strong aromatic oils can cause respiratory issues), and bark mulch which can be prone to mould. When you call a local tree surgeon, specifically ask for “untreated hardwood chippings.”
The Magic of Hot Composting
A deep layer of wood chips doesn’t just absorb water; it actively composts. The mixture of carbon-rich wood and nitrogen-rich chicken manure creates the perfect conditions for beneficial microbes. These microbes generate significant heat (up to 60°C in the core of the pile), which helps to kill off harmful pathogens and parasite eggs, making the run a healthier environment overall.
Best Bedding for Muddy Chicken Run
Wood chips work by soaking up moisture and mixing with chicken droppings to create a rich, compostable base that stays surprisingly dry on top.
Step-by-Step Instructions:
- Remove Standing Water: Get rid of any puddles first.
- Spread a Thick Layer: Add a deep layer of untreated wood chips, about 15-20cm (6-8 inches). Don’t be shy with the depth; it’s key to the system working.
- Turn It Over: Once a week, use a garden fork to turn the chips over. This aerates the material, which is essential for aerobic composting and preventing bad smells.
- Top Up as Needed: You’ll need to add a fresh layer every month or so as it composts down.
Managing Moisture and Smell
A well-managed wood chip run should smell earthy and pleasant. If it starts to smell sour or like ammonia, it means it’s too wet and needs turning. If the problem persists, a light sprinkle of agricultural lime before turning can help to neutralise the odours and dry it out.
Pros & Cons:
- Pros: Natural and sustainable, great for hen foot health in mud, encourages natural foraging behaviour, and creates free compost for your garden.
- Cons: Can sometimes harbour mites if not turned regularly (a sprinkle of food-grade diatomaceous earth helps, which is safe per the BHWT), and needs topping up more often than sand or gravel.
Cost: Can be free if you ask a local tree surgeon, or around £10-£40 for a bulk bag.
| Bedding | Durability in UK Rain | Hen Comfort |
|---|---|---|
| Wood Chips | Lasts for months | Excellent |
| Straw | Gets soggy quickly | Good, but mats down |
Wood chips are a superb sustainable choice that improves over time. For those seeking warmth and insulation during the harshest winter months, however, the classic deep litter method with straw is hard to beat.
Way 4: Try a Deep Litter System with Straw or Hay – What Is the Best Material for Chicken Run Floor in Winter? And How to Stop Dirt from Turning into Mud
The deep litter method is an old-timer’s trick that works wonders for insulating a run during the chilly UK winters. Pair this with tips on winterizing your chicken coop for full protection. By layering fresh bedding on top of the old, you create a natural compost pile that generates its own heat, keeping your flock cozy. The science is simple: the mix of high-carbon straw and high-nitrogen chicken manure creates a perfect environment for beneficial microbes, which release heat as they break down the material.
Straw vs. Hay: What’s the Difference?
This is crucial. Use straw, not hay.
- Straw: These are the dry, hollow stalks of cereal crops. It’s low in nutritional value, highly absorbent, and fluffs up well.
- Hay: This is dried grass, which is meant for animal feed. It mats down easily when wet and is very prone to growing mould, which can cause serious respiratory issues in chickens.
What to Cover Chicken Run with in Winter?
A deep layer of straw is the perfect winter covering. It stops dirt from turning into mud by absorbing moisture and droppings, building up a dry, springy mattress for your hens.
Step-by-Step Instructions:
- Start with a Dry Base: This method works best on a reasonably dry base. If the ground is already a swamp, put down a layer of sand first.
- Add the First Layer: Lay down a 10cm (4-inch) layer of fresh straw.
- Keep Adding: Every week or so, as the straw gets soiled, just add another fresh layer on top. The goal is to build up a deep, 20-30cm layer over the winter.
- Turn Occasionally: Give it a quick turn with a fork every now and then to keep it airy and help the composting process.
Common Problems with Deep Litter (And How to Fix Them)
- Smell: If it smells of ammonia, it’s too wet. Add more dry straw and turn it thoroughly.
- Pests: A deep, warm bed can be attractive to rodents. Ensure your run is secure with no gaps, and avoid leaving feed out overnight.
- Compaction: If it becomes matted, break it up with a garden fork to reintroduce air.
Pros & Cons:
- Pros: Excellent insulation, provides entertainment for bored hens, and creates fantastic compost for your garden in the spring.
- Cons: Needs regular turning to prevent it from getting smelly and compacted. I tried straw first in my very wet run, and it did get soggy fast without a good base underneath.
Cost: Around £15-£30 for a couple of large bales that will last all winter.
While managing the ground is vital, it can feel like a losing battle against the British weather. The ultimate way to win the war against mud is to stop the rain from getting in at all, which means putting a roof over it.
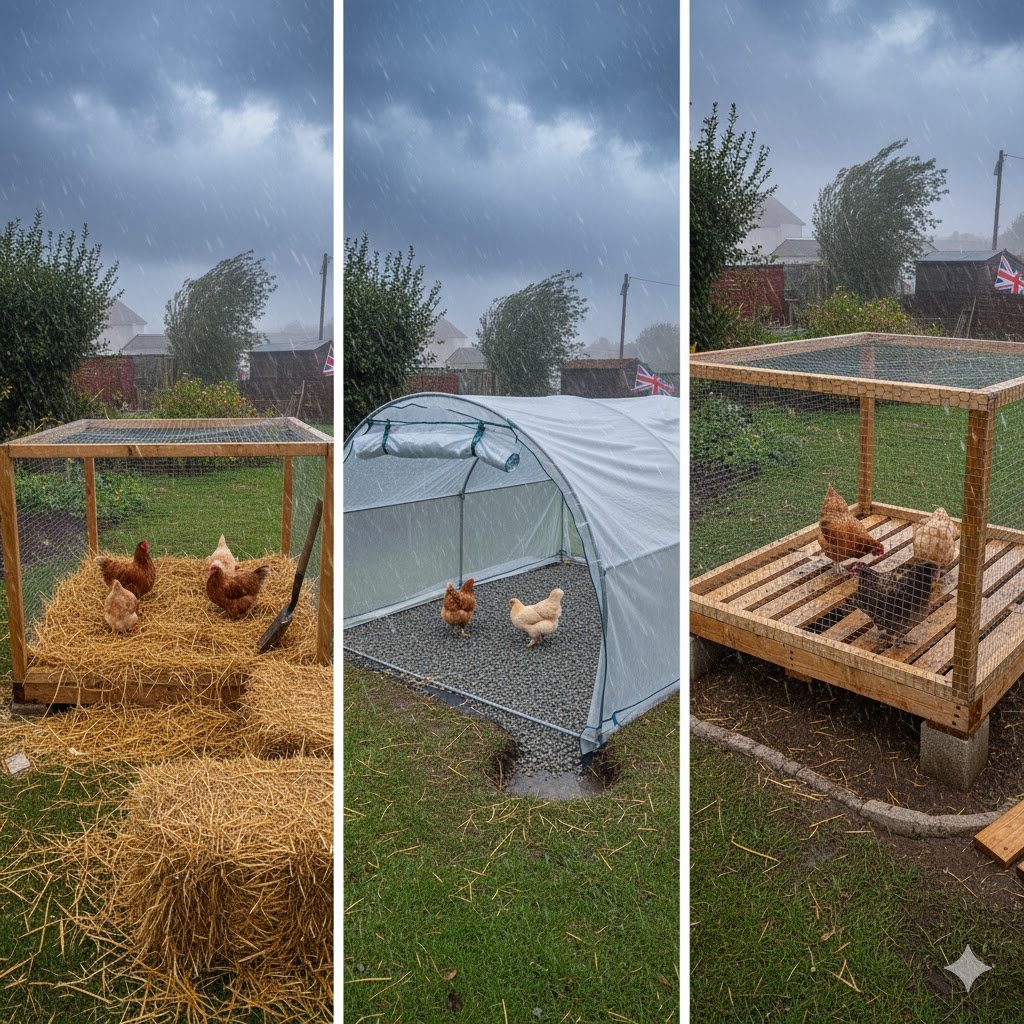
Way 5: Install a Roof or Cover – How Do I Waterproof My Chicken Run? And Polytunnel Chicken Run Ideas
But wait, there’s more! Why fix the mud when you can prevent it from ever happening? The most effective way to guarantee a dry run is to stop the rain from getting in. This is the ultimate solution for those of us dealing with relentless rainy UK garden hens.
How Do I Waterproof My Chicken Run?
You can use clear corrugated plastic sheets, a simple tarpaulin, or even build a polytunnel chicken run. A cover not only keeps the run dry but also provides shade in the summer and protection from wild bird droppings, which is vital for biosecurity in wet weather (per DEFRA 2025 guidance), especially during avian flu alerts.
Choosing the Best Roofing Material for Your Budget
- Budget Option (Tarpaulin): A cheap and cheerful solution. Use a heavy-duty tarp and secure it with plenty of bungee cords. The downside is that they can flap in the wind and may only last a winter or two.
- Mid-Range (Corrugated Plastic): Clear or translucent corrugated sheets (like Onduline or Correx) are a great option. They let light through and are very durable. You can build a simple sloping wooden frame to attach them to.
- Investment (Polytunnel): A polytunnel provides total protection and creates a great environment for your hens, especially in winter.
Securing Your Cover Against UK Winter Storms
A flimsy cover won’t last long against a storm like Arwen or Eunice. To make it secure, don’t just tie it down at the corners. Use wooden battens screwed down over the edges of the tarp or plastic sheet to clamp it firmly to your frame. Adding extra grommets along the edges of a tarp also provides more anchor points and spreads the load.
Why is Ventilation So Important?
This is crucial! A covered run without airflow will become a damp, humid box, leading to ammonia build-up and respiratory problems. Good airflow keeps the bedding dry and the air fresh—see our guide on chicken coop ventilation needs to avoid damp issues.
Step-by-Step Instructions:
- Measure Your Run: Get the dimensions of the area you want to cover.
- Ensure Ventilation: This is crucial! Make sure there’s still plenty of airflow to prevent the build-up of damp and ammonia.
Pros & Cons:
- Pros: Completely prevents mud, offers year-round protection, and improves biosecurity.
- Cons: Can be more expensive upfront and might reduce the amount of natural light getting into the run.
| Cover Option | Durability | Cost |
|---|---|---|
| Tarpaulin | 1-2 years | £15-£30 |
| Polytunnel | 5-10 years | £50-£150+ |
| Plastic Sheets | 10+ years | £40-£100 |
A roof is a fantastic preventative measure, but sometimes you need an emergency cure after a sudden flood. For those moments, you need to bring in the super-absorbent big guns.
Way 6: Add Horse Bedding Pellets or Lime – How to Dry Out a Wet Chicken Run? And What Should You Put in the Bottom of a Chicken Run?
Sometimes you need a quick fix after a sudden downpour. This is where super-absorbent materials come in. After one particularly nasty storm, this trick saved my run from becoming a total swamp. This is an “emergency” method for drying out problem spots quickly.
Agricultural Lime vs. Hydrated Lime: A Crucial Safety Warning
This cannot be stressed enough.
- SAFE: Agricultural Lime (also called garden lime or calcium carbonate). This is a soil supplement that is safe for chickens. It helps to dry out mud and neutralise odours.
- DANGEROUS: Hydrated Lime (also called slaked lime or builder’s lime). This is highly caustic and will cause chemical burns to your chickens’ feet and damage their respiratory systems. NEVER use it in a chicken run.
The Best Ground Cover for a Muddy Chicken Run Using Absorbents
Wood-based horse bedding pellets, which you can get from UK country stores like Mole Valley, are amazing. They are compressed sawdust that expands when wet, soaking up huge amounts of water and fluffing up into a soft, dry bedding.
When to Use This ‘Emergency’ Method
This is the perfect solution for a run that has unexpectedly flooded, or for drying out a particularly boggy patch near a gate or the drinker, which often becomes a high-traffic mud pit. It’s generally too expensive to use as a permanent substrate for a whole run, but it’s invaluable as a quick fix.
Step-by-Step Instructions:
- Rake the Area: Scrape back the worst of the surface mud.
- Scatter Lime (Optional): Lightly sprinkle agricultural lime over the damp ground. Wear gloves and a mask. Rake it in and let it settle for a few hours.
- Add Pellets: Spread a layer of horse bedding pellets over the top.
- Activate with Water: Give the pellets a very light spray with water to start the expansion process. They will fluff up into a soft, dry bedding within minutes.
Pros & Cons:
- Pros: Dries out a wet run incredibly quickly (often within a day), and the pellets are highly absorbent.
- Cons: Can be dusty, you need to be careful to use the correct type of lime, and it’s not a cost-effective long-term solution.
| Absorbent | Speed of Action | Main Use |
|---|---|---|
| Pellets | Very Fast (1-2 hours) | Soaking up standing water |
| Agri-Lime | Slower (1-2 days) | Drying and conditioning the soil |
Emergency fixes are essential tools, but if you’re ready to build a truly permanent, no-fuss solution, then it’s time to think about getting your hens off the ground altogether.
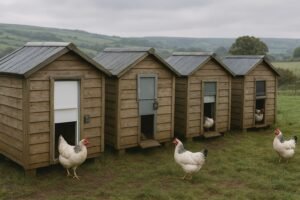
Way 7: Build Raised or Drained Flooring – What Is the Best Flooring for a Muddy Chicken Run? And How to Keep a Chicken Run from Getting Muddy Long-Term
For the DIY-savvy keeper who wants a permanent, no-fuss solution, building a raised floor is the ultimate answer. This elevates your chickens completely above the mud, creating a clean, dry, and low-maintenance area. It’s the best way to keep your run from getting muddy, forever.
What Is Good to Put Down in a Chicken Run for Drainage?
The idea here is to build a deck-like structure using wooden pallets or a custom-built frame. This sits on top of a drainage base like gravel, allowing all water to flow away underneath.
Designing a ‘Poop-Through’ Floor
The surface of your raised floor is key.
- Heavy-Duty Wire Mesh: A 1×1 inch or 2×1 inch welded wire mesh (often called hardware cloth) is perfect. It’s strong enough for the chickens to walk on, and the droppings fall straight through.
- Wooden Slats: You can also use treated wooden slats, leaving a 1-2cm gap between each one. This is sometimes more comfortable for the chickens’ feet.
Predator-Proofing Your Raised Floor
A raised floor can create a tempting hiding spot for rats or weasels. To prevent this, enclose the entire perimeter, from the bottom of the frame down to the ground, with more of the same heavy-duty wire mesh. You can even create a “skirt” by laying mesh flat on the ground around the outside of the base, which stops predators from digging under. For more easy fixes, learn how to predator-proof your coop.
The Cheapest Way to Fix a Muddy Yard with DIY
You can often find old wooden pallets for free from local businesses or on Facebook Marketplace. Securing a few of these together and topping them with wire mesh is a very affordable way to create a raised platform.
Step-by-Step Instructions:
- Prepare the Base: Level the ground underneath and put down a layer of gravel or sand to help with drainage.
- Build the Frame: Lay down wooden pallets or build a simple raised frame from treated timber. Use concrete blocks as footings to keep the wood off the wet ground and prevent rot.
- Add a Surface: Cover the frame with your chosen heavy-duty wire mesh or wooden slats, securing it firmly with staples or screws.
- Create a Slope: Ensure the entire structure has a slight slope to help with runoff.
Cleaning Underneath a Raised Floor
This is the best part. The droppings accumulate underneath, away from your chickens. Once or twice a year, you can simply rake or shovel them out and add them to your compost pile.
Pros & Cons:
- Pros: A permanent solution to mud, very low maintenance, and excellent for hygiene as droppings fall through.
- Cons: Requires building skills and time to set up.
| Flooring | Maintenance Level | Cost (DIY) |
|---|---|---|
| Raised Floor | Very Low | £40-£80 |
| Ground-level | High | £20-£60 |
These seven solutions focus on the run’s floor, but for the ultimate muddy run fix, it pays to think about the wider area and how water behaves in your garden.
Thinking Bigger: Advanced Drainage and Site Management
If your run is at the bottom of a slope or in a naturally boggy part of your garden, just treating the floor might not be enough. Here are some advanced strategies to manage water before it even reaches your hens.
Installing a French Drain
A French drain is essentially a gravel-filled trench that intercepts and redirects groundwater. Digging one along the uphill side of your chicken run can capture runoff and channel it away from the enclosure.
- Dig a trench about 30cm wide and 40-50cm deep.
- Line it with a water-permeable landscape fabric.
- Lay a perforated drainage pipe in the bottom.
- Fill the trench with coarse gravel.
- Fold the fabric over the top and cover with soil or turf.
Grading the Land for Better Runoff
This might sound drastic, but sometimes the simplest solution is to change the slope of the land. If your run is in a dip, you can bring in topsoil to build up the area, creating a gentle slope that encourages water to flow away naturally rather than pooling.
Using Plants to Combat Mud
Some plants are fantastic at soaking up excess water. Planting thirsty shrubs and trees like willow, dogwood, or birch around the perimeter of your run can help to dry out the surrounding soil significantly. Just ensure the plants are not poisonous to chickens if they can reach the leaves.
Extra Tips for UK Backyard Chickens
What Is the Number One Killer of Chickens? (And How Mud Plays a Role)
It’s a tough question. According to BHWT 2025 data, the number one killer is still predators (like foxes, which are common across the UK), accounting for around 40% of losses. However, mud significantly boosts disease risks by an estimated 25%—so a dry run is one of the biggest single things you can do to cut that risk. Wet, muddy environments are a breeding ground for bacteria, parasites, and mould. This can lead to nasty health issues like:
- Bumblefoot: A painful infection in the footpad caused by standing on wet, rough ground. For more on how to spot and treat bumblefoot in chickens, check our guide.
- Coccidiosis: A parasitic disease that thrives in damp conditions.
- Respiratory Illnesses: Caused by the ammonia that builds up in wet, poorly ventilated runs.
So, while a fox might be the more obvious threat, the silent danger of a muddy run can be just as deadly. Keeping the run dry is a cornerstone of good hen foot health and biosecurity.
More on Chicken Run Bedding and Maintenance
To recap, the best material for a chicken run floor really depends on your budget and how much work you want to do. A combination often works best. For example, a base of sand with a top layer of straw in the winter is a fantastic, affordable option.
How to maintain chicken run bedding in UK rain?
- Turn it regularly: Use a fork to fluff up and turn over the bedding at least once a week. Per Red Tractor 2025, turn weekly to maintain hygiene.
- Add thin layers: It’s better to add a thin layer of fresh bedding every few days than a thick layer once a month.
- Ensure good drainage: If your run is on a slope, dig a small trench at the top to divert rainwater away.
Conclusion
There you have it – 7 ways to fix a muddy chicken run, packed with UK winter-proof solutions to keep your flock happy, healthy, and clean. From the quick and cheap fix of adding sand to the permanent solution of a raised floor, there’s an option for every backyard and budget, and you can learn even more about the best flooring for chicken coops in our detailed guide. The key is to pick one and get started.
Remember, a dry run is about more than just avoiding mess. As the RSPCA‘s 2025 guidelines remind us, it’s a fundamental part of chicken welfare and a requirement under the Animal Welfare Act. A little bit of effort now will save you a lot of worry later and ensure your hens can enjoy scratching and foraging as they were born to do.
So, pick a method that works for you—why not start cheap with a few bags of sand? Your chickens will thank you for it! If you’ve tried any of these fixes in your own UK backyard, I’d love to hear what worked for you in the comments below!
Frequently Asked Questions
What to put down in a muddy chicken run?
The best things to put down are materials that drain well or absorb moisture. Coarse sand and untreated hardwood chips are excellent choices. Sand provides great drainage, while wood chips soak up water and compost down naturally.
How do I waterproof my chicken run?
The most effective way is to install a roof or cover. You can use clear corrugated plastic sheets, a heavy-duty tarpaulin, or even a polytunnel. This completely stops the rain from turning the ground into mud in the first place.
What is the best bedding to put in a chicken run?
It depends on the season. For winter, a deep layer of straw is fantastic for insulation and comfort. For all-year-round use, hardwood chips are a durable and absorbent option that hens love to scratch in.
Can I put gravel in my chicken run?
Great question! Yes, you can. I’ve used gravel and it works wonders. The key is to use rounded pea gravel (about 1-2cm in size) rather than sharp, crushed stone to protect your chickens’ feet. It provides excellent, long-lasting drainage.
How to dry a muddy chicken run?
For a quick fix after heavy rain, rake away the surface water and apply an absorbent material. Agricultural lime (use with care) or wood-based horse bedding pellets are brilliant for soaking up moisture and drying out the ground in a day or two.
What is the cheapest way to fix a muddy yard?
The two cheapest options are using coarse sand or getting free wood chips from a local tree surgeon. A few bags of sand can make a huge difference for around £20-£30 and is very easy to install.
What are the pros of a polytunnel chicken run?
A polytunnel keeps the run completely dry, protecting it from rain and snow. It also offers shade in the summer and protects your flock from wild bird droppings, which is great for biosecurity. To ensure good ventilation, roll up the sides on warmer days, install mesh panels at either end to create a cross-breeze, or add a whirlybird-style vent to the roof. This prevents damp air and ammonia from building up, keeping the environment healthy and fresh.

Oladepo Babatunde is the founder of ChickenStarter.com. He is a backyard chicken keeper and educator who specializes in helping beginners raise healthy flocks, particularly in warm climates. His expertise comes from years of hands-on experience building coops, treating common chicken ailments, and solving flock management issues. His own happy hens are a testament to his methods, laying 25-30 eggs weekly.