Veterinary Disclaimer: This guide is for informational purposes only. While early-stage bumblefoot can often be managed at home, advanced cases require veterinary care. Always consult a qualified avian vet for proper diagnosis and treatment, especially if the infection is severe or you are uncomfortable performing any procedure. I am not a veterinarian.
You pick up your favorite hen and notice she is limping slightly. You check her foot and see a small, dark scab on the pad. Your mind immediately jumps to one word: bumblefoot.
It is a common and treatable condition, but I understand it can feel intimidating the first time you encounter it.
Here is something that surprised me when I started keeping chickens in Nigeria years ago, and that still catches new keepers off guard: bumblefoot is far more common than most people realize, and it does not always announce itself with obvious limping. One well-known chicken keeper, Melissa from Tilly’s Nest, discovered the infection on her hen Lucy purely by accident while trimming toenails. Lucy had been walking, eating, and behaving completely normally, with no visible limp or distress.
That story stuck with me because it mirrors my own experience. In 2022, I caught bumblefoot on one of my Buff Orpingtons during a routine Saturday health check. She was acting perfectly fine, eating well, laying consistently. But when I flipped her foot over, there it was: a small, shiny pinkish patch between the toes of her left foot. Had I not made foot checks part of my weekly routine, I would have missed it entirely. Within five days of daily Epsom salt soaks and simple wound care, it resolved without any surgical intervention.
That experience shaped how I approach this condition, and it is the foundation of this guide. Early detection changes everything.
This article will walk you through exactly what bumblefoot is, how to identify it at every stage, how to treat it at home when appropriate, when to call a vet, whether bumblefoot is contagious, and most importantly, how to prevent it from happening in the first place. I have drawn from peer-reviewed veterinary research, including the detailed clinical guide published in Today’s Veterinary Practice by Dr. Gigi Wing Lin, a board-certified poultry veterinarian, alongside firsthand accounts from chicken keepers around the world and my own experience raising 50+ birds across climates ranging from Lagos, Nigeria, to Minnesota, USA.
What Is Bumblefoot in Chickens? Understanding the Condition
Bumblefoot, known medically as pododermatitis, is a bacterial infection of a chicken’s footpad. According to PoultryDVM, it is a common inflammatory condition affecting the bottom of the chicken’s foot, and it affects not just chickens but also ducks, turkeys, penguins, raptors, and even pet parrots kept in captivity.
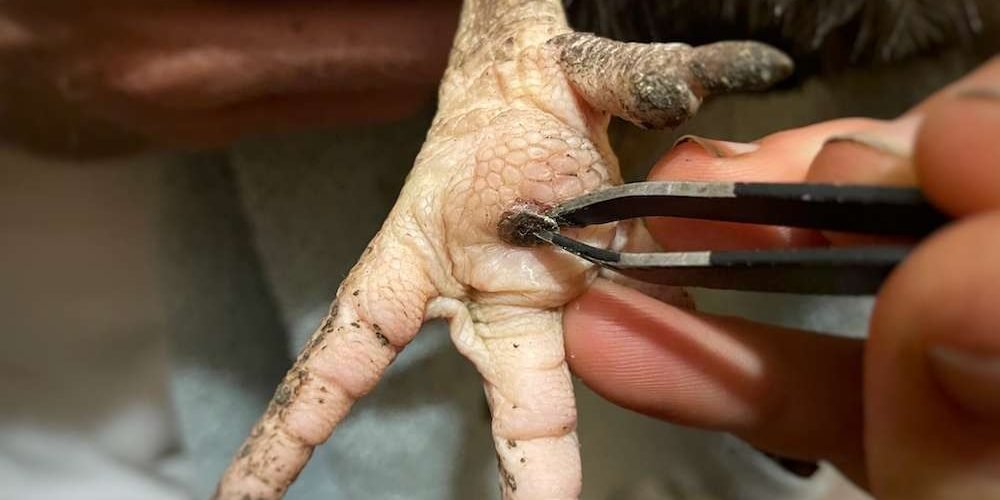
The infection starts simply. A small cut, scrape, splinter, or abrasion on the foot creates an opening in the skin. Bacteria from the environment enter through that break and begin multiplying beneath the surface. The chicken’s immune system responds by sending white blood cells to the area, and the body tries to wall off the infection by forming a hardened abscess. This produces the characteristic hard, pus-filled lump covered by a brown to black colored scab that most keepers recognize as bumblefoot.
The pus inside is not liquid like it would be in a mammal. Bird pus is a solid, cheese-like substance called caseous pus, and this solidified material, along with dead cells and bacteria, forms the hard “kernel” or “plug” that makes treating advanced cases so challenging.
According to the clinical guide published in Today’s Veterinary Practice, if left untreated, the infection often progresses and eventually extends to underlying tissues, including tendons, bones, and joints.
The Bacteria Behind It
The primary culprit is Staphylococcus aureus, the same family of bacteria responsible for staph infections in humans. However, other bacteria including E. coli and Pseudomonas species can also be involved. These are opportunistic organisms. They exist naturally in soil, chicken droppings, and even on the skin of healthy birds. They are not exotic pathogens. They are simply waiting for an opening in the skin to exploit.
This is an important point to understand. Staphylococcus bacteria are present wherever chickens live. You cannot eliminate them from your coop entirely. What you can do is minimize the opportunities for them to enter your birds’ feet, and that is what prevention is all about.
A Quick Note on Staging: 3 Stages or 5 Grades?
You will find different classification systems used in different sources, and this can be confusing. Many popular backyard chicken resources describe bumblefoot in three stages (early, moderate, advanced). However, veterinary professionals often use a more detailed five-grade system. According to VCA Animal Hospitals, the clinical grading system works as follows:
- Grade 1: Early disease, no symptoms. Loss of definition of the epidermis, possibly a shiny or reddened surface.
- Grade 2: Mild inflammation, skin intact.
- Grade 3: Moderate inflammation, ulcers or scabs may be present.
- Grade 4: Severe infection, abscess may be present with discharge.
- Grade 5: Severe infection that may include the bone and/or tendons of the foot.
The three-stage descriptions used in general poultry resources roughly correspond to Grades 1-2 (early), Grade 3 (moderate), and Grades 4-5 (advanced). For this guide, I will reference both systems so you can communicate effectively with your vet if needed.
Understanding the grading system matters because treatment approaches differ significantly based on severity. According to Dr. Lin’s clinical guide in Today’s Veterinary Practice, basic treatment for stage 1 to 2 pododermatitis includes husbandry changes, pain relief, and bandaging. However, conservative treatment is not effective for stage 2 or higher lesions that involve a penetrating callus or scab.
What Causes Bumblefoot in Chickens?
Bumblefoot is what veterinarians call a multifactorial condition, meaning multiple factors work together to cause it. In my experience raising chickens across two very different climates, I have seen how environmental conditions play a massive role. During my years keeping birds in Nigeria’s wet season, foot infections were a constant battle because of the perpetually muddy ground. When I moved to the US and set up my flocks, I made coop flooring and roost design my top priorities for exactly this reason.
Here are the primary causes, based on veterinary literature and my hands-on experience:
Environmental Hazards
- Stepping on sharp objects like wire, nails, thorns, or glass
- Rough or abrasive surfaces in the coop or run, including concrete, gravel, or rocky ground
- Splinters from unfinished wood, rough roosts, or sharp-edged bedding material
Roost and Perch Problems
This is one of the most overlooked causes, and in my opinion, it is the most preventable. According to the IVIS veterinary library’s guide on pododermatitis, improperly designed perches are a significant risk factor. This includes perches that are too small or too large in diameter, perches made of hard or slippery materials, perches with sharp corners or rough texture, and perches positioned too high.
When a heavy hen jumps down from a roost that is too high, the impact on her footpads can cause micro-injuries. Do that every single day, twice a day, and those micro-injuries become entry points for bacteria. A fact sheet from the University of New Hampshire and University of Connecticut Extension programs recommends keeping perches less than 18 inches off the floor, as repeated jumping from high perches by heavy birds can cause irritation and damage to the bottom of the foot.
For specific guidance on roost construction, see our guide on how high roosting bars should be in a coop and how to build roost bars for heavy chickens.
Moisture and Hygiene
Wet, dirty bedding softens the skin on a chicken’s footpad, making it far more vulnerable to cuts and bacterial invasion. Think of it like keeping your hands submerged in water for hours. The skin gets soft, wrinkled, and easily damaged. Your chicken’s feet experience the same thing when they stand on soggy litter or muddy ground all day.
Weight and Body Condition
Heavier breeds are more susceptible, plain and simple. The more weight pressing down on those footpads, the greater the pressure, and the higher the risk of micro-injuries. According to Today’s Veterinary Practice, obesity is a common factor in pododermatitis in hens. Breeds like Wyandottes, Buff Orpingtons, and Brahmas are more susceptible simply due to their larger body size.
In my 2023 flock, I noticed that my two heaviest Orpington hens developed rough footpads before any of my lighter Easter Eggers did, even though they shared the same coop and roosts. I adjusted their treats, cut back on scratch grain, and made sure they were getting plenty of exercise through natural foraging activity. That simple dietary change made a noticeable difference.
Nutritional Deficiencies
A diet lacking in vitamin A and biotin (vitamin B7) can weaken the skin’s integrity, making it more prone to cracking and injury. According to PoultryDVM, if chickens are not receiving a balanced diet complete with enough vitamin A and biotin, it can impact their skin integrity, resulting in dry, flaky skin that decreases the barrier protecting their feet.
For a complete overview of feeding your flock properly, see our comprehensive feeding guide.
Is Bumblefoot Contagious? The Full Answer
This is one of the most frequently asked questions I receive, and the answer requires some nuance.
The short answer: No, bumblefoot is not contagious in the traditional sense. It does not spread directly from one chicken to another through contact, the way a respiratory illness or virus would. According to My Pet Chicken, “bumblefoot is a serious problem, but it’s not contagious in the way a cold is contagious.” If one of your chickens has bumblefoot and the rest of your flock has healthy, intact skin on their feet, they will not “catch” bumblefoot simply by being in the same coop.
However, and this is important, the bacteria that cause bumblefoot are always present in your flock’s environment. Staphylococcus aureus lives in the soil, in droppings, on bedding, and even on the skin of healthy chickens. According to the UConn/UNH Extension fact sheet on bumblefoot, Staphylococcus bacteria are present wherever there are chickens. So while the condition itself is not contagious, the bacteria behind it are everywhere.
This is why you sometimes see multiple birds developing bumblefoot around the same time, as one keeper I follow online described when three of her hens started limping within weeks of each other. The infection was not spreading from bird to bird. Rather, all three birds were exposed to the same environmental hazard, whether it was a rough roost, wet bedding, or some sharp object in the run.
Is Bumblefoot Contagious to Other Chickens in the Flock?
Not directly. One hen’s bumblefoot cannot jump to another hen’s foot through proximity or shared living space. But there is an indirect risk. When a chicken has an active, open infection, the bacteria from that wound can contaminate bedding, roosts, and surfaces where other chickens walk. If those other birds happen to have any small cuts or abrasions on their own feet, they become vulnerable to infection. The risk is not from the bumblefoot itself being contagious, it is from the increased bacterial load in the shared environment.
This is why maintaining clean bedding and addressing the environmental cause of the original infection is so critical. Treat the infected bird, but also fix whatever caused the problem in the first place.
Is Bumblefoot Contagious to Humans?
The pododermatitis condition itself cannot transfer to humans. You will not develop “bumblefoot” from handling a chicken with the infection. However, the Staphylococcus aureus bacteria that cause it can potentially cause skin infections in humans, especially if you have open cuts on your hands while treating an infected foot. According to the UConn/UNH Extension fact sheet, staph bacteria can be transmitted to humans, so if you treat the bird, make sure to protect yourself by wearing gloves when handling the bird or the lesion. Wash hands, clothes, and equipment after handling affected birds.
This is standard good practice. Always wear disposable gloves when treating bumblefoot, dispose of contaminated bandages and materials properly, and wash your hands thoroughly afterward.
Is Bumblefoot Contagious to Dogs or Other Pets?
Bumblefoot as a condition is specific to birds (and, separately, to rodents and rabbits, where a similar condition is called “sore hocks”). Your dog will not develop bumblefoot from being around an infected chicken. That said, if your dog were to lick or mouth an active bumblefoot wound on a chicken, there is a theoretical risk of the staph bacteria causing a skin or wound infection in the dog. In practice, this is uncommon, but keep your dogs away from infected birds during treatment as a sensible precaution.
How Long Is Bumblefoot Contagious?
Since bumblefoot itself is not contagious in the traditional sense, there is no “contagious period” as there would be with a virus. The environmental risk, meaning the elevated bacterial contamination from an active wound, persists for as long as the infection is open and draining. Once the wound has healed and closed, and contaminated bedding has been cleaned or replaced, the risk returns to baseline levels.
Symptoms of Bumblefoot: How to Spot It Early
Early detection is the single most important factor in successful treatment. The earlier you catch it, the simpler and less invasive the treatment will be.
Make Foot Checks Part of Your Routine
I check my chickens’ feet every Saturday morning when I do my regular chicken health check. I simply pick up each bird, flip her over, and examine the bottom of both feet. It takes about 30 seconds per bird. For a flock of six, that is three minutes of your time that could save weeks of treatment later.
According to PoultryDVM, during the early stages of bumblefoot, it may initially appear as a small, superficial lesion, rough abrasion, or mild discoloring of the foot. This is the ideal window for intervention. At Grade 1, you might not see the classic black scab yet. You may only notice a shiny, reddened patch or a slight roughness on the footpad that was not there before. Pay attention to these subtle changes.
Visual Signs to Watch For
- Redness or pinkish patches on the footpad, between toes, or on top of the foot
- A shiny, smooth area where the skin texture has changed
- Swelling of the footpad, toes, or hock area
- Heat in the affected foot compared to the other
- A dark scab, typically black or dark brown, on the bottom of the foot (this is the classic, widely recognized sign)
Behavioral Changes
Chickens are stoic animals. They often hide pain until it becomes severe. Look for:
- Limping or favoring one leg when walking
- Reduced activity, spending more time sitting or resting
- Reluctance to roost at night (the pressure on the perch hurts the infected foot, so the hen may sleep on the floor instead)
- Drop in egg production (hens often stop laying when something is wrong, as their body redirects energy toward healing)
- Withdrawal from the flock or reluctance to compete for food
If your chicken seems lethargic for reasons you cannot identify, always check her feet. Our guide on why your chicken might be lethargic covers the full range of possible causes.
What Bumblefoot Is Not: Differential Diagnosis
Before you start treating for bumblefoot, make sure that is actually what you are dealing with.
Calluses: Healthy chickens develop tough, callused skin on their footpads. This is normal. A callus feels smooth and hard, while bumblefoot presents as a distinct, raised or discolored spot.
Scaly leg mites: These cause the scales on the legs and feet to lift and become crusty, but the pattern is different from bumblefoot. Mites affect the scales themselves, while bumblefoot presents as a localized sore on the footpad. See our guide on mites and lice on chickens for comparison.
Sprains or fractures: Swelling without a visible scab or wound on the footpad, often affecting the leg or ankle joint. Usually improves with rest within a few days.
Insect bites or stings: Sudden swelling, often with redness, that resolves within 24 to 48 hours.
If your chicken has a swollen foot but no visible scab or discoloration on the footpad, monitor for 24 to 48 hours and consult a vet if the swelling persists.
How to Treat Bumblefoot in Chickens at Home: A Step-by-Step Guide
If you have caught the infection early (Grade 1-2), you can often treat it successfully at home with consistent wound care. This is where patience becomes your greatest asset. Treatment is not a single event; it is a daily commitment that may last anywhere from one week to several weeks, depending on severity.
According to Dr. Lin’s clinical guide in Today’s Veterinary Practice, basic treatment for stage 1 to 2 pododermatitis includes husbandry changes, pain relief, and bandaging to decrease pain and allow for tissue healing.
What to Really Expect
Let me set honest expectations based on what I have seen personally and from dozens of keepers I have helped through our ChickenStarter.com community:
Many guides suggest bumblefoot heals in one to two weeks. While this is true for the very earliest cases, most keepers report longer timelines for anything beyond Grade 1. One documented case required daily soaks for about three months before the scab disappeared completely. Another took six weeks of nightly treatment before the plug finally came out. Be prepared for a marathon, not a sprint. Consistency matters more than intensity.
Step 1: Gather Your Supplies
Before you begin, make sure you have everything ready. Having to pause treatment to search for supplies creates stress for both you and the chicken. For a more complete list, see our guide on how to set up a chicken first-aid kit at home.
For soaking:
- Epsom salts
- A basin or small tub
- Warm water (comfortable to the touch, not hot)
For cleaning and disinfection:
- Vetericyn spray, 2% chlorhexidine solution, or povidone-iodine (Betadine)
- Saline solution for flushing
For dressing:
- Original Neosporin (triple antibiotic ointment WITHOUT added pain relievers, as these can be toxic to chickens)
- Alternatively: manuka honey, which has natural antibacterial properties
- Non-stick gauze pads
- Vet Wrap (self-adhesive bandage)
- Medical tape
For safety:
- Disposable gloves (non-negotiable given the staph bacteria risk)
- Clean towels
- Styptic powder (in case of bleeding)
- A helper, if possible
The “Chicken Burrito” Technique: Wrap your chicken securely in a towel, covering the wings and body while leaving the feet exposed. This calms most birds remarkably well and allows you to work on the feet without struggling. If you are working on only one foot, tucking the healthy foot against the body inside the towel wrap prevents kicking.
Step 2: The Epsom Salt Soak
Fill your basin with warm water and add approximately half a cup of Epsom salt per gallon of water. Gently place the chicken’s affected foot in the solution and let it soak for 10 to 20 minutes.
The purpose of this soak is twofold. The warm water and Epsom salt soften the scab and surrounding tissue, making it easier for the body to expel the infection over time. The salt also creates an osmotic gradient that helps draw fluid and bacteria toward the surface.
Here is something many keepers discover with pleasant surprise: a lot of chickens actually enjoy the warm foot soak. One keeper documented that her hen seemed to “purr” and doze off during a 20-minute soak. Chickens do make a soft, contented vibration when they are relaxed, and the warm water appears to soothe them. If your bird settles in and starts making soft vocalizations, that is a good sign she is comfortable.
Step 3: Clean and Disinfect
After the soak, gently pat the foot dry with a clean towel. Apply your chosen antiseptic, whether Vetericyn spray, chlorhexidine, or diluted Betadine, to clean the area thoroughly.
At this early stage, do not try to forcibly remove the scab. If it comes off on its own during the soak, that is fine, but do not pick at it or peel it. Simply clean the area and proceed to the next step.
A note on hydrogen peroxide: Many older guides recommend it, but it is not ideal for wound care. Hydrogen peroxide can damage healthy tissue and slow healing. Dedicated wound antiseptics like Vetericyn or chlorhexidine are better choices.
Step 4: Apply Dressing and Bandage
Apply a small amount of original Neosporin or manuka honey to a non-stick gauze pad. Place the dressing directly over the affected area on the footpad.
Now wrap the foot using a figure-eight pattern with Vet Wrap:
- Start at the top of the foot, just below the hock joint
- Wrap down and around the foot, going between the toes and over the footpad
- Loop back up around the hock
- Continue wrapping until the dressing is secure
- Make sure the toes are visible and not compressed too tightly
- You should be able to comfortably slide a finger under the wrap
Important about pain relief ointments: Never use Neosporin Plus or any formulation with added pain relievers (lidocaine, pramoxine) on a chicken. These ingredients can be toxic to poultry. Stick to the original triple antibiotic ointment only.
Step 5: Post-Treatment Care and Bandage Changes
Change the bandage every one to two days for the first week, repeating the soak, clean, and redress process each time. As the wound shows improvement, you can extend to every two to three days.
During each bandage change, assess:
- Is the swelling going down?
- Does the foot feel less warm or hot?
- Is the scab shrinking?
- Is the chicken putting more weight on the foot?
Signs you are on the right track include reduced redness, a cooler temperature in the foot, a shrinking scab, and the chicken showing more willingness to walk and roost normally.
If you see no improvement after five to seven days of consistent treatment, consult a veterinarian. The infection may need antibiotics or a more aggressive approach.
Keeping Treated Chickens With the Flock
One practical question many keepers wrestle with: should you isolate the bird during treatment?
In my experience, I keep treated chickens with their flock whenever possible. Isolation is stressful for chickens, and stress impairs healing. As long as the foot is well-bandaged with Vet Wrap and the wrap stays clean and dry, the bird can usually remain with her flockmates. According to experienced keeper Kathy Shea Mormino (The Chicken Chick), it is not necessary to separate an injured chicken when using Vet Wrap, as the bandage stays securely in place and the wound cannot be accessed by curious birds.
The exception: if flockmates are aggressively pecking at the bandaged foot. Some chickens sense vulnerability and will bully an injured bird. If that is happening, isolate for the bird’s safety.
The Snowshoe Bandage and Donut Technique: Advanced Wrapping Methods
Beyond the basic figure-eight wrap, two specialized bandaging techniques can significantly improve healing outcomes, especially for moderate cases or heavy breeds.
The Snowshoe Technique
According to Dr. Lin’s guide in Today’s Veterinary Practice, the snowshoe technique uses a flat-bottomed bandage made with a foam disk to disperse the chicken’s weight over a larger surface area. Think of it like a snowshoe for humans: it spreads the load so less pressure falls on any single point.
To create a snowshoe bandage:
- Cut a piece of craft foam or thin insulation foam into an oval slightly larger than the chicken’s footpad
- Place the treated gauze over the wound
- Position the foam disk on the bottom of the foot, beneath the gauze
- Wrap everything securely with Vet Wrap
This technique is particularly valuable for heavy breeds like Brahmas and Orpingtons, where the sheer weight on the footpad can slow healing.
The Donut Bandage
According to PoultryDVM, a donut-shaped cushion can be made from a pool noodle section or rolled gauze and strapped to the bottom of the foot so the hole sits directly beneath the wound. This lifts the lesion off the ground entirely, eliminating pressure on the infected area while the bird walks.
Both techniques are described in veterinary literature and represent best-practice approaches for pressure relief during bumblefoot recovery.
When to Seek Veterinary Care: Advanced Treatment
If the infection has progressed to Grade 3 or beyond, or if home treatment has failed to produce improvement after one to two weeks, it is time to involve a professional.
According to VCA Animal Hospitals, bumblefoot lesions categorized as Grade 4 or 5, and sometimes Grade 3, will require surgical intervention. A veterinarian will administer anesthesia, surgically remove the hardened abscess material, flush the wound with sterile antiseptic, and prescribe appropriate antibiotics based on culture and sensitivity testing.
What Happens at the Vet
The veterinary approach includes:
- Pre-surgical pain relief
- Anesthesia (general or local)
- Lancing the abscess and removing the caseous (cheese-like) plug
- Flushing the wound cavity
- Culturing the bacteria to determine the most effective antibiotic
- Packing and bandaging the wound
- Prescribing a course of oral or injectable antibiotics
Advanced Veterinary Techniques
For severe or chronic cases, veterinarians may use specialized techniques described in the clinical literature:
Intravenous Regional Limb Perfusion: A tourniquet is applied to the leg, and antibiotics are injected directly into the blood vessels of the limb, allowing high concentrations of medication to reach infected tissues that oral antibiotics cannot effectively penetrate.
Antibiotic-Impregnated Beads: Dissolvable beads containing antibiotics can be surgically placed in the wound. They release medication slowly over time directly into the infected tissue.
Fenestrated Drain Flush: A butterfly catheter is adapted to allow regular, deep flushing of difficult wounds over one to two weeks.
These techniques underscore why severe cases belong in the hands of an experienced avian veterinarian rather than being attempted at home.
Will Bumblefoot Go Away With Antibiotics Alone?
This is a common question. According to veterinary sources, antibiotics alone are rarely sufficient for established bumblefoot infections once a hardened kernel has formed. The caseous abscess has poor blood supply, so oral antibiotics cannot effectively penetrate it. Antibiotics work best when combined with wound care (soaking, cleaning, bandaging) for mild cases, or with surgical removal of the kernel for advanced cases. The medication fights the bacterial infection while the physical treatment addresses the abscess itself.
Approximate Treatment Costs
Home treatment supplies typically run $15 to $40 total. A veterinary examination may cost $50 to $150 depending on your location, with surgical treatment ranging from $100 to $300 or more. Antibiotic prescriptions typically add $15 to $50. While veterinary care is an investment, it is often the only effective option for Grade 3+ infections and can save the chicken’s life.
How to Prevent Bumblefoot in Chickens
Prevention is always easier, cheaper, and less stressful than treatment. After dealing with bumblefoot in my own flocks and helping hundreds of keepers through our community, I have identified the measures that make the biggest difference.
Get the Roosts Right
This is the single most impactful prevention step. A 2×4 board with the 4-inch (wide) side facing up is the gold standard for chicken roosts. It allows the bird to rest her feet flat, distributing weight evenly across the footpad rather than gripping tightly. Sand down any rough spots or splinters.
According to Dr. Lin’s clinical guide in Today’s Veterinary Practice, adding Astroturf to perches is a recommended environmental modification. Astroturf provides a softer gripping surface, reduces pressure points, and is easy to clean.
Keep roost height between 12 and 18 inches for heavy breeds. For light breeds, you can go slightly higher, but always provide intermediate perches or ramps so birds are not making hard landings from height.
Maintain Clean, Dry Bedding
Wet litter is a breeding ground for bacteria and softens footpads to the point where even walking across normal surfaces can cause micro-injuries. Use absorbent bedding like pine shavings, hemp, or sand, and clean or replace it regularly. Our guide on the best flooring for a chicken coop covers all the options.
If you use the deep litter method (which I do and recommend), make sure to add fresh material on top regularly and monitor moisture levels. When done correctly, deep litter actually supports beneficial microorganism growth that helps control pathogenic bacteria. When done incorrectly, letting it get soggy, it creates exactly the conditions that promote bumblefoot.
Inspect the Environment Regularly
Walk your coop and run on a regular basis, looking for anything sharp or hazardous: exposed nails, splintered wood, broken wire, pieces of glass or metal, sharp-edged stones. Remove hazards immediately.
Feed a Balanced Diet
A diet deficient in vitamin A or biotin weakens the skin and increases susceptibility. A quality layer pellet from a reputable brand provides these nutrients, but if you are supplementing with kitchen scraps or treats, make sure the base diet is not getting diluted. Overfeeding treats, especially starchy ones like bread and pasta, can also contribute to obesity, which is a direct risk factor.
For weight management, limit scratch grain to a small evening treat rather than a significant portion of the diet, and encourage exercise through free-ranging or at minimum providing space and enrichment for natural foraging behavior.
Monthly Foot Checks
Make it a habit. Once a month at minimum, pick up each bird and examine the bottoms of both feet. Look for any redness, roughness, shiny patches, or early scab formation. Catching bumblefoot at Grade 1 means treatment is as simple as daily soaks for a week. Catching it at Grade 4 means potential surgery, weeks of recovery, and significant expense.
Real Stories From Keepers: What Bumblefoot Looks Like in Practice
Understanding the medical facts is important, but hearing from people who have actually dealt with bumblefoot provides invaluable context.
When Multiple Birds Are Affected
One keeper described the alarm she felt when three of her hens started limping within weeks of each other. As she put it, first it was one, then another, then a third, and she could not figure out what was happening. The issue was not that bumblefoot was spreading between birds. All three were jumping down from the same too-high roost onto a hard-packed dirt floor. Once she lowered the roost and added a thick layer of sand to the landing area, the problem stopped recurring.
This pattern is something I have seen repeatedly. When bumblefoot seems to be “spreading” through a flock, the real cause is almost always a shared environmental hazard affecting multiple birds simultaneously.
Luna and Buddy: Two Paths to Recovery
Two cases from the Chicken Coop Company community illustrate both treatment paths. Luna, a Buff Orpington from Texas, developed bumblefoot from an unsanded coop perch. Her owner caught it early and treated it with Epsom salt soaks and antibiotic ointment. Within two weeks, Luna was fully recovered.
Buddy, a large Australorp, was not caught as early. His infection required minor surgical removal of the abscess by a vet. With post-surgical antibiotics and a clean recovery environment, he was back to normal within a few weeks.
Both outcomes were positive, but Luna’s was faster, less expensive, and less stressful for everyone involved. That is the power of early detection.
My Personal Protocol
After treating bumblefoot in my own flocks more times than I would like to admit, here is what I have settled on as my go-to approach for early-stage cases:
- Daily warm Epsom salt soaks for 15 minutes
- Clean with Vetericyn spray
- Apply a thin layer of manuka honey to a gauze pad
- Wrap securely with Vet Wrap using the figure-eight method
- Return the chicken to the flock
- Repeat daily for the first week, then every other day
I prefer manuka honey over Neosporin for mild cases because of its natural antibacterial properties and because it keeps the wound environment moist, which promotes healing. For anything beyond a Grade 2, I switch to antibiotic ointment and consult a vet.
Frequently Asked Questions
What is bumblefoot in chickens?
Bumblefoot, medically known as pododermatitis, is a bacterial infection of the chicken’s footpad. It is most commonly caused by Staphylococcus aureus bacteria entering through a cut or abrasion on the foot. It presents as a swollen area with a characteristic dark scab and, in advanced cases, a hard internal abscess.
Is bumblefoot contagious to other chickens?
No. Bumblefoot is not contagious in the traditional sense. It does not spread from bird to bird through contact. However, the bacteria that cause it are naturally present in the environment, so if multiple birds have foot injuries, they can develop infections independently from the same environmental sources.
Is bumblefoot contagious to humans or dogs?
The bumblefoot condition itself cannot transfer to humans or dogs. However, the Staphylococcus aureus bacteria can potentially cause skin infections in people, especially through open cuts. Always wear gloves when treating an infected bird, and wash your hands thoroughly afterward.
How long does bumblefoot take to heal?
Grade 1 cases treated promptly may resolve in one to two weeks. Grade 2-3 cases typically take three to six weeks. Advanced cases requiring surgery may take a month or more. Some keepers have documented treatment timelines stretching to three months for particularly stubborn infections.
Can a chicken survive bumblefoot without treatment?
Very early cases may occasionally resolve if the chicken’s immune system is strong and the underlying cause is addressed. However, established infections with visible scabs typically require active treatment. According to the UConn/UNH Extension fact sheet, untreated bumblefoot can result in a 50 percent mortality rate.
Can you eat eggs from a chicken with bumblefoot?
Yes, as long as the infection is localized to the foot and the chicken is not on antibiotics. If a vet prescribes antibiotics, you must observe the specified egg withdrawal period before consuming eggs.
Is bumblefoot curable?
Yes. Grade 1 and 2 cases can generally be treated with great success according to veterinary sources. Even advanced cases can be resolved with persistent treatment, though they may leave scarring. The key factors are early detection, consistent treatment, and addressing the underlying cause.
Do you have to cut out bumblefoot?
Not always. Early-stage cases often respond to conservative treatment with soaks, antiseptic cleaning, and bandaging. Surgical removal of the kernel is typically only necessary for Grade 3+ cases where a hardened abscess has formed and is not responding to soaking and wound care.
What is the best home remedy for bumblefoot?
The most effective home treatment is a combination of warm Epsom salt soaks (15 to 20 minutes daily), antiseptic cleaning with Vetericyn or chlorhexidine, application of antibiotic ointment or manuka honey, and secure bandaging with Vet Wrap. Consistency and patience are essential.
Are some breeds more prone to bumblefoot?
Yes. Heavier breeds like Wyandottes, Orpingtons, Brahmas, and Cochins are more susceptible due to the increased pressure their body weight places on their footpads. Older and less active birds are also at higher risk.
How can I tell if bumblefoot is healing?
Signs of healing include reduced swelling and warmth in the foot, a shrinking scab, the chicken putting more weight on the affected foot, and a return to normal walking, roosting, and foraging behavior. The scab may eventually fall off during a soak, revealing healthy pink skin underneath.
How long can a chicken live with bumblefoot?
Without treatment, advanced bumblefoot can be fatal as the infection spreads to bones, tendons, and eventually the bloodstream. With proper treatment, even severe cases can heal, and the chicken can live a normal lifespan. The prognosis depends entirely on the stage at which treatment begins and how consistently it is applied.
When to Call a Veterinarian
Please consult a qualified avian or poultry veterinarian if:
- The infection is at Grade 3 or above (deep scab, significant swelling, visible pus)
- Home treatment has produced no improvement after 5 to 7 days
- The chicken shows signs of systemic illness (lethargy, loss of appetite, fluffed feathers)
- The swelling is spreading up the leg
- You are uncomfortable performing any part of the treatment
- The infection keeps returning despite addressing environmental causes
Finding an avian vet can be challenging. Our guide on when to call the vet for a backyard chicken offers tips for locating qualified poultry veterinarians in your area.
Final Thoughts: Prevention Is the Best Medicine
After years of raising chickens across two continents and helping hundreds of keepers through bumblefoot scares, the lesson I come back to again and again is that prevention is profoundly easier than treatment. A smooth, properly positioned roost. Clean, dry bedding. Regular foot inspections. A balanced diet. These simple practices eliminate the vast majority of bumblefoot cases before they ever start.
But if your chicken does develop bumblefoot, do not panic and do not feel guilty. It is one of the most common conditions in backyard poultry worldwide. The bacteria are everywhere, and even the best-managed flocks occasionally deal with it. What matters is that you caught it, you are educating yourself, and you are taking action.
Start with soaks. Be consistent with your bandage changes. Watch for improvement. And if things are not getting better, call a vet. Your chicken’s feet carry her through every single moment of her life. Taking care of them is one of the most important things you can do as a keeper.
About the Author
Oladepo Babatunde is a poultry expert and the founder of ChickenStarter.com, with over 6 years of hands-on experience raising more than 50 chickens across diverse climates. Drawing from training with the Nigerian Agricultural Extension Services and extensive practical work adapting tropical poultry techniques to US, UK, Australian, and Canadian conditions, Oladepo provides data-driven, experience-backed guidance for backyard chicken keepers worldwide. His work is informed by USDA, APHIS, and American Poultry Association standards. He is not a licensed veterinarian. Always consult a qualified poultry DVM for flock health concerns.

Oladepo Babatunde is the founder of ChickenStarter.com. He is a backyard chicken keeper and educator who specializes in helping beginners raise healthy flocks, particularly in warm climates. His expertise comes from years of hands-on experience building coops, treating common chicken ailments, and solving flock management issues. His own happy hens are a testament to his methods, laying 25-30 eggs weekly.