Keeping a happy, healthy flock means paying attention to the little things. And trust me, when it comes to chicken coops, chicken coop ventilation isn’t a little thing – it’s everything. I’ve seen firsthand how quickly a stuffy coop can turn into a disaster zone, leaving your feathered friends panting, miserable, and even in danger. I once woke up to my hens panting heavily, wings outstretched, even though it wasn’t the hottest day – a clear sign their coop wasn’t breathing.
If your chickens look like they’ve just run a marathon on a scorching day, chances are your coop isn’t breathing right. We’re going to walk through the 17 Coop Ventilation Mistakes That Overheat Your Flock and, more importantly, how to ventilate a chicken coop properly to fix them. Because your flock’s comfort isn’t just about being nice; it’s about their health, egg production, and overall well-being. Let’s get them some fresh air!
Ventilation is just one piece of the puzzle for happy chickens. If you’re a new chicken keeper, make sure you’re avoiding other common pitfalls. Find out more in our guide on Mistakes Every First-Time Chicken Keeper Makes!
Quick Reference: Your Coop Ventilation Checklist
- Ensure Upper and Lower Vents: Hot air rises, so you need high vents for exhaust and low vents for fresh air intake.
- Never Block Vents in Summer: Trapping air makes the coop hotter, not cooler.
- Size Vents Correctly: Aim for about 1 square foot of ventilation per chicken.
- Don’t Forget Roof Ventilation: Ridge vents, turbines, or floating roofs prevent heat buildup from above.
- Optimize Coop Orientation: Use natural breezes and shade to your advantage.
- Prioritize Cross-Ventilation: Vents on opposite sides create vital airflow.
- Avoid Overcrowding: More chickens mean more heat and humidity than your ventilation can handle.
- Clean Vents Regularly: Dust and debris block airflow.
- Use Proper Mesh: 1/2-inch or 1/4-inch hardware cloth is essential for both airflow and predator protection.
- Manage Humidity: Good ventilation helps control moisture, preventing respiratory issues.
- Adjust Seasonally: Ventilation needs change from summer to winter – don’t seal it up completely in cold weather!
- Monitor Your Flock: Watch for signs of heat stress and act quickly.
Why Coop Ventilation is Non-Negotiable for Your Flock’s Health
Proper chicken coop ventilation is crucial for removing stale, humid air, reducing ammonia buildup, and preventing respiratory diseases, ensuring your flock’s overall health and productivity. As part of a healthy coop ecosystem, good airflow is paramount.
Why is proper coop ventilation important? Proper chicken coop ventilation is essential to remove stale, humid air and harmful ammonia, preventing respiratory illnesses and maintaining a healthy environment for your chickens. It directly impacts their well-being and productivity.
Think of your chicken coop like your own home. If you sealed up all the windows and doors, never opened them, and had a bunch of people living in there, how long would it take before it became unbearable? Stuffy, humid, smelly, and just plain unhealthy, right? It’s the same for your chickens, but with added biological factors.
Chickens produce a surprising amount of moisture through their breathing and droppings. Without good airflow, this moisture builds up, creating a damp, muggy environment. This isn’t just uncomfortable; it’s a breeding ground for bacteria, mold, and respiratory illnesses. Plus, their droppings release ammonia, which, in high concentrations, can literally burn their respiratory systems and eyes. Good ventilation flushes out these harmful gases and excessive humidity, keeping the air fresh and clean.
🧠 What the Experts Say:
According to poultry experts from the Mississippi State University Extension Service, maintaining proper air quality in chicken houses is a continuous challenge, especially concerning ammonia and moisture. They emphasize that while ventilation rates change with factors like bird age and outside conditions, the primary goal remains consistent: ensuring sufficient air exchange to keep ammonia levels below 20-30 ppm and relative humidity between 50-70% to prevent health issues and optimize bird performance. Michael McCreesh, a veterinary consultant at SenseHub Poultry, adds, “When it’s working well, ventilation keeps CO2, relative humidity and temperature within target ranges reducing the level of airborne disease in circulation.”
The Dangers of an Overheated Coop: More Than Just Discomfort
An overheated chicken coop can lead to severe heat stress, evidenced by panting, lethargy, and reduced egg production, potentially culminating in fatal heatstroke.
Can chickens get heatstroke in a coop? Yes. An overheated coop can lead to severe heat stress, which can progress to fatal heatstroke if not addressed quickly. Chicken coop overheating is a serious concern for flock health.
Chickens don’t sweat like humans do. Their primary way to cool down is by panting, which is why you’ll see them with their beaks open on hot days. If the air around them is already hot and humid, panting becomes less effective, and their internal temperature can quickly rise to dangerous levels.
Signs of heat stress include:
- Panting: Rapid, shallow breathing with an open beak.
- Wings held away from the body: This helps them dissipate heat.
- Lethargy and reduced activity: They’ll often just stand or lie still.
- Pale comb and wattles: Though sometimes they can appear darker.
- Reduced appetite and water consumption: Paradoxically, they might drink less if they’re too stressed.
- Diarrhea.
- Decreased egg production or soft-shelled eggs.
- In severe cases, collapse and death.
According to the University of Minnesota Extension, chickens start to feel heat stress when temperatures consistently reach above 85∘F (29∘C), especially if combined with high humidity. Don’t wait for your birds to show severe signs; proactive ventilation is key. Trust me, you don’t want to find your favorite hen looking like she’s melting!
Understanding the Basics: How Air Moves (or Doesn’t) in Your Chicken Coop
Effective coop ventilation relies on understanding how air naturally moves, using principles like convection and cross-ventilation to ensure continuous fresh air exchange.
How does air move in a properly ventilated chicken coop? Air moves through convection, where hot, stale air rises and exits through upper vents, while cooler, fresh air is drawn in through lower vents, creating a continuous flow. Cross-ventilation, with vents on opposite sides, also facilitates horizontal airflow.
Good ventilation isn’t just about poking a few holes in the coop. It’s about understanding how to ventilate a chicken coop and designing your coop to make that movement happen. It’s a bit like a dance, and your coop needs to know the steps!
The Science of Airflow: Convection and Cross-Ventilation
Hot, stale air naturally rises and needs an escape point (upper vents), while cooler, fresh air should be drawn in through lower vents, creating a continuous flow. This is the principle of convection. Think of a chimney: hot air goes up and out. In a coop, the warm, humid air (and ammonia) rises, and if there are vents high up, it escapes. This creates a slight vacuum, pulling in cooler, fresh air from lower vents. Pretty neat, right?
Cross-ventilation refers to air moving directly across the coop. This happens by having vents on opposite sides, allowing a breeze to flow through. Combining both convection (vertical airflow) and cross-ventilation (horizontal airflow) gives the most effective air exchange. It’s like giving your coop a complete lungful of fresh air! As the University of Minnesota Extension points out, “Air flow at the birds’ level is key to removing bird heat. Increasing ventilation to remove heat from the birds should be your first priority.”
Measuring Success: How to Know Your Coop is Breathing Right
You can assess your coop’s ventilation by checking for signs like ammonia smell, condensation, and your chickens’ behavior, or by using simple tools like a thermometer and hygrometer.
How can I tell if my chicken coop has good ventilation? You can tell by the absence of a strong ammonia smell, no condensation on surfaces, minimal dust buildup, and observing your chickens to ensure they are active and not showing signs of heat stress.
You don’t need fancy equipment to tell if your coop is well-ventilated, though a thermometer and hygrometer can certainly help. Sometimes, your nose is the best tool!
Here are the signs:
- No strong ammonia smell: If you walk into your coop and immediately smell ammonia, your ventilation isn’t enough. That smell means harmful gases are building up. It’s a literal red flag for your chickens’ lungs! What’s tricky is that your nose can get used to the smell. As experts from the Alabama Cooperative Extension System warn, “The truth of the matter is that at levels of 50 ppm ammonia or lower, most growers are not able to smell harmful levels of ammonia in the house. The problem is that your nose loses sensitivity to ammonia after repeated or long exposure, so your birds can be suffering before you can detect the problem.” [Source: Alabama Cooperative Extension System].
- No condensation: In colder weather, condensation on the walls or ceiling means high humidity and poor airflow. If your coop walls are sweating, you’ve got a problem.
- Minimal dust: While chickens are dusty, too much dust buildup can mean airborne particles aren’t getting out. Are you walking into a dust storm? Time to rethink your vents.
- Happy, active chickens: They aren’t panting too much on warm days, and their combs and wattles look healthy. Your flock will tell you if they’re uncomfortable, often by just looking miserable.
- Fresh air feeling: The air inside the coop should feel fresh, not stagnant or heavy. Take a deep breath – does it feel good, or like you just stepped into a sauna?
I knew my coop wasn’t breathing right when I’d step in and immediately smell that strong ammonia. It was a clear sign I needed to add more upper ventilation to let that heavy, stale air escape. Honestly, it was a bit embarrassing how long I let it go!

The 17 Coop Ventilation Mistakes That Overheat Your Flock
Common chicken coop ventilation mistakes include insufficient upper and lower vents, blocking airflow, improper sizing, and forgetting seasonal needs, all contributing to dangerous chicken coop overheating.
Let’s get into the specifics. Prepare to nod along, because you’ve probably made a few of these yourself (I certainly have!).
Quick List: 17 Common Coop Ventilation Mistakes
- Mistake #1: Insufficient Upper Ventilation (Heat Rises!)
- Mistake #2: Lack of Lower Vents for Fresh Air Intake
- Mistake #3: Blocking Vents in Summer “To Keep the Cool In”
- Mistake #4: Relying Solely on Doors and Windows for Airflow
- Mistake #5: Incorrectly Sizing Vents for Your Flock and Coop Size
- Mistake #6: Forgetting About Roof Ventilation and Heat Buildup
- Mistake #7: Poor Coop Orientation Affecting Sun Exposure and Airflow
- Mistake #8: Neglecting Cross-Ventilation Opportunities
- Mistake #9: Overcrowding Your Coop, Leading to Increased Heat and Humidity
- Mistake #10: Not Cleaning Vents Regularly (Dust, Debris, Cobwebs)
- Mistake #11: Using the Wrong Type of Mesh or Grating on Vents
- Mistake #12: Ignoring Humidity Levels in the Coop
- Mistake #13: Failing to Account for Seasonal Changes in Ventilation Needs
- Mistake #14: Over-Insulating Without Adequate Ventilation
- Mistake #15: Placing Waterers Inside the Coop Without Proper Airflow
- Mistake #16: Not Monitoring Your Flock for Signs of Heat Stress
- Mistake #17: Thinking Winter Means No Ventilation Needed
Mistake #1: Insufficient Upper Ventilation (Heat Rises!)
This mistake traps hot, stale air at the top of the coop, turning it into an oven because heat has no escape route. This can lead to lethargy, reduced egg production, and even heatstroke.
Without enough upper ventilation, the hot air produced by chickens and ambient temperatures gets trapped at the coop’s highest points, leading to a significant temperature increase. This is probably the most common mistake I see. People forget that heat rises. If there’s nowhere for that hot, stale air to go, it just sits there, turning your coop into an oven. Ridge vents, gable vents, or high windows/openings are essential. It’s like trying to cool your house by only opening the basement windows – it just won’t work!
💡 Quick Fix: Add a gable vent near the roofline and pair it with a lower opening for proper airflow. Think chimney effect!
Mistake #2: Lack of Lower Vents for Fresh Air Intake
Without lower vents, fresh, cool air cannot enter the coop efficiently, disrupting the natural convection cycle needed for proper air exchange, which contributes to stuffy conditions and heat stress.
You can’t have exhaust without intake. If you only have high vents, you’ll get some air movement, but it won’t be efficient. Lower vents (below roosting height, but above litter level) are crucial for drawing in cool, fresh air, completing the convection cycle. These should be placed to help airflow. Think of it as the “in-breath” for your coop. Without it, the “out-breath” is pretty weak.
💡 Quick Fix: Install a series of small, predator-proof openings along the lower walls of your coop to draw in fresh air.
Mistake #3: Blocking Vents in Summer “To Keep the Cool In”
Blocking coop vents in summer traps heat and humidity inside, making the coop hotter and more dangerous for your flock, increasing their risk of heatstroke and dehydration. This is a common error that leads to chicken coop overheating.
This is a classic rookie error, and I totally made it myself when I first started! It seems logical, right? Close everything up to keep the cool air from escaping. But coops are not insulated like homes; they need constant airflow in summer. Blocking vents traps heat and humidity inside, making the problem worse. Your goal is to move air through the coop, not trap it. You’re essentially creating a chicken-sized hotbox, and nobody wants that!
💡 Quick Fix: Keep all permanent vents open year-round, especially in summer. If you have adjustable vents, open them fully during hot weather.
Mistake #4: Relying Solely on Doors and Windows for Airflow
Using only doors and windows for ventilation provides inconsistent and often insufficient airflow, failing to ensure continuous fresh air exchange, which can lead to fluctuating temperatures and poor air quality.
While open doors and windows can provide some temporary relief, they aren’t a substitute for dedicated, continuous ventilation. They might offer a burst of air, but they don’t ensure consistent, all-day airflow, especially when you’re not around to open them. Plus, leaving doors wide open can be a security risk. Are you really going to be there all day, every day, acting as your coop’s personal doorman? Probably not!
💡 Quick Fix: Install dedicated, hardware-cloth-covered vents (both high and low) that remain open regardless of whether doors or windows are open.
Mistake #5: Incorrectly Sizing Vents for Your Flock and Coop Size
Vents that are too small won’t move enough air, leading to a stuffy, hot coop, while oversized vents can cause drafts in colder weather, increasing the risk of respiratory issues or frostbite.
One tiny vent isn’t going to cut it for a flock of 10 chickens. General guidelines suggest about 1 square foot of ventilation per chicken, but this can vary based on climate and coop design. According to the Meyer Hatchery Blog, “In warm weather climates, the general rule of thumb is 1 square foot of ventilation per 10 square feet of coop floor space.” For comprehensive sizing, our detailed article How Big Should a Chicken Coop Be? provides further guidance. Too little ventilation, and you’ll have a stuffy coop. Too much, and you might struggle with drafts in winter (more on that later). A good rule of thumb is to have total vent area equal to about 1/10th of your coop’s floor space. Don’t eyeball this one; a little math goes a long way!
💡 Quick Fix: Calculate your coop’s floor space and aim for roughly 1/10th of that area in total ventilation, distributed between upper and lower vents.
Mistake #6: Forgetting About Roof Ventilation and Heat Buildup
Neglecting roof ventilation allows solar heat to build up and radiate downwards, significantly increasing the coop’s internal temperature, contributing to overall heat stress for your flock. This is a common cause of chicken coop overheating.
The roof of your coop takes a direct hit from the sun, absorbing a lot of heat. If this heat isn’t allowed to escape, it radiates down into the coop. Ridge vents, turbine vents, or even simple gaps at the roof peak (protected from rain and predators) can make a huge difference in preventing solar heat gain and attic space heat buildup. Imagine wearing a thick wool hat in summer – that’s what your coop feels like without roof ventilation.
💡 Quick Fix: Install a ridge vent along the peak of your coop roof or add a small cupola to allow heat to escape from the highest point.
Mistake #7: Poor Coop Orientation Affecting Sun Exposure and Airflow
Placing your coop without considering sun exposure and prevailing winds can lead to excessive heat buildup and hinder natural air movement, making it harder for chickens to cool down.
Where you place your coop matters! If it’s in direct, all-day summer sun with no shade, it’s fighting an uphill battle. Consider orienting the coop to take advantage of natural breezes and minimize direct summer sun. Placing it under shade trees or adding a shade cloth can significantly reduce internal temperatures. Don’t make your coop bake in the sun all day if you can help it!
💡 Quick Fix: Add shade cloths over the coop during peak summer sun, or plant deciduous trees nearby for natural summer shade and winter sun.
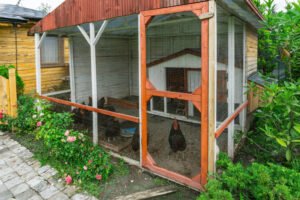
Mistake #8: Neglecting Cross-Ventilation Opportunities
Failing to include vents on opposite sides of the coop prevents a continuous cross-breeze, reducing overall air exchange and leaving stagnant areas, which can trap heat and humidity.
Having vents on opposite sides of the coop, even if they’re small, creates a powerful cross-breeze. This horizontal airflow works with vertical convection to ensure maximum air exchange. If your coop is long and narrow, this is especially important. It’s like having a refreshing breeze blow right through, instead of just stagnant air.
💡 Quick Fix: Install vents on opposing walls of your coop to create a consistent cross-breeze, maximizing horizontal airflow.
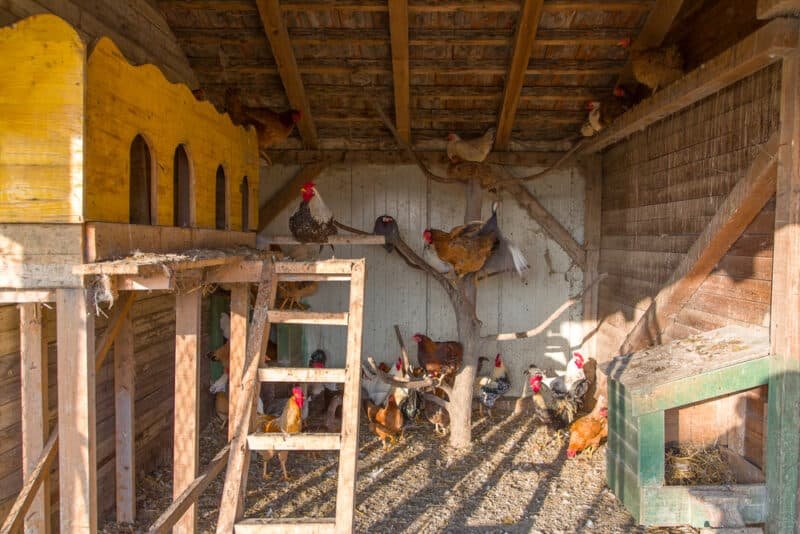
Mistake #9: Overcrowding Your Coop, Leading to Increased Heat and Humidity
Too many chickens in a small space generate excessive body heat and moisture, overwhelming the ventilation system and causing dangerous heat and humidity levels, leading to severe heat stress and poor air quality.
Overcrowding dramatically increases the heat and humidity inside the coop, overwhelming even well-designed ventilation systems. Each chicken is a little heat and moisture factory. If you cram too many birds into a small space, they generate more heat and moisture than your ventilation system can handle, leading to a hot, humid, and ammonia-filled environment. Always ensure adequate space per bird (at least 4 square feet per bird inside the coop). Seriously, give those ladies some elbow room! Wondering how many chickens are truly right for your family and space? Our article How Many Chickens Do You Need for a Family of 4? can help you figure out your ideal flock size to prevent overcrowding issues from the start.
💡 Quick Fix: Ensure you have at least 4 square feet per chicken inside the coop. If overcrowded, consider expanding your coop or reducing flock size.
Mistake #10: Not Cleaning Vents Regularly (Dust, Debris, Cobwebs)
Clogged vents, due to dust, feathers, or cobwebs, severely restrict airflow, rendering your ventilation system ineffective, which compromises air quality and temperature control. This is a common issue when fixing poor coop ventilation.
Vents aren’t “set it and forget it.” Over time, dust, feathers, cobwebs, and even wasp nests can clog them, reducing how well they work. I once found a whole wasp nest blocking a vent – no wonder it felt stuffy! Make vent cleaning part of your regular coop maintenance routine. A clogged vent is no vent at all.
💡 Quick Fix: Include a monthly check and cleaning of all coop vents in your regular maintenance routine to ensure unobstructed airflow.
Mistake #11: Using the Wrong Type of Mesh or Grating on Vents
Using mesh that’s too fine restricts airflow, while mesh that’s too wide compromises predator protection, creating a dilemma between safety and ventilation, potentially leading to overheating or predator attacks.
While you need airflow, you also need predator protection. Chicken wire is not predator-proof. Use 1/2-inch or 1/4-inch hardware cloth over all vent openings. This allows for excellent airflow while keeping out raccoons, snakes, and other unwelcome guests. Don’t learn this lesson the hard way, like I almost did with a sneaky raccoon!
💡 Quick Fix: Replace any chicken wire on vents with sturdy 1/2-inch or 1/4-inch hardware cloth, securely fastened to the coop frame.
Mistake #12: Ignoring Humidity Levels in the Coop
High humidity in the coop exacerbates heat stress and promotes respiratory problems and mold growth, even if temperatures aren’t extremely high, directly impacting chicken health and comfort.
High humidity, often a sign of poor ventilation, makes chickens feel hotter and can lead to respiratory problems and mold growth within the coop. It’s not just about temperature; it’s about how that temperature feels to your chickens. High humidity prevents evaporative cooling (panting), making heat stress worse. A hygrometer can help you keep an eye on this. Ever been in a muggy, humid heat? Imagine that, but with feathers and nowhere to escape. As the UGA Cooperative Extension recommends, “It is recommended that a low level of relative humidity be maintained between 50 and 70 percent throughout the growout period, including the brooding period.” [Source: UGA Cooperative Extension].
💡 Quick Fix: Monitor humidity with a hygrometer and increase ventilation if levels consistently exceed 70%, especially in warm weather.
Mistake #13: Failing to Account for Seasonal Changes in Ventilation Needs
Not adjusting ventilation for different seasons means your coop will either be too stuffy in summer or too drafty and damp in winter, increasing risks of heat stress or respiratory illness. This is crucial for proper chicken coop ventilation.
Should ventilation change throughout the year? Absolutely! While maximum airflow is needed in summer, you still need ventilation in winter to remove moisture and ammonia. The key is adjustable ventilation – vents that can be partially closed or opened depending on the outside temperature and wind. Your coop’s ventilation needs to be as adaptable as the weather!
💡 Quick Fix: Install adjustable vents (e.g., with sliding panels) that allow you to control airflow, opening them wider in summer and narrowing them in winter while still allowing some air exchange.
Mistake #14: Over-Insulating Without Adequate Ventilation
Insulation without proper airflow traps moisture and ammonia, creating a damp, unhealthy environment despite efforts to keep the coop warm, leading to respiratory problems and potential frostbite.
Insulation is great for keeping chickens warm in winter, but if it’s not paired with excellent ventilation, it can trap moisture and ammonia inside, leading to a damp, unhealthy environment. Thinking insulation alone is enough to keep chickens comfortable is a common mistake. Insulation helps regulate temperature, but ventilation cleans the air. Don’t create a cozy, but ultimately toxic, little box.
💡 Quick Fix: Ensure any insulated coop has corresponding upper and lower ventilation to prevent moisture and ammonia buildup, even in cold weather.
Mistake #15: Placing Waterers Inside the Coop Without Proper Airflow
Placing waterers inside the coop, especially without good ventilation, significantly increases humidity levels, making the coop feel even hotter for your flock, contributing to heat stress and damp litter.
Waterers placed inside the coop, especially without adequate ventilation, significantly increase humidity, making the environment feel hotter for chickens. Chickens splash, and water evaporates. If possible, place waterers just outside the coop, or ensure they are directly under a strong ventilation point if kept inside. Every drop of water contributes to that muggy feeling if it’s not properly aired out.
💡 Quick Fix: Move waterers outside the coop if possible, or ensure they are placed directly under a strong, dedicated vent to help evaporate moisture.
Mistake #16: Not Monitoring Your Flock for Signs of Heat Stress
Failing to regularly observe your chickens for early signs of heat stress can delay crucial interventions and put your flock at risk, potentially leading to severe health issues or mortality.
Even with perfect ventilation, extreme weather can still be a challenge. Watching your flock is key. Regularly check your chickens for signs of heat stress (panting, wings out, lethargy). Catching it early lets you take emergency cooling measures like offering frozen treats, misting, or providing extra shade. Your chickens can’t tell you they’re too hot, so you have to be their advocate!
💡 Quick Fix: Make daily flock observation a priority, especially during hot spells. Learn the signs of heat stress and have a plan for immediate cooling measures.
Mistake #17: Thinking Winter Means No Ventilation Needed
Believing that winter requires an airtight coop is a critical error, as it traps harmful ammonia and moisture, leading to respiratory issues and frostbite, negatively impacting overall flock health and well-being. This is a common pitfall when considering how to ventilate a chicken coop in colder months.
This is a big one! Chickens handle cold much better than they handle dampness and ammonia buildup. Remember “draft-free” versus “airtight.” While you want to prevent direct drafts on roosting birds, you absolutely need continuous, albeit reduced, airflow in winter to remove moisture from droppings and breath. An airtight coop in winter is a recipe for respiratory illness. Don’t suffocate your chickens in the name of warmth!
💡 Quick Fix: Maintain continuous, albeit reduced, airflow in winter through high, draft-free vents to remove moisture and ammonia. Avoid sealing the coop completely.
Beyond the Mistakes: Proactive Strategies for a Cool and Healthy Coop
Now that we’ve covered the pitfalls, what can you do to ensure year-round optimal ventilation? Let’s get proactive and build a coop that breathes!
Designing for Success: Building a Coop with Ventilation in Mind
When building a new coop, integrate ventilation from the start by planning for high and low vents, cross-ventilation, and strategic window placement to maximize airflow. This is key to effective DIY chicken coop airflow.
If you’re building a new coop, include ventilation from the ground up:
- High vents: Ridge vents, continuous soffit vents, or high gable vents are ideal. Think about how hot air naturally escapes.
- Low vents: Make sure there are plenty of openings near the floor, protected by hardware cloth. This is where the fresh air comes in!
- Cross-ventilation: Plan for openings on opposite walls. A good cross-breeze is your best friend.
- Windows: Placed well, windows can offer both light and airflow, but remember they are not a substitute for dedicated vents.
- Roof overhangs: These can help protect vents from rain while allowing airflow. Keep that rain out, but let the air flow!
- Cupolas: Not just for aesthetics, a cupola on your coop roof acts as a fantastic natural ventilator. It allows hot, rising air to escape freely, creating a strong stack effect. Plus, it looks charming!
- Turbine Vents: These spinning roof vents actively draw hot air out of the coop as the wind blows, providing continuous exhaust. They’re a great option for boosting upper airflow.
- Floating Roof Design: Consider a roof that’s slightly elevated above the coop walls, creating a continuous gap for hot air to escape around the entire perimeter. This provides excellent, consistent ventilation while still offering rain protection.
- Skylight Vents: While primarily for light, some skylight designs include vents that can be opened to allow hot air to escape from the very top of the coop, combining light and ventilation.
Practical Fixes for Existing Coops: Improving Airflow on a Budget
You can improve ventilation in an existing coop with simple, budget-friendly DIY solutions like adding hardware cloth panels or small gable vents. This is all about fixing poor coop ventilation without breaking the bank.
Don’t despair if your current coop is a ventilation nightmare. There are practical fixes:
- Add hardware cloth panels: Cut out sections of your coop walls (high and low) and cover them with 1/2-inch hardware cloth. Add a small roof overhang above them to keep rain out. It’s simpler than you think! Cost: ~$10-30 per panel (materials). Time: 1-2 hours per panel. If you’re thinking about building a new coop on a budget, or just love a good DIY project, check out our guide on How to Build a Chicken Coop for Under $200. It’s full of tips that can help you incorporate great ventilation from day one!
- Install small gable vents: These are relatively inexpensive and easy to install in the peaks of your coop’s gables. A quick weekend project! Cost: ~$20-50 per vent. Time: 2-3 hours.
- Create covered openings: Even a simple, predator-proof opening near the roofline, protected by a small piece of plywood or metal angled over it, can help hot air escape. Get creative! Cost: ~$5-20 (materials). Time: 1-2 hours.
- My personal anecdote: When I realized my old coop was a sauna, I added simple hardware cloth panels near the roofline, and it made a world of difference. It wasn’t pretty, but it was effective and budget-friendly. The relief on my chickens’ faces (if chickens can have relief on their faces!) was clear.
Essential Accessories to Aid Coop Cooling
Beyond structural changes, essential accessories like fans, misters, and frozen water bottles can provide supplementary cooling for your flock. These are great for boosting your DIY chicken coop airflow.
Beyond structural changes, some accessories can help:
- Fans: Safely installed, outdoor-rated fans can boost airflow. Make sure cords are out of reach and the fan is secured. Just like you love a fan on a hot day, so do your chickens!
- Misters: Used carefully, fine misters can cool the air, but avoid making the coop damp. Only use on very hot, dry days. A little spritz can go a long way.
- Frozen water bottles: Place these in the coop for chickens to lean against. A chicken ice pack, if you will!
- Shade cloths: Drape these over the coop to reduce direct sun exposure. Instant shade!
- Plenty of fresh, cool water: Always available, in multiple locations. Hydration is key, always.
My Personal Experience: Learning from Ventilation Trial and Error
My journey with chicken coop ventilation involved learning from early mistakes, like sealing up the coop too tightly, and discovering the transformative power of proper airflow and cross-ventilation.
When I first started with chickens, I thought a coop was just a box. My first coop was a repurposed shed, and I sealed it up tight, especially in winter, convinced I was keeping my girls cozy. Boy, was I wrong. The ammonia smell was overwhelming, and my chickens were constantly sniffling. In summer, they’d pant relentlessly, even on moderately warm days. It was a clear sign of poor ventilation.
I learned the hard way that “draft-free” doesn’t mean “airtight.” I started by adding permanent upper vents covered with hardware cloth, then some lower ones. The biggest “aha!” moment was realizing the power of cross-ventilation. Once I had openings on opposite sides, even small ones, the difference was immediate. The air felt fresher, the smell disappeared, and my chickens were visibly more comfortable. It was a humbling but crucial lesson in basic physics and chicken welfare. And honestly, a huge relief for me too, knowing my flock was finally comfortable.
Frequently Asked Questions About Coop Ventilation
Here are some quick answers to common questions about keeping your coop airy and fresh:
How much ventilation does a chicken coop need per chicken?
Generally, aim for about 1 square foot of ventilation opening per chicken, distributed between upper and lower vents, though this can vary with climate.
Can chickens get too much ventilation in winter?
Yes—but only if it causes direct drafts. You still need airflow to remove moisture and ammonia.
How do I predator-proof my vents?
Always cover all vent openings with 1/2-inch or 1/4-inch hardware cloth, securely fastened to the coop frame. This mesh is strong enough to deter most predators while allowing airflow.
What are the best types of vents for a chicken coop?
Ridge vents, gable vents, and covered lower openings with hardware cloth are highly effective for creating natural airflow.
How often should I clean my coop vents?
Inspect and clean your coop vents monthly, or more frequently if you notice significant dust, cobwebs, or debris buildup.
Final Thoughts: Your Flock’s Comfort is Your Responsibility
Ventilation isn’t a luxury for your chickens; it’s a fundamental necessity for their health and well-being. By understanding the common mistakes and putting proactive strategies into practice, you can ensure your flock stays cool, comfortable, and healthy year-round. It’s about being observant, adapting to your specific climate, and always prioritizing the needs of your feathered friends. Your readers are counting on you to guide them, and a well-ventilated coop is a happy coop!
✅ Checklist for Healthy Coop Air Quality
☐ Upper vents installed (ridge/gable)
☐ Lower vents present (above litter, below roosts)
☐ Vents not blocked by dust or debris
☐ Cross-ventilation between opposite walls
☐ Waterers placed away from coop or near vents
☐ Coop not overcrowded (min. 4 sq ft/bird)
☐ No ammonia smell upon entry
☐ Winter airflow = draft-free, not airtight

Oladepo Babatunde is the founder of ChickenStarter.com. He is a backyard chicken keeper and educator who specializes in helping beginners raise healthy flocks, particularly in warm climates. His expertise comes from years of hands-on experience building coops, treating common chicken ailments, and solving flock management issues. His own happy hens are a testament to his methods, laying 25-30 eggs weekly.