I still remember the first time I found red mites in my coop. It was a warm July evening, and I went out to close up the run before dark. When I lifted the end of the roosting bar to check on a hen who’d been unusually quiet that week, my fingers came away speckled with what looked like moving grains of pepper. That was my introduction to Dermanyssus gallinae, the red roost mite, and it kicked off a two-week battle that taught me more about poultry parasites than any article ever could.
Discovering mites or lice in your flock is every chicken keeper’s nightmare, but it doesn’t need to be. These are common external parasites that cause stress, anemia, and a real drop in egg production, but they are completely manageable once you know exactly what you’re looking at and follow a plan that treats both the birds and their environment at the same time.
This guide combines my own hands-on experience (including the mistakes I made the first time around) with current guidance from university poultry extension programs and veterinary sources, so you get something more useful than repeated forum advice: a plan that is both practical and factually accurate.
Why Mites and Lice Matter More Than People Think
New keepers often treat a mite or lice problem as a minor annoyance, something to deal with “eventually.” I made that mistake myself the first summer I kept chickens. I noticed my Rhode Island Red hen scratching more than usual and assumed it was just normal preening behavior. Three weeks later, her comb had gone pale, her egg laying had stopped completely, and she had visible feather loss around her vent. What started as a mild nuisance had become a genuine health crisis for that bird, and by then, the infestation had spread to two more hens in the same coop.
That experience taught me the single most important lesson in this guide: mites and lice are progressive problems. A light infestation that would take twenty minutes to treat today can become a flock-wide anemia crisis in a matter of weeks if ignored. Red mites, in particular, reproduce extremely quickly, and a small population hiding in your roost joints can explode into thousands within a couple of weeks under warm conditions.
Beyond the welfare concern, there is a real economic cost. Reduced egg production, veterinary visits, replacement bedding, and treatment products all add up. Catching an infestation early is not just kinder to your birds, it is also the cheaper and faster path back to a healthy flock.
Do My Chickens Have Mites or Lice? Key Signs
Before treating anything, confirm what you are actually dealing with. Mites and lice look similar to a new keeper but require slightly different attention, and misidentifying the pest can mean you treat the wrong problem.
Behavioral signs of an infestation:
Restlessness, excessive preening, or feather pulling is often the first thing you will notice. Chickens with an active infestation seem unable to settle. They will interrupt normal foraging or dust bathing to scratch and preen obsessively, sometimes to the point of damaging their own feathers.
Lethargy and a pale comb or wattles is a more serious sign, and it specifically points toward mites rather than lice, since mites feed on blood and lice do not. A chicken with heavy blood loss from mites can become genuinely anemic, which shows up as pale skin around the face, weakness, and reduced activity.
A sudden drop in egg production is common with both mites and lice, since the constant irritation and stress divert the bird’s energy away from laying.
Changes in dust bathing frequency can go either way. Some birds dust bathe more often in an instinctive attempt to smother the parasites, while very sick or heavily infested birds may dust bathe less because they simply do not have the energy.
Physical signs to check for:
Dirty, matted, or discolored vent feathers are usually the first physical clue. The area around the vent may look grayish, greasy, or clumped together.
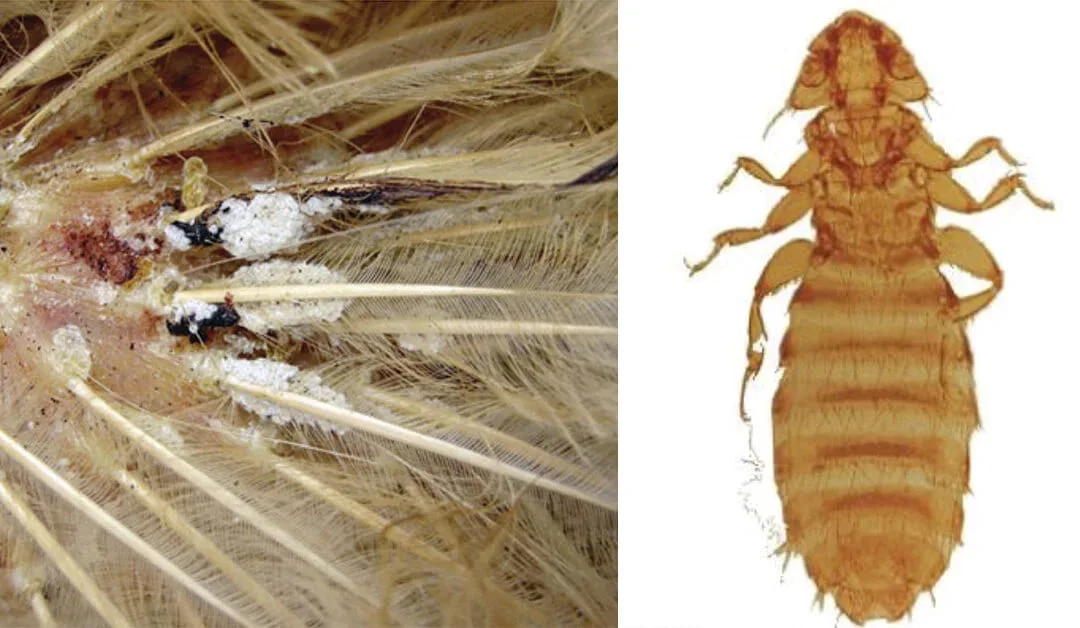
Small pale or tan colored eggs, often called nits, cemented to the feather shafts near the vent are a clear sign of lice specifically, since lice glue their eggs directly to feathers.
Feather loss around the vent and lower back is common in both mite and lice infestations, caused by the bird’s own scratching and preening in response to the irritation.
Visible pests are the most direct confirmation. Part the feathers around the vent and check carefully. For red mites, checking at night with a flashlight is far more effective, since they hide in coop crevices during the day and only emerge to feed after dark.
Mites vs. Lice at a Glance
| Feature | Chicken Mites | Chicken Lice |
|---|---|---|
| Appearance | Tiny, round, dark red to black, darker after feeding | Larger, straw colored, flat, elongated |
| Movement | Fast moving, many hide in coop crevices by day | Slow moving, spend their entire life cycle on the bird |
| Feeds on | Blood | Dead skin cells and feather debris |
| Where found | Skin, especially around the vent, plus coop cracks and roost ends | Feather shafts, in clusters near the vent |
| Life cycle | Short, as little as five to seven days for red mites, which is why coop treatment is essential | Longer, entirely completed on the host bird |
| Anemia risk | Yes, in heavy infestations | No |
| Human contact | Can bite temporarily, cannot reproduce on humans | Species specific, cannot survive on humans at all |
The Three Pests You Are Most Likely to Find
Red Roost Mite (Dermanyssus gallinae)
This is the pest that started my own mite education, and it remains the most common and most frustrating one for backyard keepers. It hides in coop cracks, roost joints, and any small gap in the wood during the day, then crawls onto birds to feed on blood at night. That nocturnal habit is exactly why treating the coop, not just the birds, is non-negotiable. If you only dust the chickens and skip the coop, the mites simply wait in their hiding spots and reinfest the birds the following night.
Look for pepper flake sized black or reddish specks in roost joints, in the corners of nest boxes, or under any loose bark on branch style roosts. A trick I now use every few weeks as a preventive check is wrapping a strip of white tape, sticky side out, around a section of roosting bar overnight. In the morning, any mites present will be stuck to the tape and easy to see against the white background. The Merck Veterinary Manual’s overview of poultry mites confirms this nocturnal hiding behavior and is a useful reference if you want to see photos of what an active infestation looks like in the coop itself.
Northern Fowl Mite (Ornithonyssus sylviarum)
Unlike the red roost mite, this species lives its entire life cycle on the bird itself, so treating the bird directly is the higher priority here, though coop treatment is still worthwhile as a precaution. It causes the classic grayish or blackish “dirty vent” staining from accumulated feces and egg clusters, and it tends to be more of a year round problem in cooler climates since it does not depend on warm nights to feed the way red mites do.
Scaly Leg Mite (Knemidocoptes mutans)
This one is a completely different pest from the two above, and it causes a completely different set of symptoms. It burrows under the scales on a chicken’s legs and feet, feeding on the tissue there and causing the scales to lift, thicken, and become crusty and deformed over months if left untreated. I have seen older hens with legs so affected that the scales resembled tiny stacked shingles instead of lying flat.
Treatment is different from the dust and spray approach used for mites and lice elsewhere on the bird. Soak the affected legs in warm, soapy water to soften the crusted scales, pat the legs dry gently, then coat them in a thick, occlusive ointment such as petroleum jelly or a wax based salve. The goal is suffocation rather than a chemical kill, so this needs to be repeated every few days for several weeks, since the mite’s life cycle continues under the scales even while you are treating the surface.
A Note on Related Problems That Get Mistaken for Mites or Lice
Part of building real diagnostic confidence is knowing what mites and lice are not. A few conditions commonly get confused with parasite infestations by newer keepers, and I have mixed some of these up myself in the past.
Molting causes feather loss too, but it tends to be more symmetrical, follows a seasonal pattern (usually late summer to fall), and is not accompanied by the restlessness, scratching, or pale comb associated with a parasite burden.
Vent gleet, a yeast infection around the vent, can cause similar looking discoloration and matting around the vent area, but it is usually accompanied by a distinct foul odor and abnormal discharge rather than visible nits or crawling pests.
Bumblefoot, a bacterial infection of the foot pad, is sometimes confused with scaly leg mite damage since both affect the legs and feet, but bumblefoot presents as a swollen pad with a dark scab, not lifted, crusty scales spreading up the leg.
Feather pecking from a pecking order dispute can cause feather loss in similar areas to a parasite infestation, but it typically shows as broken or plucked feathers with visible aggression from flock mates, rather than the fine debris, nits, or crawling insects you would see with an actual infestation.
If you are ever unsure which of these you are dealing with, a quick call to a vet familiar with poultry, or a poultry extension office, is worth the time before you commit to a treatment plan aimed at the wrong problem.
Treatment Plan: Bird and Coop, at the Same Time
Immediate five step response:
First, confirm the pest. Check the vent and feather shafts for lice, and check coop crevices and roost joints for mites.
Second, choose a poultry labeled treatment such as a permethrin dust or spray, or food grade diatomaceous earth.
Third, dust or spray every single bird in the flock, focused on the vent area, working the powder against the direction of feather growth so it reaches the skin rather than sitting on top of the feathers.
Fourth, strip out and dispose of all bedding, then deep clean the coop within twenty four hours.
Fifth, repeat the full treatment in seven to ten days. This second application is what actually breaks the life cycle, since a single treatment often misses eggs that were laid before the first dusting and hatch out afterward.
Critical safety note: always follow the specific product label for dosage, application method, and any stated precautions. Wear gloves and a dust mask when applying any powder treatment, both to protect yourself and because inhaling fine dust repeatedly is not good for anyone’s lungs.
Treating the Birds
Dusts, including permethrin, food grade diatomaceous earth, and sulfur, are the standard first line treatment because they reach pests directly on the skin. Lift the feathers against the grain and apply the powder so that it makes contact with skin rather than just coating the outer feathers. I usually work in sections, starting at the vent, then moving to under the wings and around the neck, since these are the areas mites and lice concentrate most heavily.
Sprays, including permethrin and spinosad based products like Elector PSP, work well for coop cracks and crevices and can also be used directly on birds when the label permits. Make sure the spray actually reaches the skin and does not just wet the outer feather surface, since a spray that only dampens feathers will do little against pests living close to the skin.
Systemic treatments (ivermectin) deserve a more careful explanation than most articles give them. Ivermectin is not FDA approved for use in poultry in the United States, so any use in chickens is considered off label, and dosing recommendations come from accumulated veterinary experience rather than an official poultry label.
This matters more for a laying flock than people often realize. Unlike labeled poultry permethrin products, which generally carry no required egg withdrawal period, ivermectin residues can persist in eggs for an extended period with no established safe withdrawal time for human consumption. Several poultry veterinarians and extension sources now specifically advise against routine ivermectin use in actively laying hens for exactly this reason. If you are considering it, talk to a vet first, especially if you or your family eat the eggs your flock produces.
A Correction Worth Making Clearly: Egg Safety After Permethrin
This is one of the most commonly misunderstood points in backyard poultry keeping, so it is worth stating precisely. In the United States, poultry labeled permethrin products, such as Permectrin II and Prozap, generally carry no required egg withdrawal period when used according to the label. This means eggs can typically still be eaten or sold during and after treatment, unlike many other veterinary chemicals.
That said, independent residue testing has detected trace permethrin in egg yolks for up to several weeks after treatment, at levels that are not considered a health risk but are worth knowing about, particularly if you sell your eggs to others. A cautious, self imposed short withdrawal period of a few days is a reasonable personal choice even though it is not legally required. Product formulations do vary, so always check your specific product’s label, and when in doubt, contact an extension poultry specialist or your veterinarian for the most current guidance. A Rural Veterinary Outreach summary of egg withdrawal times for common poultry treatments is a helpful reference to bookmark, since withdrawal requirements differ across products and it is easy to mix them up if you treat for more than one issue at a time.
Natural and Non-Chemical Options
Food grade diatomaceous earth (DE) works by physically damaging the exoskeleton of mites and lice, causing them to dehydrate and die. University research on dust box treatments using DE, kaolin clay, or sulfur has shown meaningful reductions in ectoparasite loads within about a week of consistent use, and a Cooperative Extension entomology response on chicken mites confirms that dust boxes with inert dusts like DE or sulfur are considered very effective for bird self-treatment. It is worth being realistic about the limits too: DE suppresses mite populations rather than eliminating them outright, and it does not kill mite eggs, so it works best paired with the coop treatment and repeat-dusting schedule described above rather than as a standalone fix. Use food grade DE only, never the pool grade version, and always wear a mask, since the fine dust is irritating to both human and bird lungs when inhaled in quantity.
Sulfur dust is another organic option, and it has the added benefit of a longer residual effect in bedding and dust bath areas compared to DE alone, meaning it continues offering some protection even after the initial application.
Garlic or herbal sprays, often made with garlic juice, lavender, or other essential oils, are reasonable as a preventive deterrent but are generally not potent enough to knock down an active, heavy infestation on their own. Do not rely on these alone once you have confirmed a real outbreak. I learned this the hard way during my first infestation, when a garlic spray alone did essentially nothing to slow down the red mites already established in my coop’s roost joints.
Treating the Coop (Non-Negotiable)
Remove and bag all bedding immediately for disposal well away from the coop.
Scrape every surface, including roosts, nest boxes, corners, and cracks, to remove accumulated droppings and debris where mites hide.
Wash the entire structure down with soap and water, or use a pressure washer for a deeper clean if the coop’s construction can handle it.
Let the coop dry completely before applying any treatment, since most sprays and powders work best on a dry surface.
Treat all cracks, crevices, and roost ends with a labeled spray or food grade DE, paying particular attention to the exact spots where you found mites during your initial inspection.
Add fresh bedding only once the coop is fully dry and treated.
Recommended Ways to Stop Mites: Prevention as the Best Long-Term Investment
After going through my own infestation, I completely changed how I manage my coop, and I have not had a serious outbreak since. If you’re looking for recommended ways to stop mites before they take hold in the first place, a few habits made the biggest difference for my flock.
Deep clean monthly, and let sunlight into the coop whenever possible. Red mites in particular dislike direct sun and dry conditions, so a coop design that allows some natural light and airflow is a real advantage, not just a comfort feature.
Provide a proper dust bath station so birds can self treat through natural behavior. This is one of the simplest, lowest cost prevention tools available, and it gives your flock a way to manage light parasite loads on their own before they become a real problem. For exact ratios and placement, see our dust bath mix recipe guide and how to set up a dust bath.
Seal coop cracks and crevices where mites hide during the day. Every gap you close is one less hiding spot for red mites to retreat to when the sun comes up.
Quarantine every new bird for two to four weeks before introducing it to your existing flock, and assume any newly acquired bird could be carrying mites or lice until proven otherwise through observation. This single habit would have prevented my first infestation entirely, since I later realized the mites almost certainly arrived with a hen I bought from a local sale barn without quarantining her first.
Watch for pests introduced by wild birds or rodents sharing your feed source, since sparrows, pigeons, and rodents can all carry mites or lice into a coop even if you never bring in a new bird. Rodent proofing your coop and feed storage reduces this risk meaningfully. See our guide on how to keep rats out of your coop for practical steps.
Consider seasonal timing. Red mite populations tend to explode fastest in warm summer conditions, so increasing your inspection frequency during hot months, even just a quick roost check every couple of weeks, catches problems earlier than an infestation found in the dead of winter when reproduction has slowed naturally.
Related Keywords and Search Terms Covered in This Guide
Readers researching this topic often search using slightly different phrasing depending on what they already suspect or have found. This guide covers all of the following related questions and terms: recommended ways to stop mites, chicken mite treatment, poultry lice treatment, red mites in a chicken coop, how to get rid of chicken mites naturally, chicken lice versus mites, scaly leg mite treatment, diatomaceous earth for chicken mites, chicken mite bites on humans, chicken lice life cycle, permethrin dust for chickens, Elector PSP for chickens, northern fowl mite identification, vent gleet versus mites, chicken pecking due to mites, signs of mites in a chicken coop, best mite treatment for chickens, chicken mite eggs, how often to treat chickens for mites, mite resistant chicken breeds, coop dust bath recipe, chicken quarantine period for new birds, backyard chicken parasite prevention, and chicken lice identification pictures.
Can Humans Get Mites or Lice from Chickens?
Chicken lice are species specific parasites and cannot survive or reproduce on humans at all. If one ends up on you, it will simply die off without causing any lasting issue.
Chicken mites, meaning red roost mites and northern fowl mites, can bite humans and cause itchy red bumps, but they cannot complete their life cycle on human blood and will not establish a lasting infestation on you or in your home. If you are bitten, showering in hot water and washing your clothes and bedding in hot water clears them quickly. I dealt with a handful of bites myself during my first coop cleanout, and a hot shower and a load of laundry resolved it within a day. Persistent irritation beyond that warrants a doctor’s visit.
When to Call a Vet
Most mite and lice infestations can be handled at home with the steps above, but a few situations warrant professional input rather than continued DIY treatment. If a bird’s comb remains pale and she stays lethargic even after a full treatment cycle, she may be dealing with anemia severe enough to need veterinary support. If you notice scaly leg mite damage that has progressed to visible deformity or lameness, a vet can advise on whether additional care beyond the ointment protocol is needed. And if you are ever unsure whether a systemic product like ivermectin is appropriate for a specific bird, especially one that is laying eggs for your family’s consumption, that is exactly the kind of question worth a quick call to a vet rather than a guess. For more on recognizing when a health issue has moved beyond routine home care, see our guide on when to call the vet for a backyard chicken.
Frequently Asked Questions
What is the fastest way to get rid of mites and lice on chickens?
A labeled permethrin dust or spray applied to every bird, combined with a full coop clean out and crevice treatment on the same day, then a repeat treatment seven to ten days later to catch newly hatched pests, is the fastest reliable approach.
Can I eat eggs after treating chickens with permethrin?
Check your specific product’s label. Most poultry labeled permethrin products in the United States carry no required withdrawal period, though trace residues can persist for weeks. A short personal withdrawal period is a reasonable precaution, especially if you sell your eggs.
How long can chicken mites live without a host?
Red roost mites can survive for months in an empty coop without feeding, which is exactly why coop treatment matters as much as treating the birds themselves.
Is diatomaceous earth actually effective against mites?
Yes, when used consistently as food grade DE in dust baths or applied directly. University dust box studies show meaningful ectoparasite reduction within about a week. It works more slowly than chemical treatments, so it suits prevention and light infestations better than a severe active outbreak.
How do I know if treatment worked?
Recheck seven to ten days after your second treatment. Watch for returning restlessness or scratching, and re-inspect roost ends for mites and vent feathers for lice. No pests found on two consecutive checks a week apart is a good sign the infestation has cleared.
How do mites and lice get into a coop in the first place?
Most commonly through wild birds sharing a feed source or perch nearby, through rodents, or through new chickens brought in without a quarantine period, which is exactly why quarantine is not optional.
What are the recommended ways to stop mites from coming back?
The most reliable combination is a dedicated dust bath station with food grade DE or sulfur, a strict two to four week quarantine for any new bird, monthly deep coop cleaning with attention to cracks and roost joints, and rodent and wild-bird proofing around feed storage. None of these alone is a complete solution, but used together they are the recommended way to keep a flock mite-free long term rather than repeatedly treating outbreaks after the fact.
Are certain chicken breeds more resistant to mites and lice?
Breeds with heavier feathering, such as Cochins or Silkies, can sometimes harbor infestations longer before they are noticed simply because the dense feathers hide early signs, while breeds with tighter feathering may show visible symptoms sooner. This is a difference in detection difficulty rather than true biological resistance, so no common backyard breed should be assumed safe from infestation.
Can mites or lice kill a chicken?
In severe, prolonged, untreated cases, heavy mite infestations can cause anemia serious enough to be fatal, particularly in smaller or already weakened birds. Lice infestations alone are far less likely to be fatal but can significantly weaken a bird’s condition and immune resilience over time.
Conclusion
Discovering mites or lice on your chickens is stressful, especially the first time, but it is a completely manageable problem once you know what you are looking at. The core of a successful response has not changed since I dealt with my own infestation years ago: identify the specific pest correctly, treat the birds and the coop at the same time rather than one or the other, repeat the treatment on schedule to break the life cycle, and build simple prevention habits, like dust baths and new bird quarantine, into your regular routine going forward. Do that consistently, and a mite or lice problem becomes a manageable inconvenience rather than a recurring crisis for your flock.
Disclaimer: This article is for educational purposes and reflects information current as of the update date above. It is not a substitute for veterinary advice. Always follow your specific product’s label instructions and consult a licensed veterinarian or poultry extension specialist for diagnosis, treatment, and any questions about egg or meat safety for your flock.

Oladepo Babatunde is the founder of ChickenStarter.com. He is a backyard chicken keeper and educator who specializes in helping beginners raise healthy flocks, particularly in warm climates. His expertise comes from years of hands-on experience building coops, treating common chicken ailments, and solving flock management issues. His own happy hens are a testament to his methods, laying 25-30 eggs weekly.