You pick up your favorite hen and notice she’s limping slightly. You check her foot and see a small, dark scab on the pad. Your mind immediately jumps to the dreaded word: Bumblefoot. It’s a common and treatable condition, but it can be intimidating for chicken owners. This guide is designed to be your trusted resource, empowering you to act early while knowing when to seek professional help.
Bumblefoot is a common foot infection that, when caught early, is highly treatable at home. This article will be your complete guide on how to spot the signs, treat early-stage cases, and prevent it from happening again.
VETERINARIAN DISCLAIMER:
Important: This guide is for informational purposes. While early-stage Bumblefoot can often be managed at home, advanced cases require veterinary care. Always consult a qualified vet for a proper diagnosis and treatment plan, especially if the infection is severe or you are uncomfortable with the procedure.
What is Bumblefoot? (And What Causes It?)
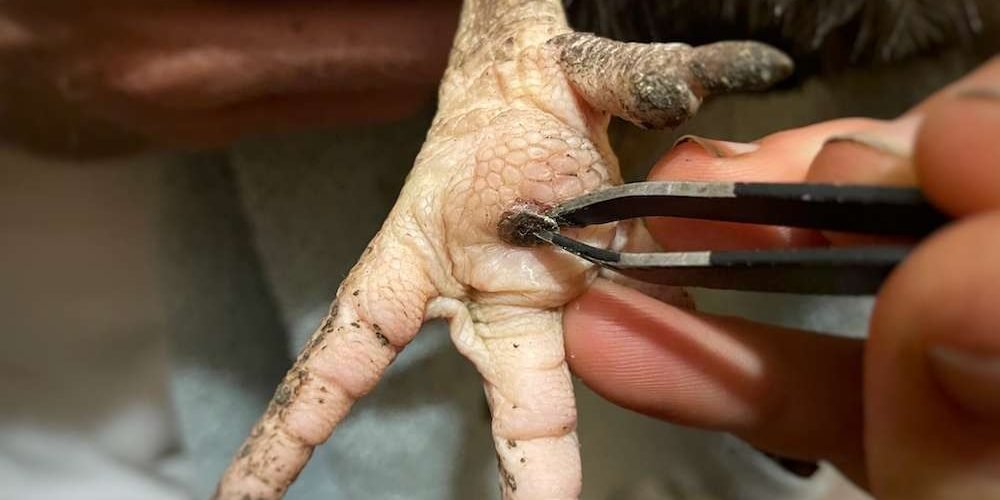
Bumblefoot, medically known as Pododermatitis, is a common bacterial infection of a chicken’s footpad. It starts with a small cut, scrape, or abrasion on the foot. This small break in the skin allows bacteria to enter and cause an infection. In response, the body forms a hardened abscess, which is the hard, pus-filled core known as a “kernel” or “plug” that is characteristic of the condition.
The Anatomy of a Chicken’s Foot
A chicken’s foot is designed to handle a lot of pressure, but it has a key vulnerability. The bottom of the foot, or pad, is covered by a thick layer of keratinized skin. This provides a natural cushion for walking and roosting. However, a single small cut, splinter, or abrasion on this pad is all it takes for the infection to set in.
The Pathology of the Infection
When bacteria, most often Staphylococcus aureus, get into the skin through an injury, a localized infection begins. The chicken’s immune system sends in white blood cells to fight it, but the bacteria can overwhelm the defenses. The body then forms a hardened, fibrous capsule to wall off the infection, creating the abscess. The pus inside is not liquid like in mammals but is a solid, cheese-like substance called caseous pus. This solidified pus, along with dead skin cells and bacteria, forms the hard “kernel” that makes treating advanced cases so difficult.
“The infection won’t go away until the core is removed. That’s best done by a veterinarian, who can provide pain relief during the surgery and an antibiotic prescription afterward.” – Gail Damerow, author of Storey’s Guide to Raising Chickens.
Common Causes of the Initial Injury
The initial injury that allows the bacteria to enter can be caused by a number of things:
- Rough or sharp roosts/perches: Uneven surfaces or splintered wood can easily cut the sensitive footpad.
- Jumping down from high places: Landing on hard surfaces like concrete from a high roost can cause tiny micro-tears in the footpad, even without a visible wound.
- Wet, dirty bedding: Constant exposure to wet, soiled bedding softens the skin, making it more permeable and susceptible to bacteria.
- Splinters or sharp objects in the run: Even a small, unseen piece of debris can be a point of entry for infection.
Understanding the root cause is the first step in both treatment and prevention. With this knowledge, you’ll be better equipped to inspect your flock’s feet for the tell-tale signs of a brewing problem.
How to Spot Bumblefoot: The Early Signs and Stages
Early intervention is key to a quick recovery. The sooner you spot the problem, the easier it is to treat at home.
“Regular flock foot inspections are highly recommended to detect infections at the earliest possible stage.” – The Chicken Chick, blogger and expert backyard chicken keeper.
The Daily Foot Check
Make checking your chickens’ feet a regular part of your routine. This proactive step can help you catch a problem long before it becomes an advanced, painful infection. Simply lift your chicken and check the bottoms of her feet. Pay special attention to the central footpad and the pads at the base of the toes.
When to Suspect Bumblefoot
Beyond a visual check, there are key behavioral signs that may indicate a foot problem. Look for:
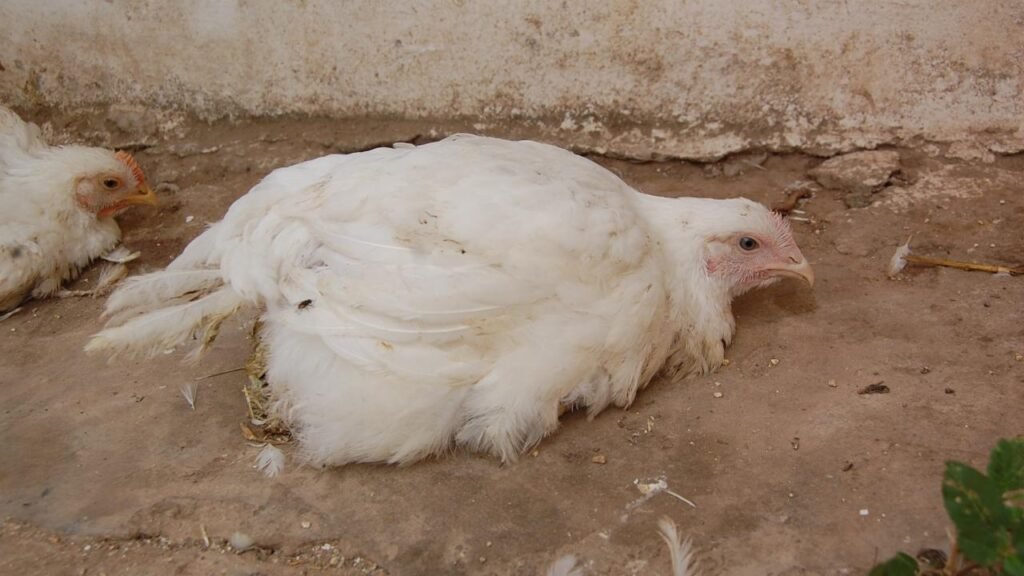
- Limping or hopping when walking.
- Reluctance to walk or roost on high perches.
- Laying down more often than usual.
- A “scaly” or rough appearance to the bottom of the foot.
The Stages of Bumblefoot
- Early Stage (Grade 1-2): You will see a small, pinkish spot, a tiny scab, or a shiny, smooth patch on the footpad. At this stage, there is no swelling or limping. The skin may be slightly warm to the touch. This is the ideal time to intervene.
- Moderate Stage (Grade 3-4): There is a distinct, dark scab, and the foot may show minor swelling and redness. The chicken may have a slight limp. The footpad will feel hard and the infection is beginning to form the core or “kernel” inside.
- Advanced Stage (Grade 5): The foot and toes have significant swelling. The scab is large, hard, and black. There is severe limping and obvious pain. The infection may be spreading up the leg and causing the foot to feel very hot. This stage almost always requires a vet.
Misdiagnosing a Healthy Foot
It’s important not to mistake a simple callus for Bumblefoot. Healthy chickens will often develop tough, callused skin on their footpads. This is normal and a sign of a working, healthy foot. A callus will feel smooth and hard, whereas a Bumblefoot scab will be a distinct, black spot that feels rough or raised.
Now that you can confidently diagnose the issue, let’s move on to the practical steps for treating an early-stage case right at home.
How to Treat Early-Stage Bumblefoot at Home
If you’ve caught the infection early, you can often treat it effectively at home. Follow these steps carefully.
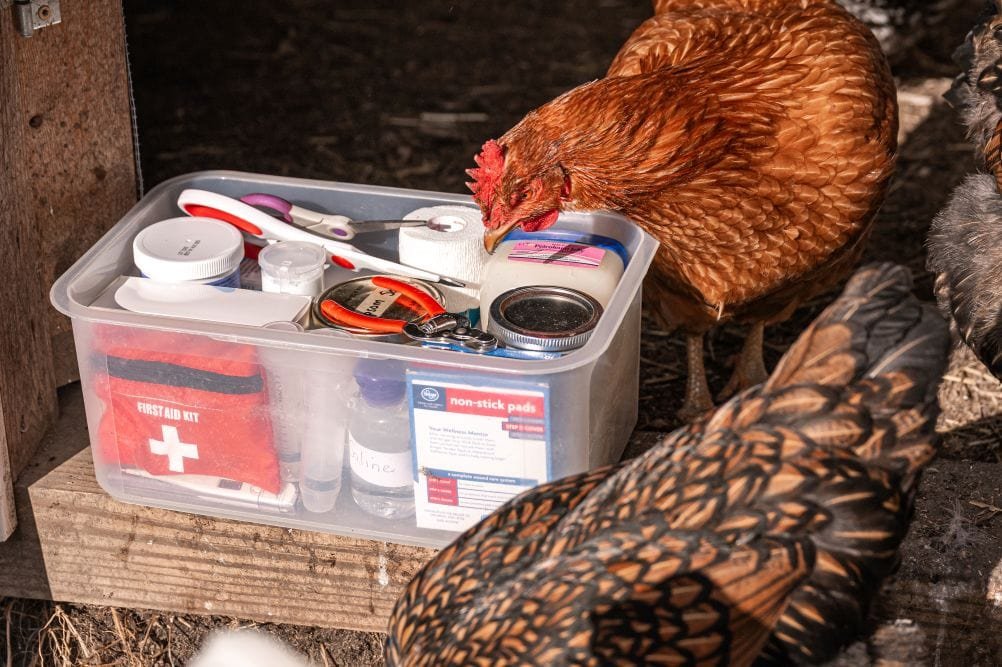
Step 1: Gather Your Supplies
You’ll need a few key items before you begin:
- Epsom salts: To draw out the infection and soften the scab.
- A basin or small tub: For soaking the foot.
- Clean towels: To dry the foot and keep your workspace clean.
- Gloves: To protect yourself from bacteria.
- A good antiseptic: (e.g., Vetericyn spray or a chlorhexidine solution) to kill bacteria.
- A non-pain-relief antibiotic ointment: (like original Neosporin) to fight the infection.
- Gauze pads or non-stick wound pads: To cover the wound.
- Vet Wrap and medical tape: To create a secure bandage.
For a complete list of supplies you should have on hand, check out our guide on how to set up a chicken first-aid kit.
Step 2: The Epsom Salt Soak
The purpose of the soak is to soften the scab and the surrounding tissue, making it easier for the body to expel the infection. Fill a basin with warm water (not hot) and add a generous amount of Epsom salts. Gently place your chicken’s foot in the water and let it soak for 15-20 minutes, or until the scab feels soft. The salt helps draw out fluids and reduce swelling.
Step 3: Clean and Disinfect
After the soak, gently pat the foot dry with a clean towel. Use the antiseptic spray to clean the area thoroughly. At this early stage, it is not necessary to try and forcibly remove the scab. However, if the scab comes off naturally during the soak, do not panic. Simply clean the area and proceed with the next step.
Can you use hydrogen peroxide? It’s not recommended for deep wounds as it can damage healthy tissue and slow healing. It’s okay for an initial clean of a very dirty surface-level scrape, but a dedicated antiseptic like Vetericyn is a superior choice.
Step 4: Apply Salve and Wrap the Foot
Apply a small amount of an antibiotic ointment that does not contain added pain relievers, like original Neosporin. Avoid formulas like ‘Neosporin + Pain Relief,’ as the pain-relieving ingredients can be harmful to chickens. Place the ointment on a non-stick gauze pad and place it directly over the scab. Now, carefully wrap the foot. First, secure the gauze with a small piece of medical tape. Then, use Vet Wrap to create a secure bandage that holds the pad in place without cutting off circulation. Ensure the toes are visible and not too tightly compressed.
Wrapping the Foot: A Mini-Tutorial
To create a secure bandage, start with the Vet Wrap at the top of the chicken’s foot, just below the hock joint. Wrap it down and around the foot, making a “figure-eight” pattern that goes around the hock and over the footpad. This technique prevents the bandage from slipping off. Make sure you can comfortably fit a finger under the wrap to ensure it’s not too tight.
Step 5: Post-Treatment Care
Change the bandage every 2-3 days, repeating the soak and cleaning process. During each change, monitor the foot for signs of improvement, such as reduced swelling and a softening of the scab. Continue this routine until the infection is resolved.
By following these steps, you are giving your chicken the best chance at a full recovery at home. But if the condition worsens, it’s time to consider professional help.
Advanced Bumblefoot: When to Call the Vet
If the foot is very swollen, hot to the touch, or if the chicken is severely lame, it’s time for a vet. Advanced cases of Bumblefoot require professional intervention, often involving a procedure to remove the hardened core of the infection.
What to Expect at the Vet’s Office
A veterinarian will perform a minor surgical procedure, often called “Bumblefoot surgery.” The vet will:
- Administer a local anesthetic to numb the area.
- Surgically remove the hardened “kernel” or “plug” of infection from the footpad.
- Flush the abscess with a sterile antiseptic to remove any remaining pus or bacteria.
- Suture the wound closed if necessary.
- Prescribe a course of oral or injectable antibiotics like Penicillin or Tylosin to kill the remaining bacteria.
Post-Surgical Care and Recovery
After the procedure, the recovery process is just as important as the surgery itself. Your vet will send you home with a course of antibiotics and instructions for daily wound care. This will likely involve removing the bandage every day to clean the wound and apply a fresh dressing, a process that can take a month or more to fully heal. Be prepared for a long recovery, but a successful one with proper care.
With a deep understanding of the problem and its treatment, the next logical step is to prevent it from ever happening again.
Prevention: The Best Way to Treat Bumblefoot
The ultimate goal is to prevent the infection from happening in the first place.
The Role of Roosts and Perches
Ensure your roosts are made of smooth, unpainted wood. A 2×4 with the 4-inch side facing up is often recommended, as it allows your chickens to rest their feet flat, distributing their weight evenly and preventing pressure sores. Avoid thin, round perches, which can lead to footpad damage. Additionally, consider the height of your roosts; anything over 2 feet can cause a high-impact landing that leads to injury.
Coop and Run Safety
Regularly check your coop and run for any sharp objects like splinters, nails, or pieces of glass. Fill in any holes or uneven ground in the run to prevent foot injuries. Consider covering the floor of your coop with a softer material like sand or a thick layer of straw to provide a cushioned surface for walking and landing.
Cleanliness
Keep your coop bedding clean and dry. Wet, mucky bedding can soften your chickens’ footpads and make them more susceptible to cuts and infections. A deep-litter method, where you add a new layer of carbon-rich bedding as the old layer breaks down, can also help keep the coop clean and dry by using beneficial bacteria to break down waste.
Nutrition and Immune Support
A healthy chicken has a strong immune system. A balanced, high-quality diet will help your chicken’s body fight off infections and heal more quickly if an injury does occur. Ensure your birds have access to a complete feed, and provide supplements like Vitamin A and Biotin, which are essential for skin and feather health.
By focusing on these preventative measures, you can create an environment that minimizes the risk of foot injuries and supports your flock’s natural defenses.
Frequently Asked Questions (FAQ)
Q: Is Bumblefoot contagious?
A: The condition itself is not contagious from chicken to chicken. However, the Staphylococcus bacteria is present in the environment and can infect any chicken with a cut.
Q: Can Bumblefoot be transmitted to humans?
A: It is very rare, but Staph bacteria can cause infections in humans. Always wear gloves when treating an open wound on a chicken and wash your hands thoroughly.
Q: Can you eat eggs if a chicken has Bumblefoot?
A: Yes, as long as the infection is localized to the foot and the chicken is not on antibiotics. If a vet prescribes antibiotics, you must observe the specified egg withdrawal period.
Q: How long does it take a chicken to heal?
A: Early-stage cases can resolve in 1-2 weeks with consistent treatment. Advanced cases requiring surgery can take a month or more to fully heal.
Q: How do you know if Bumblefoot is healing?
A: Signs of healing include reduced swelling and redness, the scab shrinking and eventually falling off on its own, and the chicken putting more weight on the foot.
Q: What is the “kernel” in Bumblefoot?
A: The “kernel” or “plug” is a hardened abscess, which is a clump of dead white blood cells, bacteria, and pus that the body has walled off to contain the infection. It’s essentially a solidified core of infection.
Q: Are some breeds more prone to Bumblefoot?
A: Yes. Heavier breeds like Wyandottes, Orpingtons, and Brahmas are more susceptible due to their increased weight, which puts more pressure on their footpads. They also tend to have fluffy foot feathers, which can trap moisture and debris.
Q: Can a chicken survive Bumblefoot without treatment?
A: Early-stage cases may resolve on their own, but more advanced infections will likely not. Without treatment, the infection can spread up the leg, get into the bones (osteomyelitis), and lead to a life-threatening systemic infection.
Q: Does a chicken’s age affect treatment?
A: Yes. Older chickens tend to have a harder time fighting off infections due to a weaker immune system, and their recovery time may be longer.
Conclusion: A Proactive Approach to Healthy Feet
Bumblefoot can be a frightening sight, but it doesn’t have to be a major ordeal. By being a vigilant and proactive chicken keeper, you can spot the signs early, provide simple and effective treatment, and prevent it from ever becoming a serious issue. Taking these steps ensures your flock stays healthy and happy from the feet up.


