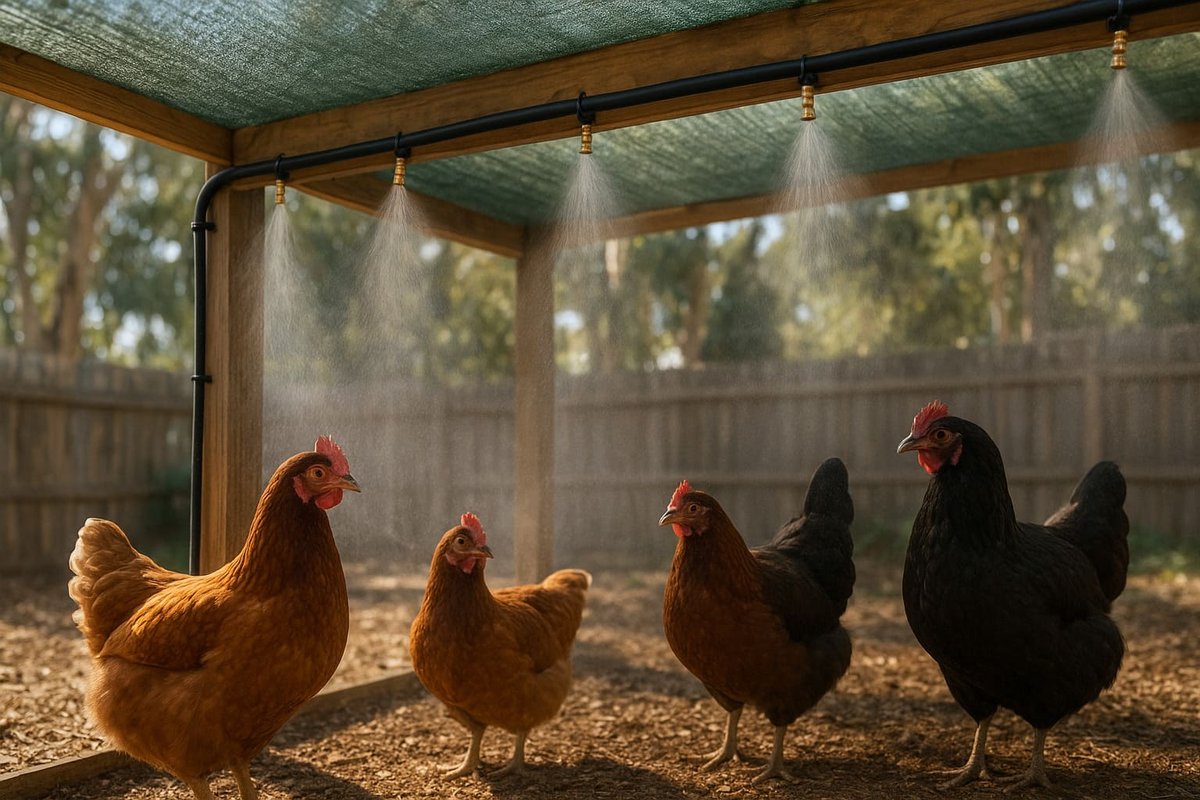
Fair dinkum, the Australian summer can be a shocker. When the mercury climbs past 35°C, it’s not just us feeling the heat. Our backyard chooks are seriously struggling, and keeping chickens cool in summer becomes the biggest challenge for Australian poultry keepers.
For chickens, this kind of heat isn’t just uncomfortable. It’s genuinely dangerous. That’s where DIY misting systems for chicken coops come in as one of the most effective Australian poultry cooling methods available to backyard keepers.
These systems work through evaporative cooling to provide direct relief by allowing water to evaporate from the air around your birds. According to research published by the University of Kentucky’s College of Agriculture, evaporative cooling systems “can be effective at alleviating or preventing poultry heat stress during hot weather” when used in conjunction with proper air movement. The cooling effect is most pronounced in dry climates like Adelaide and Perth, where evaporation occurs rapidly. In humid regions like Brisbane and Darwin, combining misters with fans becomes essential to force evaporation and air movement.
This guide will show you how to build an affordable and effective DIY misting system. I’ve waded through the technical jargon to give you a clear, step-by-step plan. You’ll learn what problems to look out for, how to save water, and exactly what to grab from Bunnings.
My Experience with Misting Systems
I’ve been keeping backyard chickens in Western Sydney for over seven years, and I installed my first DIY misting system after losing two birds to heat stress during a 42°C day. My ISA Browns’ egg production had dropped from 18 eggs per week to just 4 during that heatwave. Since then, I’ve helped a dozen other chicken keepers in the area set up their own systems, and I’ve learned what works and what doesn’t in real Australian conditions.
The difference a simple misting system makes is remarkable. My egg production now stays consistent through summer, and I haven’t lost another bird to heat since installing the system. It cost me under $80 in parts and took about 45 minutes to set up.
Safety Warnings Before You Start
Electrical hazards: Keep misting systems at least 2 metres away from any electrical outlets, heaters, or lighting. Water and electricity don’t mix.
Legionella risk: While extremely rare in cold misting systems, always flush your system for a minute after a week of non-use.
Drowning risk: Never use deep water containers. Chickens can drown in as little as 5cm of water.
Predators: Wet ground can attract snakes seeking water in hot weather. Maintain clear sightlines around your coop and review proper snake-proofing techniques.
Compliance: Consult your local council about any required permits for permanent plumbing installations.
Why Australian Chickens Need Misting Systems
Chickens don’t sweat. Their main way to cool down is by panting, which becomes much less effective when the air temperature climbs too high. According to peer-reviewed research published in the journal Animals, “any environmental temperature higher than 25°C elicits heat stress in poultry,” and the thermoneutral zone for optimal chicken performance sits between 18 and 21°C.
Once temperatures exceed 30°C, most breeds, including popular backyard layers like Australorps and ISA Browns, start to struggle. Understanding heat-tolerant chicken breeds for Australia helps, but even the hardiest birds need cooling support during extreme heat.
Understanding Heat Stress in Australian Climate Zones
Australia’s climate presents unique challenges for chicken keepers, which is why designing coops specifically for Australian hot climates matters so much.
In temperate zones (Melbourne, Sydney, Adelaide): Sudden heatwaves can catch flocks and their owners off guard, leading to sudden drops in egg production. I’ve seen Melbourne keepers lose entire flocks during unexpected 40°C days because they weren’t prepared.
In subtropical and tropical zones (Brisbane, Perth, Darwin): Long, sustained periods of high heat and humidity create a relentless challenge, putting constant stress on your birds throughout summer.
How Hot Is Too Hot for Chickens?
This is one of the most common questions I get from new chicken keepers. Will my chickens be OK in 100 degree weather (about 38°C)? Can chickens survive 110 degree weather (about 43°C)?
According to research from Dine-a-Chook Australia, “anything above 29 degrees Celsius is hot for a chicken and can lead to heat stress.” However, the same source notes that “chickens can be successfully kept cool and healthy during a heatwave even up to 50 degrees Celsius” using the right strategies.
The critical factors are:
Temperature threshold: Heat stress begins around 29 to 30°C. Above 35°C, you need active cooling measures.
Humidity levels: High humidity makes heat far more dangerous. A 35°C day with 60% humidity feels significantly worse than dry heat at the same temperature.
Duration: Sustained heat overnight prevents recovery. When night temperatures don’t drop, chickens can’t cool down and recover.
Individual factors: Older birds, overweight chickens, and heavy-feathered breeds like Orpingtons struggle most.
Behavioural Signs of Heat Stress to Watch For
Chickens will tell you they’re in trouble long before they’re in critical danger. Look for these behavioural indicators:
Panting: This is the most obvious sign. Their beaks will be open, and they’ll be breathing rapidly.
Wing spreading: They’ll hold their wings away from their bodies to try and release heat.
Lethargy: Your normally active chooks will be listless, standing around and not foraging.
Reduced eating and drinking: They’ll lose their appetite, which quickly leads to further health problems. This is dangerous because chickens won’t drink water that’s too warm.
Seeking shade: They will huddle in any small patch of shade they can find and won’t want to move.
Beyond Eggs: The Hidden Costs of Heat Stress
When a chicken is heat-stressed, its health and egg production suffer badly.
Egg production: This is the first thing to go. You’ll see a dramatic drop in the number of eggs.
Egg quality: The eggs you do get will often have thin shells or be misshapen.
Reduced fertility: If you have a rooster, his fertility can be significantly reduced by heat.
Poor growth: Young birds won’t grow as fast or as healthy during periods of high heat.
Weakened immune system: Heat stress makes your entire flock more vulnerable to other illnesses and parasites.
Cost-Benefit Analysis: Is a Misting System Worth It?
A basic DIY chicken waterer with mist can cost you less than $50 to $80 in parts. But what’s the real return? Let’s look at the numbers for a typical 6-hen flock, especially when compared to the overall startup costs for Australian chicken keeping.
Return on Investment: Real Numbers
| Scenario | Without Misting | With Misting ($75 system) | Annual Savings |
|---|---|---|---|
| Egg production loss (6 hens, 4-week summer drop) | Lost 168 eggs (@$0.80/egg) = $134.40 | Lost 40 eggs = $32 | $102.40 |
| Heat stress mortality (average 1 bird @ $35) | $35 replacement cost | $0 | $35 |
| Veterinary intervention | $120 average vet visit | $0 | $120 |
| Water costs (timer vs. no system) | N/A | $15/summer | -$15 |
| Total First-Year Net Benefit | $242.40 |
The system pays for itself in the very first summer and provides ongoing savings. Over a 5-year lifespan, you’re looking at over $1,200 in value from saved eggs, healthier birds, and avoided vet bills.
Common Problems with Misting Systems and How to Fix Them
Before you race off to the hardware store, it’s smart to know the common traps. I learned a few of these the hard way. A misting system is fantastic, but it’s not a set and forget solution.
What Is the Common Problem of a Mist System?
The number one problem, without a doubt, is nozzle clogging. Those tiny brass or plastic holes are what create the mist, but they get blocked easily.
The cause: Mineral buildup from hard water, particularly calcium deposits and limescale, is the leading cause of nozzle clogging. This problem is particularly severe in Adelaide and Perth, which have some of Australia’s hardest water. For Adelaide residents in particular, where tap water has exceptionally high mineral content, nozzle cleaning every 2 to 3 weeks is essential rather than optional.
The fix: We’ll cover this in the maintenance section, but the solution involves two key things: installing an inline filter from day one and a regular cleaning schedule with white vinegar.
Do Misters Waste a Lot of Water?
This is a big concern for water-conscious Aussies, especially with water restrictions.
The answer: No, not if you use quality nozzles and a timer. A quality misting nozzle uses approximately 7.5 litres per hour. For a 10-nozzle system running continuously, that’s 75 litres per hour.
In perspective: With a timer set to run 15 minutes per hour during peak heat (from 11 AM to 4 PM), your actual usage is only 18 to 20 litres per hour. These water-saving misting systems for chickens are far more efficient than a garden sprinkler, which can use that much in 15 minutes.
How to Maximise Water Efficiency
To be a good water-wise citizen and keep bills down:
Use a timer: This is the most important tip. You don’t need the misters running all day. An automatic tap timer set to run for 10 to 15 minutes every hour during peak heat is far more effective and efficient.
Use fine nozzles: Choose nozzles specifically designed for misting, not spraying. They use less water and create a finer mist that evaporates better.
Check for leaks: A slow drip from a poorly-fitted connector can waste a surprising amount of water over a summer.
The Disadvantages of Misting and How to Prevent Them
If used incorrectly, misters can cause problems. But here’s the good news: every single one is preventable.
Problem 1: Too Much Humidity and Respiratory Issues
Misters work best when the water can evaporate. In very humid climates (hello, Brisbane in January), the water doesn’t evaporate as well. This can make the air feel muggy and sticky, and in a poorly ventilated coop, it can lead to respiratory health problems. This is a sign you have issues with your proper coop ventilation requirements.
Prevention: Never run misters inside a closed coop. Always place them in a well-ventilated run, and consider pairing them with a fan in humid areas to force evaporation.
Problem 2: Wet Bedding and Disease
This is a big one. You want to mist the air, not the floor. Wet bedding like straw or wood chips is a breeding ground for mould, bacteria, and coccidiosis.
Prevention: Place your misters on the outside of the coop or high up in the run, pointing away from the bedding. Aim for a curtain of mist, not a shower.
Problem 3: Wetting the Chickens
A light mist is fine, but you should never soak your chickens. A wet chicken can’t regulate its body temperature properly and can, ironically, overheat or get chilled.
Prevention: Give them a cool-down zone with misters, but make sure they have a dry area to escape to. Let them choose.
Problem 4: Pest Attraction
Standing water or constantly damp ground can attract flies and mosquitoes, which can be carriers for diseases like fowl pox.
Prevention: Again, a timer is your best friend. Allowing the ground to dry out between misting cycles prevents it from becoming a swampy, pest-filled mess.
DIY Misting System Materials and Costs
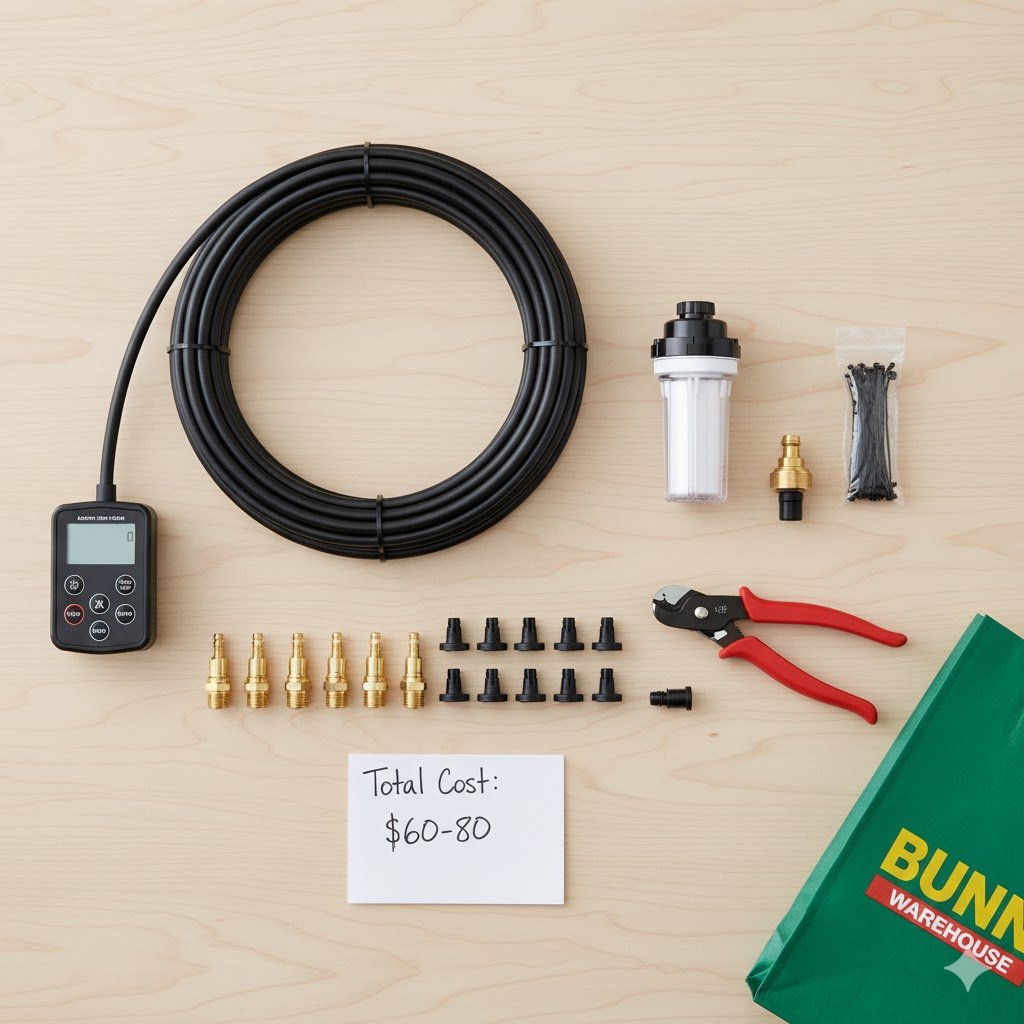
Everything you need for a complete 10-nozzle misting system costs $60 to $80 from Bunnings and can be assembled in under an hour.
Note: Prices listed are indicative only. Check the current Bunnings catalogue or website for latest pricing.
Here’s your shopping list. You can get all of this from Bunnings, a local rural supply store, or an online irrigation shop. This build assumes you’re connecting to a standard garden tap.
| Material | Approximate Cost | Purpose |
|---|---|---|
| 1/4″ (or 6mm) Irrigation Tubing (15m) | $15 to $20 | The main water line |
| Misting Nozzles (Brass or Plastic) | $2 to $3 each | Creates the mist (get a few spares) |
| Misting ‘Tee’ Connectors | $1.50 to $2 each | Holds the nozzles |
| 1/4″ Tap Adapter | $5 to $7 | Connects the tube to your tap/hose |
| 1/4″ Inline Water Filter | $10 to $15 | CRITICAL for nozzle life |
| Tube Cutters or Sharp Scissors | $5 (or use your own) | Clean cuts prevent leaks |
| End Plugs or Elbows | $2 to $3 | To cap off the end of the line |
| Cable Ties or Mounting Clips | $5 | To secure the tubing |
| Optional: Automatic Tap Timer | $30 to $60 | Highly recommended for efficiency |
Total DIY Cost: For a 10-nozzle system, you’re looking at $60 to $80.
Commercial Kit Cost: A similar pre-built kit often starts at $150 and can go up to $500 or more.
You’re saving a packet by doing it yourself, and it’s a genuinely simple project.
Where to Buy: Australian Retailer Comparison
| Retailer | Pros | Cons | Price Range |
|---|---|---|---|
| Bunnings | Complete range, price match guarantee | Can be crowded in summer | $$ |
| Rural Co / Elders | Specialized poultry supplies | Limited metro locations | $$ to $$$ |
| Irrigation Warehouse | Professional-grade components | Online only (shipping delays) | $$$ |
| Amazon Australia | Fast delivery, variety | Quality varies wildly | $ to $$$ |
Commercial Alternatives: When DIY Isn’t Your Style
If building your own system doesn’t appeal to you, ready-made poultry misting systems are available. Products like CoopCOOL (from the US) are designed specifically for chicken coops, with users reporting reduced stress and increased egg production from their flocks.
However, at $150 to $300 or more compared to $60 to $80 for DIY, the cost savings of building your own system are substantial. Commercial systems do offer convenience and often include built-in timers with programmable intervals (such as seconds per hour settings), but the components are essentially the same as what you’d buy separately.
Professional terrarium misting systems like MistKing can also be adapted for chicken coops. These high-pressure systems produce extremely fine mist through specialised nozzles that atomise water into tiny droplets. While they’re excellent products, they’re generally overkill for a backyard chicken setup and cost significantly more than a simple DIY solution.
For most Australian backyard chicken keepers, the DIY approach offers the best balance of cost, effectiveness, and customisation.
Choosing the Right Parts: A Deeper Dive
Nozzles: Brass vs. Plastic
Plastic: Cheaper upfront, but they can clog more easily and degrade in the harsh Aussie sun.
Brass: A few dollars more, but they last much longer, are easier to clean, and often produce a finer mist. For hard water areas, brass is the clear winner.
High-Pressure vs. Low-Pressure Systems
Most DIY systems run on standard household water pressure (low-pressure), which works perfectly well for backyard coops. High-pressure systems use a pump to force water through smaller nozzle openings, creating an ultra-fine mist that evaporates almost instantly.
High-pressure systems are more effective in humid conditions because the smaller droplets evaporate faster, but they’re also more expensive and complex to install. For most Australian backyards, standard pressure is sufficient. If you’re in tropical Darwin or coastal Queensland, a high-pressure system might be worth considering, but start with a basic setup first and upgrade if needed.
Tubing: 1/4″ (6mm) Is Best for DIY
You’ll see 1/2″ (13mm) tubing, but this is overkill for a backyard coop. The 1/4″ tubing is flexible, cheap, easy to cut, and maintains good pressure for misting.
The Inline Filter (Don’t Skip This!)
I know it’s tempting to save $10, but don’t. This little filter screws in right at the tap and stops 99% of the gunk that will clog your nozzles. This one part will save you hours of frustrating maintenance, especially in Adelaide, Perth, and other hard water areas.
Step-by-Step Installation Guide
This should take you less than an hour.
Step 0: Safety and Planning First
Plan your run: Walk the path of the tubing from the tap to the coop. Make sure it won’t be a trip hazard.
Avoid electrics: Make sure your misting line is nowhere near any electrical outlets, lights, or electric-fence wiring. Water and electricity don’t mix.
Turn off the tap: Obvious, but important.
Step 1: Connect to Water
Start at your garden tap or hose.
- Screw on your tap adapter.
- Attach the inline water filter to the tap adapter. This is your best defence against mineral buildup.
- Push your 1/4″ tubing firmly into the other end of the filter.
Pro tip: If the tubing is stiff, dip the end in a cup of hot (not boiling) water for 10 seconds. It’ll soften up and slide on much easier.
Step 2: Run Your Main Line
Unroll the tubing and run it from the tap to your planned cool-down zone. Don’t pull it super-tight; leave a little slack. Secure it loosely with cable ties or clips as you go.
Step 3: Cut and Install Tee Connectors
This is where you’ll place your nozzles.
- At the spot for your first nozzle, use your cutters to make a clean, straight cut in the tubing. An angled cut will cause leaks.
- Firmly push the tee connector into both ends of the cut tube. You should feel it pop into place.
- Repeat this every 50 to 60cm along the line. A fellow chicken keeper in Perth told me this spacing gives great coverage without soaking the ground.
Step 4: Install Nozzles and End Cap
- Once all your tees are in, go to the end of the line. Cut any excess tubing and push an end plug (or an elbow if you’re turning a corner) firmly into the last tee.
- Screw one misting nozzle into each of the tee connectors. Hand-tight is fine.
Step 5: Flush and Test
Before you turn it on full-blast, turn the tap on just a little. Let the water fill the tube and trickle out the nozzles. This pushes out any dust from the cutting process. Once it’s flushed, turn the tap on fully. Check for leaks. If a connector is dripping, it’s usually because the tube wasn’t pushed in all the way or the cut wasn’t clean.
Step 6: Secure and Aim
Go back and tighten your cable ties. The best part? You can aim the nozzles. Point them away from the coop itself, creating a fine curtain of mist that the breeze can drift through.
Critical Placement: Where to Install Your Misters
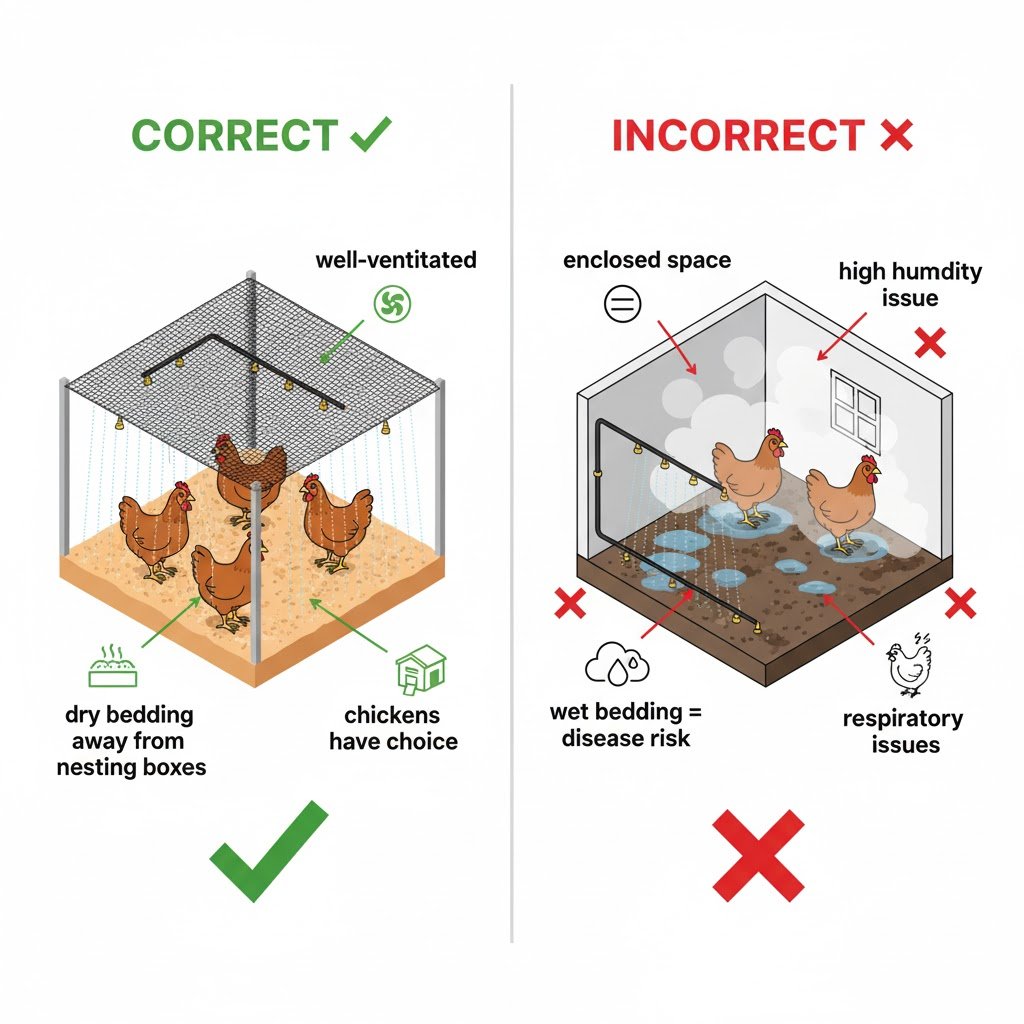
This is the most important part of the installation.
Best location: In a shaded, well-ventilated part of the run. Under the eaves or along a fence line is perfect. This creates a cool-down zone that chickens can choose to enter.
The No-Go Zones
Never install misters in these spots:
Inside the enclosed coop: This is a recipe for high humidity, wet bedding, and respiratory illness.
Directly over the nesting boxes: Hens need a dry, private, safe place to lay.
Directly over the feeder: You’ll turn their food into a soggy, mouldy mess.
Directly over their dust bath: You’ll just make mud, and chickens need their dry dust bath to control mites.
I’ll be honest. The first time I installed one of these, I put the nozzles way too close to the nesting boxes. Came out the next morning to soggy bedding and very unimpressed hens. Live and learn, yeah? That’s why I’m spelling this out for you.
Alternative Cooling Methods for a Multi-Layered Strategy
A misting system is fantastic, but it works best as part of a complete summer chicken coop cooling plan. Learn more about keeping chickens cool in summer for a comprehensive approach.
Shade: The Unsung Hero
There’s no way around it. Your chooks need shade. Full stop.
Natural: Trees and large bushes are the best.
Artificial: A simple shade cloth is a great option. We have a guide to choosing the right shade cloth you can follow.
Ventilation: Let the Hot Air Out
Hot air rises. A stuffy coop becomes an oven.
Vents: Your coop must have vents up high, near the roof, to let hot air escape. Cover them with 1/4″ wire mesh to keep predators out.
Fans: A simple outdoor or shed fan (safely secured and with cables out of reach) can be a lifesaver in a well-ventilated run.
Cool Water and Icy Treats
Waterers: Get a second waterer. Place them all in the shade. Chickens won’t drink hot water, so keeping their water cool during extreme heat is critical.
Ice blocks: Add big blocks of ice to their waterers.
Frozen treats: Freeze corn, peas, or berries in an old ice-cream container of water. They’ll love pecking at it.
Kiddie Pools and Wading
Chickens cool down through their feet. A shallow kiddie pool with just 2 to 5cm of water (any deeper can be a drowning risk) is a perfect way for them to cool off.
What Is the Best Thing to Put on the Ground in a Chicken Run?
During extreme heat, your ground material matters. Moist soil or mulch are the best options for chickens in a heatwave because they stay cooler than concrete or bare earth. Avoid heavy litter like straw in heatwaves as it traps heat.
Using Misters for Coop Pre-Cooling
One technique I’ve found effective is running the misting system for 10 to 15 minutes before the hottest part of the day to pre-cool the area around the coop. This is similar to how some people use misting systems to pre-cool air conditioning units. By lowering the ambient temperature in the run before peak heat hits, your chickens start from a cooler baseline and cope better throughout the afternoon.
Maintenance and Troubleshooting
Look, I know maintenance sounds like a chore, but we’re talking 10 minutes a month here, maximum. A chicken coop misting system maintenance schedule is simple but vital to keep it from clogging.
Monthly Maintenance (or Every 2 to 3 Weeks in Hard Water Areas)
Clean nozzles: Unscrew the blocked nozzles. Soak them for 30 minutes in a cup with a 50/50 mix of white vinegar and water. Use a very small brush (like an old toothbrush) to gently clear any remaining calcium deposits. Rinse them in clean water and screw them back in.
Check filter: Unscrew the inline filter housing. Pull out the little mesh screen, rinse it under the tap, and pop it back in.
End of Season Winterising
Drain: Disconnect the system from the tap. Unscrew the end plug and let all the water drain out.
Purge: If you have an air compressor, gently blow air through the line to get every last drop out.
Store nozzles: Unscrew the brass nozzles and store them indoors in a small jar so they don’t corrode or get blocked by spiders.
Troubleshooting Table
| Problem | Likely Cause | Solution |
|---|---|---|
| Nozzles squirting not misting | 1. Clogged nozzle 2. Low water pressure | 1. Clean the nozzle with vinegar 2. Check tap is fully on, check filter isn’t blocked |
| Leaking from connectors | 1. Tube not pushed in fully 2. Tube cut at an angle | 1. Push tube in harder 2. Re-cut the tube end straight and re-insert |
| Mist is making the ground soggy | 1. Running it for too long 2. Leaks | 1. Use a timer, run for 10 mins on, 30 mins off 2. Check for leaks |
| System is leaking at the tap | 1. Worn tap washer 2. Tap adapter isn’t on straight | 1. Replace the washer in your tap 2. Unscrew the adapter, add plumber’s tape, and re-screw |
Complete Maintenance Calendar
Weekly (During Operating Season):
- Visual check for leaks at all connections
- Verify all nozzles are misting properly
- Check water supply pressure
Monthly (or every 2 to 3 weeks in hard water areas):
- Soak clogged nozzles in vinegar solution for 30 minutes
- Clean inline filter screen
- Inspect tubing for UV damage or cracking
- Test timer function
End of Season (March/April):
- Complete system drain
- Remove and store brass nozzles indoors
- Flush lines with compressed air if available
- Inspect all rubber seals for wear
- Store timer in dry location
Start of Season (October/November):
- Reinstall nozzles
- Check all connections for winter damage
- Replace inline filter if discoloured
- Test full system before first heatwave
- Verify timer programming
Australian-Specific Considerations
Running a misting system down under comes with a few extra things to keep in mind.
Climate Zone Installation Variations
Tropical (Darwin, Cairns): High humidity year-round means evaporative cooling is less effective. You must combine misters with high-velocity fans to force evaporation. Risk of respiratory issues is high if ventilation is poor. Run misters for shorter intervals (5 to 10 minutes) with longer breaks.
Subtropical (Brisbane, Gold Coast): Humid summers reduce misting effectiveness. Install larger ventilation openings in coops. Monitor for mould in bedding more frequently and be prepared for dehumidifying periods between misting cycles.
Temperate (Sydney, Melbourne, Adelaide): These are ideal conditions for misting systems. Dry heat means maximum evaporative cooling. You can run longer intervals during heatwaves. Winter winterisation is essential to prevent pipes from cracking.
Arid (Central Australia, Western NSW): Extremely effective due to very low humidity. Water conservation is critical so use efficient nozzles and a timer. You must also protect the plastic tubing from intense UV degradation by running it under eaves or using UV-resistant clips.
Water Restrictions Compliance
Before installing your misting system, check your local water authority’s current restrictions. Most Australian water authorities permit automated watering systems on timers even during Level 2 restrictions, provided they operate during approved hours. Sydney Water and Melbourne Water both have guidelines for irrigation systems that typically apply to misting setups.
Pests and Predators
A damp area can be attractive to more than just chooks.
Mosquitoes: Use a timer to ensure the ground dries out, preventing mossies from breeding.
Snakes and frogs: In summer, snakes are looking for water. Keep the area around your coop mowed and clear of junk so they have nowhere to hide.
Heat Tolerance of Different Breeds
Not all chickens are created equal. Choosing the right breeds for hot climates is your first line of defence.
Heat-tolerant: Lighter-bodied, Mediterranean breeds like Leghorns and Minorcas tend to cope better. Australorps, despite being Australian-bred, can struggle in extreme heat due to their dark feathers.
At-risk: Heavy, fluffy heritage breeds like Orpingtons, Sussex, and Wyandottes will suffer the most. If you have these breeds, a cooling system is critical.
Frequently Asked Questions
How much water does a DIY misting system use?
Very little. A typical misting nozzle uses about 7.5 litres per hour. A 10-nozzle system running for an hour uses about 75 litres. If you put this on a timer to run for 10 minutes every hour during peak heat, your actual usage is only about 12.5 litres per hour. It’s incredibly efficient compared to other cooling methods.
Do misters help chickens stay cool?
Yes, absolutely. Misters can lower the ambient air temperature by 5 to 15°C through evaporative cooling, with temperature drops of up to 20°C possible under ideal dry conditions. This creates a cool zone where chickens can escape the heat. According to industry research, misters are highly effective for poultry keepers, as they can reduce heat stress mortality and improve overall flock health and egg production.
Will misting systems work in humid Queensland weather?
Misters work by evaporative cooling, where the water turns from liquid to gas and absorbs heat from the air. In high humidity (like coastal Queensland), evaporation is slower, so the cooling effect is reduced. The mist will still provide some cooling, but the main risk is just making the air wetter. In Brisbane, it’s better to combine misters with a big fan to force evaporation and ventilation.
What’s the best time to run misters in Australia?
Only during the hottest part of the day. There’s no point running them on a cool morning. A timer control is the best investment. Set it to come on from about 11 AM to 4 PM on hot days. Even better, get one that lets you set intervals (such as 10 minutes on, 20 minutes off) to keep the air cool without wasting water or soaking the ground.
How do I prevent Legionella in my misting system?
The risk in a simple, cold-water garden system is extremely low. Legionella bacteria prefer warm, stagnant water between 20 and 45°C. Your tap water is too cold, and the system is flushed with fresh water every time you use it. To be extra safe, just run the system for a minute or two away from the coop to flush the line if it hasn’t been used in a few days.
Can I use tank or rainwater in my misting system?
Absolutely. Rainwater is actually better for your nozzles as it’s soft and has no calcium deposits. However, tank water often has more physical debris like dust, pollen, and mosquito larvae. You must install a good quality inline filter between the tank and the misting tube, and you may need to clean this filter more often.
How hot is too hot for live chickens?
Chickens start experiencing heat stress at around 29°C (85°F). Above 35°C (95°F), you need to take active steps to cool your flock. At temperatures above 40°C, chickens are at serious risk without intervention. However, with proper cooling measures including shade, ventilation, cool water, and misting systems, chickens can survive even 45°C days.
Can chickens survive 100 degree weather (38°C)?
Yes, but only with proper support. At this temperature, chickens need shade, unlimited cool water, good ventilation, and ideally a misting system or other active cooling. Without intervention, heat stress mortality becomes a real risk, especially for heavy breeds and older birds.
How to keep a chicken coop from getting too hot?
The key strategies are: ventilation (hot air rises, so vents near the roof are essential), insulation (keeps the sun’s heat out), shade (both natural and artificial), light-coloured roofing (reflects heat), and active cooling like misting systems or fans. Never seal a coop completely in summer.
Will my chickens be OK in 100 degree weather?
They can be, if you take proper precautions. Provide multiple water stations with ice, ensure complete shade coverage, install a misting system, improve ventilation, and monitor your birds closely for signs of heat stress. If you see panting, wing spreading, or lethargy, act immediately.
Should I buy a commercial misting system or build my own?
For most backyard chicken keepers, DIY is the way to go. You’ll save $70 to $220 compared to commercial systems, and the components are identical. Commercial systems like CoopCOOL offer convenience and often include sophisticated timers, but you’re paying a premium for packaging and branding. If you’re comfortable with basic DIY projects, building your own is straightforward and takes under an hour.
Final Thoughts
Building one of these DIY misting systems for chicken coops in Australia is a simple weekend project that will make a massive difference to your flock’s health and happiness. For a small cost and a bit of time, you can provide serious relief from the brutal Aussie heat, keep your hens laying, and prevent the heartbreak of heat stress.
Remember the keys to success: use a filter, place the misters in a shaded run area (not in the coop), and use a timer to save water. Your chooks will thank you for it.
Got a question or a tip for fellow Aussie chicken keepers? Drop a comment below!

Oladepo Babatunde is the founder of ChickenStarter.com. He is a backyard chicken keeper and educator who specializes in helping beginners raise healthy flocks, particularly in warm climates. His expertise comes from years of hands-on experience building coops, treating common chicken ailments, and solving flock management issues. His own happy hens are a testament to his methods, laying 25-30 eggs weekly.