Last Updated: October 12, 2025 Last Reviewed for Accuracy: October 12, 2025
So, how much ventilation does a chicken coop need? Over my 8 years of raising chickens—during which I’ve designed and built three coops from scratch and managed flocks in climates ranging from cold Midwest winters to the humid heat of Lagos—I’ve learned the answer depends heavily on the season. Here are the core requirements:
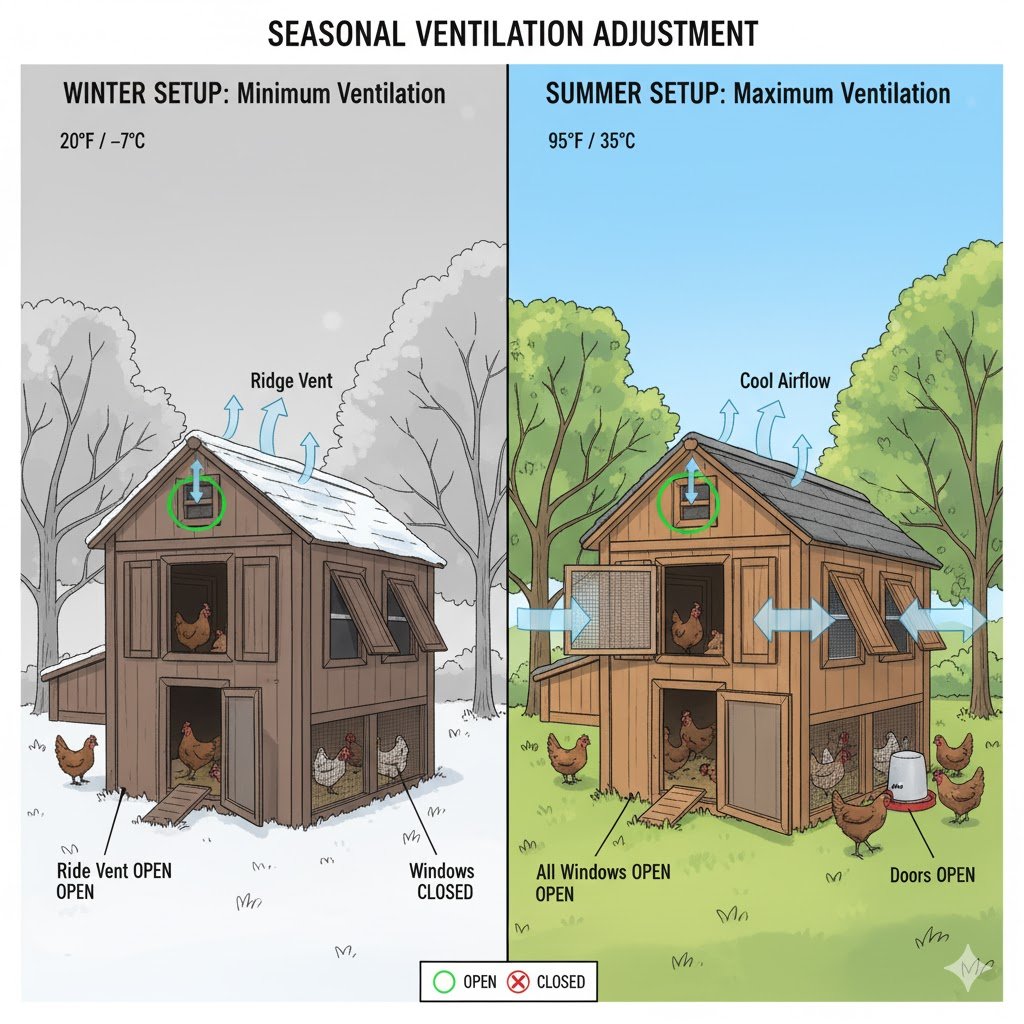
- Winter Ventilation Requirement: A typical backyard chicken coop needs a minimum of 3-4 square feet of total ventilation during cold weather, including the pop door. For a small flock of 4-6 birds, this equals roughly 0.5-1 sq. ft. per chicken.
- Summer Ventilation Requirement: During hot weather, the goal shifts to providing the maximum possible ventilation through large windows, doors, and vents to promote cross-ventilation and prevent heat stress.
It’s a topic I’m frequently asked about, both in online forums and at local poultry club meetings. This guide is regularly reviewed to ensure the advice remains current and reliable. Many of us have struggled with this balancing act. Too little air and you’re dealing with ammonia and sick birds; too much and you risk cold stress and frostbite. This guide breaks down the exact measurements, placement strategies, and seasonal tweaks to keep your flock healthy and happy, no matter the weather.
Ventilation at a Glance: Seasonal Strategies
| Season | Minimum Ventilation Amount | Primary Goal & Key Strategy |
|---|---|---|
| Winter | 3-4 sq ft total (including pop door) | Moisture Removal: Use high vents (ridge, soffit, gable) to exhaust humid air while protecting roosts from drafts. |
| Summer | Maximum Possible | Heat Removal: Create cross-ventilation by opening large windows and doors on opposite sides of the coop. |
Understanding Why Your Coop Needs to Breathe
Before you can determine how much ventilation a chicken coop needs, it’s crucial to understand what good ventilation actually does. As University of Kentucky poultry extension specialists explain, the main function is to maintain oxygen levels while removing moisture, odors, and dust. Think of it as your coop’s respiratory system—it’s a system of fresh air exchange that breathes in clean air and exhales stale, humid air. This constant air circulation is your best defense against two major threats to your flock’s health: moisture and ammonia.
The Science Behind the Stink (Moisture and Ammonia)
You’d be surprised how much moisture chickens release. According to poultry specialists at Penn State Extension, a flock of 10 large-bodied birds like my Buff Orpingtons can put over a gallon of water into the air every single day! Without an escape route, that humid air cools and leads to condensation on every surface inside.
- Moisture Dangers: In winter, this is a recipe for nasty frostbite on combs and wattles. Effective moisture control is critical for frostbite prevention, and as documented by the Poultry Extension Network, frostbite is most likely in a cold, damp, poorly ventilated coop. Year-round, it creates a damp, gross environment perfect for mold, mildew, and bacteria, which is terrible for your flock’s respiratory health.
- Ammonia Dangers: As chicken droppings break down, they create an ammonia buildup. Research on ammonia toxicity in poultry shows that exposure to 20-25 ppm can result in tissue damage and increased susceptibility to disease, while chickens naturally prefer environments with ammonia levels under 11 ppm. At high levels, it can cause blindness and is even fatal.
Proper airflow physically shoves that moisture- and ammonia-filled air out of the coop while pulling fresh, dry air in.
The Nasty Health Risks of Stale Air
Beyond just being unpleasant, poor air quality leads directly to serious illnesses. According to peer-reviewed poultry respiratory disease research, respiratory syndromes arise from complex interactions between pathogens and environmental factors like poor air quality. Conditions like Mycoplasma gallisepticum (MG), Infectious Bronchitis (IB), and Chronic Respiratory Disease (CRD) are often triggered or made worse by high ammonia and humidity management issues. A well-ventilated coop is your first and most powerful line of defense against a chicken respiratory infection.
Chicken Coop Ventilation vs Draft: The Most Important Difference
If you take one thing away from this guide, let it be understanding chicken coop ventilation vs draft. They are not the same thing. I learned this the hard way back in 2019 when a poorly placed low vent caused my flock of Wyandottes to huddle in a corner, stressed and chilled.
- Ventilation is the slow, steady, gentle exchange of air, ideally happening high above where your chickens are roosting on their roosting bars. It’s all about air quality.
- A draft is a focused, chilling stream of cold air blowing right on your birds. Drafts are the enemy, especially at night, as they can quickly lower a chicken’s body temperature, causing stress and illness.
The golden rule we all live by is: Ventilation high, chickens low. This simple principle ensures stale air gets out without blasting your flock with cold air.
Now that you know the “why” behind it all, let’s figure out exactly how much you need.
How Much Ventilation Does a Chicken Coop Need in Winter?
During cold weather, the main challenge is providing enough ventilation for a chicken coop in winter without creating drafts. Your goal is humidity management while holding onto some warmth. It’s a common mistake to seal up a coop completely. A sealed coop is a wet coop, and as poultry experts from the University of Minnesota Extension emphasize, a wet coop is far more dangerous than a cold one. According to University of Arkansas extension poultry experts, coops must be well-ventilated even in frigid temperatures to remove moisture and prevent ammonia. For a complete guide, see how to winterize your chicken coop.
Why Less is More in Winter
Chickens are like little feathered furnaces; they generate a surprising amount of body heat. This warm air naturally rises, taking moisture with it. Vents placed up high give this warm, moist air an escape route, which in turn creates a slight negative pressure that gently pulls in fresh, cold, and—most importantly—dry air from outside. This natural process, called convection or passive ventilation, is a beautiful thing, and it’s why high vents are so effective.
Quick Tips for Winter Ventilation
- Keep Vents Clear: Make a habit of checking that your high vents aren’t buried in snow or blocked by ice.
- Use Adjustable Covers: Build simple sliding covers or vent covers for larger vents. This lets you shrink the opening size on the coldest nights without sealing them off entirely.
- The Deep Litter Method: While using the deep litter method helps manage moisture, it’s a partner to good ventilation, not a replacement for it. Using barn lime in the chicken coop can also help keep things dry.
Getting winter right is all about managing that moisture. As the seasons change, however, your strategy will do a complete 180.
Summer Ventilation: Open Everything Up!
In hot weather, the principle is simple: you want as much air circulation as you can possibly get. The question of how much ventilation a chicken coop needs shifts from “enough” to “as much as physically possible.” Can chickens overheat in a coop? Absolutely. According to Mississippi State University Extension, chickens begin to suffer from heat stress at temperatures above 85°F (29°C), especially in high humidity, making constant air movement critical. The name of the game is preventing heat stress. Your coop should feel breezy and fresh, never hot and stuffy.
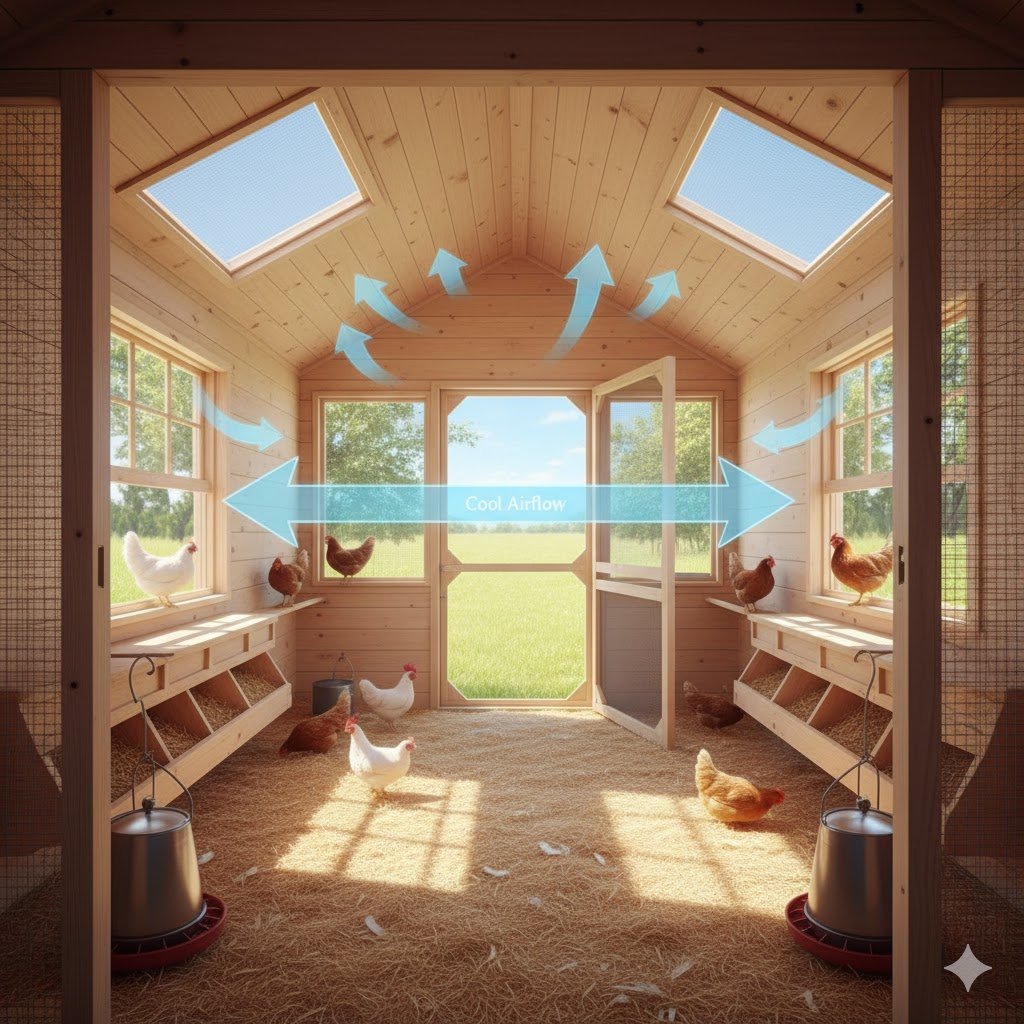
The Magic of Cross-Ventilation
The single most effective summer strategy is cross-ventilation. This means having large openings (think windows or big panels of hardware cloth) on opposite sides of the coop. This design allows even the faintest breeze to flow through the entire building, flushing out hot air and providing a wonderful cooling effect. For my 10×10 coop, I have large, hardware-cloth-covered windows on three of the four walls, which keeps the air moving for my mix of Leghorns and Australorps even on still, scorching days. (You can see a photo of my setup below).
Strategies to Beat the Heat
- Maximize Airflow: Open every single adjustable vent, window, and door. A secure screen door on a walk-in coop is a fantastic addition.
- Provide Shade: The best place to put your chicken coop is somewhere with afternoon shade. A well-placed deciduous tree is perfect, as it provides summer shade but lets the winter sun shine through.
- Cool Water is a Must: Always have fresh, cool water available. Tossing a few ice blocks into the waterer on a hot afternoon is a welcome treat.
- Dust Baths: A shady, cool spot for a dust bath lets chickens cool themselves down naturally.
Knowing where to put those openings is what makes your system truly work.
Where to Put Ventilation in a Chicken Coop
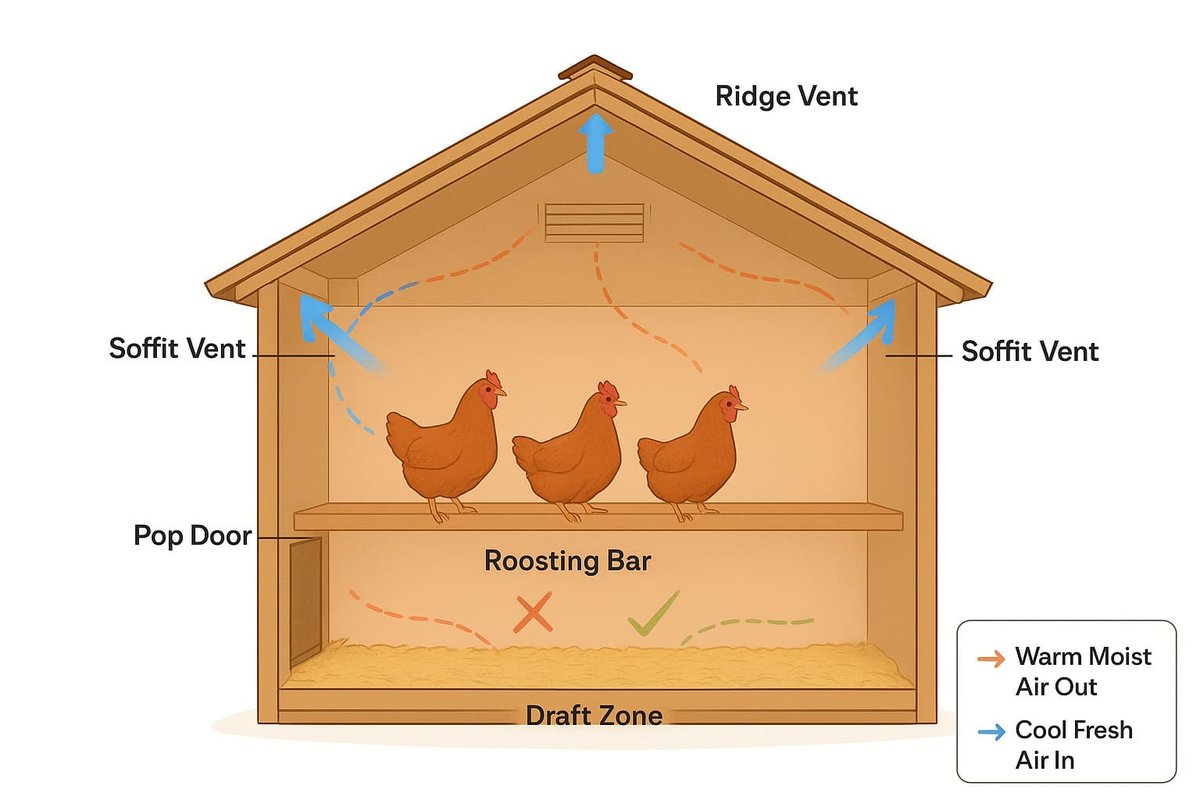
Vent placement is every bit as important as size. Putting vents in the wrong spot is how you create those harmful drafts we talked about. (Refer to the chicken coop ventilation diagram below for ideal vent locations).
- High is Best: Always, always, always place vents above the level of your roosting bars. Warm, moist air rises, so vents near the coop ceiling or roofline are in the perfect position to kick it out.
- Ridge and Soffit Vents: In my opinion, the combination of soffit vents (under the eaves) and ridge vents (at the very peak of the roof) is the gold standard. It creates a natural chimney effect that pulls fresh air in low and pushes stale air out high. It’s unbeatable.
- Gable Vents: Vents placed on the gables (the triangular part of the wall under a pitched roof) are great for cross-ventilation and are pretty easy to install.
- Avoid Low Vents: Any vent placed low on the walls near the floor is just asking to create a draft, especially on your flock while they’re sleeping.
With your vents correctly placed, you can now play detective.
How Do I Know If My Chicken Coop Has Enough Ventilation?
So how do you know if you’ve got it right? Your coop will give you some very clear signals.
The Sniff Test: Your Nose Knows
Your nose is your most reliable tool. If you open the coop door in the morning and get blasted with a sharp, eye-watering ammonia smell, you absolutely need more ventilation. A healthy coop should smell earthy, and learning how to keep a chicken coop from smelling is key to flock management.
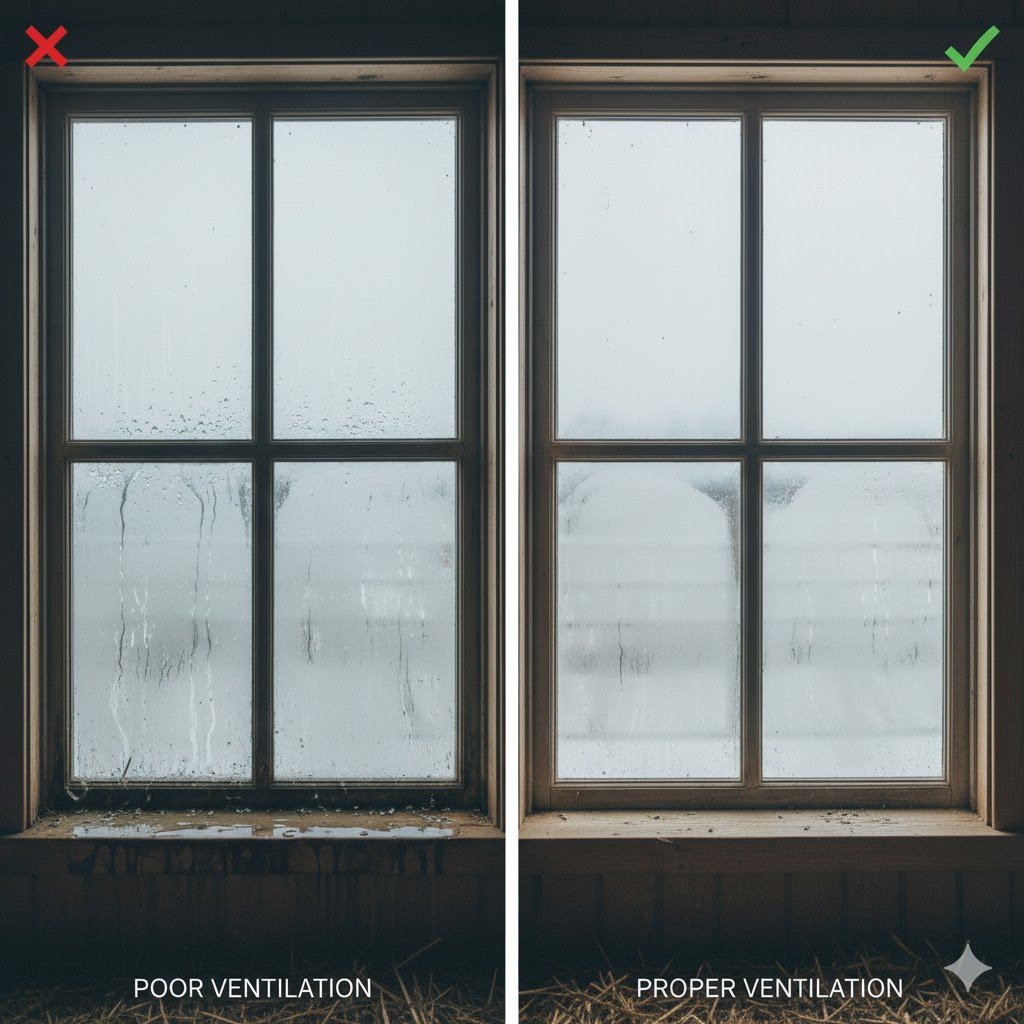
The Sight Test: Look for Condensation
Look for moisture. On a cold morning, check the inside of your windows. Is there condensation? (See the image for an example of heavy window condensation). Run your hand along the walls and ceiling. If they feel damp or slick, you have a humidity problem, and that means you need more airflow.
The Flock Test: Watch Your Chickens
- Not Enough Air: Are your chickens frequently coughing, sneezing, or showing signs of bubbly eyes? That’s a classic sign of poor air quality. A regular chicken health check can help you spot these signs early.
- Too Much Air (Drafts): Are your chickens huddling together during the day when the weather is mild? I once saw frostbite on a rooster’s comb tips, and it was because a small, unnoticed gap near the roosts was creating a terrible draft.
Once you’ve diagnosed the problem, the solution is usually straightforward.
12 Practical Chicken Coop Ventilation Ideas
You don’t need a fancy system. Here are some effective and easy chicken coop ventilation ideas to get the air moving:
- Ridge and Soffit Vents: The most effective passive system out there.
- Gable Vents: Simple to install—just cut a hole and cover it with hardware cloth.
- Wall-Roof Gap Vents: Leaving a 1-inch gap where the tops of the walls meet the roof (covered with hardware cloth, of course) provides amazing airflow.
- Circular Hole Vents: A 2-inch hole saw creates perfectly sized vents for small coops under 50 square footage.
- Adjustable Windows: Cover your windows with hardware cloth. That way, you can leave them open for fresh air without inviting predators in.
- Screen Doors: A game-changer for walk-in coops in the summer.
- Pop Door: The chicken entrance itself is a source of ventilation.
- Hardware Cloth Panels: For maximum summer airflow, replace entire sections of solid wall with predator-proof hardware cloth.
- Floating Roof Designs: A coop design where the roof is slightly raised above the walls.
- Removable Flaps: Create simple hinged flaps over vents that you can prop open or close depending on the season.
- Cross-Ventilation Windows: The simple act of placing windows on opposite walls to create a breeze.
- Wind Turbines: A spinning roof vent that actively sucks stale air out.
While these passive methods are fantastic, some climates just need a little extra help.
Should You Have a Fan in Your Chicken Coop?
A chicken coop ventilation fan can be a real lifesaver in hot, humid climates where the air just doesn’t move. But let’s be clear: it’s a helper (mechanical ventilation), not a replacement for a good passive ventilation system. Here in Lagos, a fan is a non-negotiable for my flock during the peak of the hot season. But for many years when I lived in a milder climate, I never needed one.
Choosing the Right Fan (Safety First!)
If you decide to use a fan, it must be rated for agricultural or outdoor use. This means it’s sealed to keep out the dust and moisture, which seriously reduces the risk of a fire. Your average box fan is a fire hazard in a coop.
Safe Installation
Place the fan to circulate air, not to blow it directly on the chickens. As Penn State Extension explains, proper mechanical ventilation design is crucial for maintaining healthy conditions, so aim the fan towards a ceiling or high wall to help push stagnant air towards a window or vent. Make sure all electrical cords are completely out of reach. A battery-powered or solar-powered fan is an even safer bet.
Does a Chicken Coop Need Ventilation at Night?
Yes, 100% yes. Chickens are breathing and producing moisture and ammonia 24/7. Nighttime is when they’re all packed in there together, which makes good air quality even more critical. Your ventilation system needs to work around the clock. And a crucial reminder: ensure every single opening is covered securely with ¼-inch hardware cloth. I learned the hard way that a raccoon can rip through chicken wire in seconds, so having a predator-proof chicken coop is essential.
Calculating How Much Ventilation Your Chicken Coop Needs: Practical Examples
A common question is how much ventilation does a chicken coop need per chicken. While it’s tempting to use a per-bird calculation, the most reliable method recommended by poultry experts is based on the coop’s total floor space. This is because the overall air volume, moisture load, and ammonia production are a function of the entire flock within that space. As a very rough guideline, you can think of the ‘1 sq. ft. of ventilation per 10 sq. ft. of floor space’ rule as indirectly covering about one large-breed bird per 4 square feet, aligning the two metrics.
While the “3-4 square feet minimum” rule is a good start, another helpful guideline endorsed by many agricultural extension offices is to have 1 square foot of ventilation for every 10 square feet of floor space. This is a key part of figuring out exactly how much ventilation a chicken coop needs. Let’s crunch some numbers.
Example: 4×4 Coop (16 sq ft, for 4-6 Chickens)
- Winter: You’ll want about 3 sq ft of total ventilation. Your pop door probably provides about 1 sq ft, so you need an additional 2 sq ft from high vents. This could be two 1×1 ft gable vents or a series of 3-inch holes drilled along the top of the walls.
- Summer: Throw everything open. If you have two 2×2 ft windows (that’s 8 sq ft of airflow!) plus your winter vents, you’ll have a nice breezy coop.
Example: 10×10 Coop (100 sq ft, for 25 Chickens)
- Winter: A coop this size needs at least 6-8 sq ft of ventilation. A large pop door might give you 1.5 sq ft. The rest should come from ridge, soffit, or gable vents. I can tell you from experience, after installing ventilation, my condensation problems vanished in three days.
- Summer: You need serious airflow for a coop this big. Large windows on at least two sides are a must, and a screen door is an excellent idea for maximum breeze.
These examples should give you a solid starting point for determining how big your chicken coop should be.
Adapting for Your Climate and Coop Style
Ventilation isn’t one-size-fits-all. Your geographic location and coop design are major factors. For advice tailored to your specific county, I always recommend contacting your local agricultural extension office—they are an incredible and often underutilized resource for backyard keepers.
Hot and Humid Climates (e.g., Southeast US)
Here, your number one enemy is heat stress and humidity.
- Strategy: Maximize passive airflow all year long.
- Tactics: Think about designing your coop with large, hardware-cloth-covered “windows” on all four sides. A full hardware cloth door is much better than a solid one. Ridge and soffit vents are absolutely essential.
Cold Climates (e.g., Midwest, Northeast US, Canada)
The challenge here is balancing moisture removal with heat retention.
- Strategy: Focus on high, adjustable vents.
- Tactics: Use well-placed gable or ridge vents that you can leave open all winter. Your larger windows should have hinged, insulated covers that you can close up during the most bitter cold snaps, without making the coop airtight.
Mobile Coops and Chicken Tractors
These smaller coops can get stuffy in a hurry. You’ll need to consider the pros and cons of a chicken tractor vs. a stationary coop when planning ventilation.
- Strategy: Go for lightweight, secure vents.
- Tactics: Vents cut into the gabled ends and covered with hardware cloth are perfect. Many chicken tractor designs already have an open-air, hardware-cloth-covered run attached, which provides fantastic, constant fresh air.
How to Install Vents: A Quick Guide
Got a plan? Time to make it happen.
Tools and Materials
- Drill with a hole saw or a jigsaw/sawzall
- Staple gun
- ¼-inch hardware cloth
- Tin snips
- Screws or heavy-duty staples
Step-by-Step Instructions
- Mark and Cut: Mark your desired vent locations high on the wall vents or gables. A hole saw is great for round vents, and a jigsaw works perfectly for square ones.
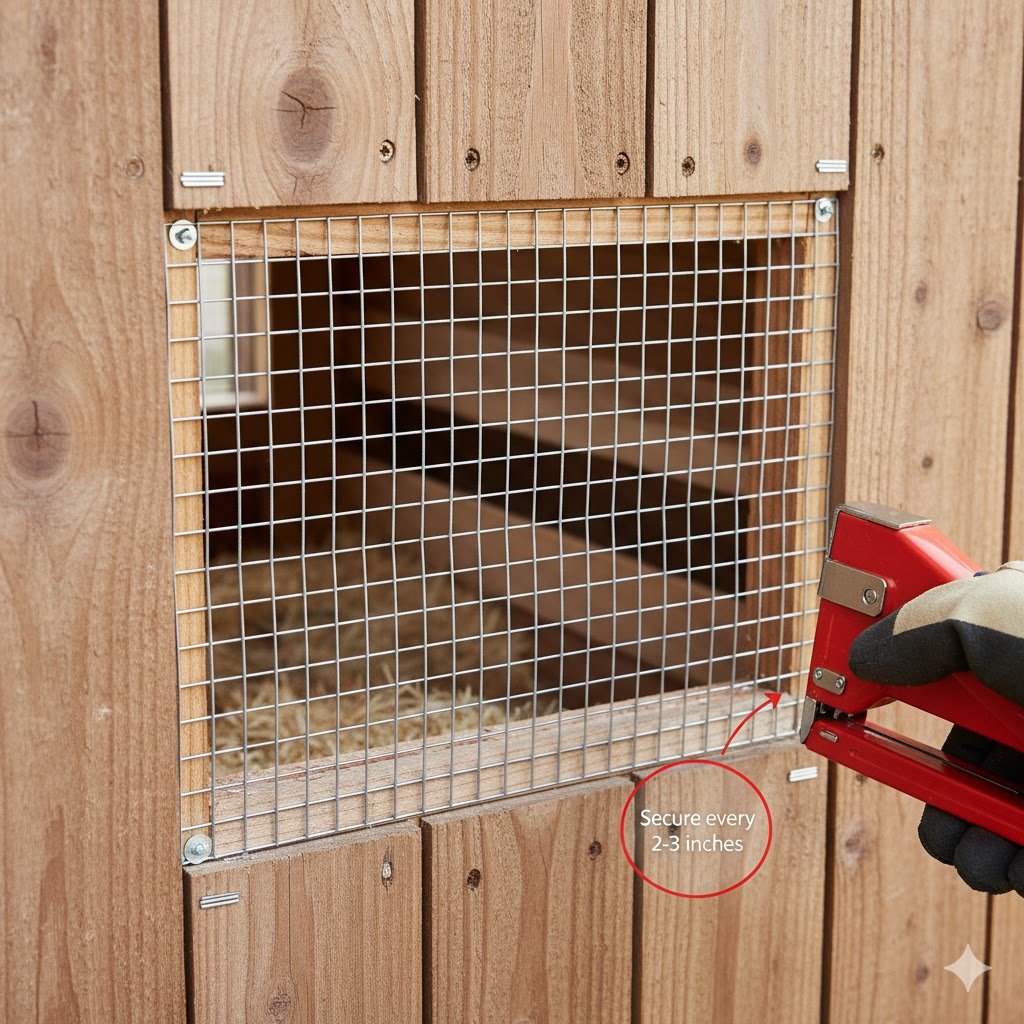
- Cut the Cloth: Use your tin snips to cut a piece of hardware cloth that’s at least 2 inches wider and taller than your opening.
- Secure the Mesh: Staple or screw the hardware cloth tightly over the inside of the opening. Check for any gaps a predator could wiggle through.
- Add a Cover (Optional): To make your vents adjustable, you can build a simple sliding cover with a piece of plywood in a basic channel, or a hinged flap you can secure open or closed.
Common Ventilation Mistakes to Avoid
- Placing Vents Below the Roosts: This is the #1 cause of dangerous drafts. Keep them high! (See our chicken coop ventilation diagram illustrating the wrong vs. right vent placement).
- Not Enough Winter Ventilation: Sealing a coop too tightly is a recipe for disaster. Trust me, your chickens can handle dry cold way better than they can handle damp cold.
- Forgetting Predator-Proofing: Every opening, no matter how small, must be secured with hardware cloth. Chicken wire only keeps chickens in; it doesn’t keep rats out of the chicken coop or stop larger predators.
- Ignoring Humidity: A cheap little hygrometer can tell you the humidity level in your coop. Try to keep it below 70%.
- No Way to Adjust: Your coop’s needs will change dramatically from a July heatwave to a January blizzard. Vents you can open, close, or partially cover are essential for seasonal adjustment.
Frequently Asked Questions (FAQ) on how much ventilation does a chicken coop need
Can you have too much ventilation in a chicken coop?
In the summer, it’s pretty hard to overdo it (short of a hurricane!). The goal is maximum airflow. In the winter, however, “too much” ventilation can definitely become a draft if the openings are too large or in the wrong place, preventing your flock from staying warm. This is why adjustability is so important.
Does bedding choice affect ventilation needs?
It does. Super absorbent bedding like pine shavings or sand can help manage moisture on the floor, which can reduce the overall humidity a bit. But even the best bedding in the world can’t replace the need for actual air exchange to get the moisture out of the building. Choosing the best flooring for your chicken coop is an important first step.
Will ventilating my coop make it too cold in winter?
This is the biggest fear people have, but a dry cold is so much safer for chickens than a damp cold. Proper high ventilation is what removes the moisture that causes frostbite. Chickens have fantastic downy feathers and they huddle together to share warmth. A dry, ventilated coop lets them use their natural abilities to stay warm, while a sealed, humid coop just makes them sick.
Do chicks need different ventilation than adult chickens?
Absolutely. Chicks are incredibly fragile and susceptible to drafts. They need to be in a consistently warm brooder for their first few weeks that is free of any drafts. Ventilation for a brooder should come from the top (like a mesh lid) so air isn’t blowing directly on them. Once they’re fully feathered and move into the big coop, they need the same robust ventilation system as the rest of your flock.
Disclaimer: A Note on Extreme Weather Conditions
The guidelines in this article are designed for typical seasonal weather. For extreme events like polar vortexes, severe blizzards, heat domes, or nearby wildfires with poor air quality, you must use your best judgment. During life-threatening cold, you may need to temporarily reduce ventilation further (while watching carefully for moisture buildup) and consider supplemental, safe heating options. In extreme heat, fans become essential, and you might need to add misters or provide frozen treats to prevent fatalities. Always prioritize your flock’s immediate safety during severe weather alerts.
Conclusion: It’s All About Air Quality
Answering the question, “how much ventilation does a chicken coop need?,” doesn’t have to be a headache. It all comes down to a few key ideas. Your goal isn’t really to control the temperature—it’s to control the air quality. Moisture and ammonia are the real enemies of a healthy flock, and a steady flow of fresh air is your best weapon against them.
By placing vents high above the roosts, making them predator-proof, and adjusting them with the seasons, you’ll create an environment where your chickens can truly thrive. Pay attention to your coop—the way it smells, the way the air feels—and watch your chickens. They’ll tell you everything you need to know. Get this one thing right, and you’ll be rewarded with a happy, healthy flock for years to come. Trust me, your chickens will thank you.

Oladepo Babatunde is the founder of ChickenStarter.com. He is a backyard chicken keeper and educator who specializes in helping beginners raise healthy flocks, particularly in warm climates. His expertise comes from years of hands-on experience building coops, treating common chicken ailments, and solving flock management issues. His own happy hens are a testament to his methods, laying 25-30 eggs weekly.