Watching your first chicks develop inside their eggs is one of the most exciting parts of backyard chicken keeping. But without the best egg candlers, you’re pretty much guessing whether those eggs sitting in your incubator for 21 days will actually hatch.
I learned this the hard way during my first season. I used a basic flashlight and couldn’t see anything through my Maran’s chocolate-brown shells. I wasted nearly two weeks incubating infertile eggs. A good egg candling light makes checking for fertility and development easy, especially when paired with a quality incubator for beginners.
This guide will review the best egg candlers I’ve tested over 500+ eggs, teach you how to candle an egg properly, and show you exactly what to look for at every stage. If you’re just getting started and choosing your flock, check out the easiest chicken breeds for beginners before you start incubating.
What is the Best Egg Candler?
For most backyard chicken keepers, the Brinsea OvaView High Intensity Egg Candler is the best overall choice. Its professional-grade, high-intensity LED light is bright enough to see through even dark Marans shells. It requires AA batteries and features adjustable brightness, making it perfect for all egg types, from tiny bantam eggs to large duck eggs.
Egg Candler Comparison Table
Note on Pricing: Prices for poultry supplies change often, especially between hatching seasons. The price ranges below are relative estimates: $ = Budget (under $20), $$ = Value ($20-$40), $$$ = Premium ($40+). Always check current retailer pricing.
| Candler Model | Best For | Price Range | Comparative Brightness | Shell Color Performance | Egg Size Range | Battery/Plug | Warranty |
|---|---|---|---|---|---|---|---|
| Brinsea OvaView | Overall / Dark Shells | $$$ | Very High | Excellent (All) | All (Bantam to Goose) | 4xAA | 3-Year |
| Farm Innovators C-40 | Best Value | $$ | Basic-Good | OK (White/Light Brown) | Standard Chicken | 4xAA | 1-Year |
| Incu-Bright Ultra Bright | High Intensity Alt. | $$$ | Very High | Excellent (All) | Standard Chicken | 4xAA | 2-Year |
| GQF Cool-Lite Candler | Beginners (Plug-in) | $ | Basic | OK (White) | Standard Chicken | Plug-in | 1-Year |
| Magicfly/Generic LED | Budget Battery | $ | Basic | Poor (White Only) | Standard Chicken | 3xAAA | 90-Day |
Best Egg Candlers for Backyard Chicken Keepers (Detailed Reviews)
I’ve tested all of these models across multiple hatches. When comparing the best egg candlers on the market, finding the right one for your specific needs depends on your flock size and egg color. Here’s the real-world breakdown.
1. Brinsea OvaView High Intensity – Best Overall / Dark Shells
Key Features and Specifications
- Ultra-bright, cool-running high-intensity LED
- Adjustable light intensity
- Requires 4 AA rechargeable batteries (not included)
- Flexible black viewing hood
- Ergonomic, handheld design
Real-World Performance Testing This is the gold standard for a reason. After candling over 200 Marans eggs with this light, I can confirm it justifies the investment. The high-intensity LED beam cuts through dark-brown and blue-shelled eggs, letting you see clear veining by day 7. Cheaper candlers make you guess, but the OvaView gives you a definite ‘yes’ or ‘no’. The adjustable intensity and flexible viewing hood are premium features that actually make a difference. If you’re deciding between Brinsea and Nurture Right incubators, the same quality standards apply here.
Best Use Cases This is for the serious hobby breeder, anyone with dark-shelled breeds (Marans, Welsummer), or homesteaders hatching 100+ eggs a year.
Pros and Cons
- Pros:
- Amazing penetration on dark/thick shells
- Uses AA rechargeable batteries (long-lasting)
- Cool LED won’t heat the embryo
- Viewing hood blocks all outside light
- Cons:
- Higher upfront cost
- Batteries are not included
2. Farm Innovators Model C-40 – Best Value
Key Features and Specifications
- High-intensity, ultra-bright LED
- Durable, simple handheld design
- Runs on 4 AA batteries
- Soft-touch ring to seal against the egg
Real-World Performance Testing The Farm Innovators C-40 offers decent value, but it’s not a powerhouse. Experienced users and my own tests confirm that it requires a completely dark room to be effective. It’s bright enough for white and light-brown eggs in pitch-black conditions, but don’t expect premium performance. It struggled to show clear detail on my darker brown shells. It uses 4 AA batteries (about 30 hours of life) and is a step up from a flashlight, but set your expectations accordingly.
Best Use Cases A good choice for anyone who needs a reliable egg candling light without a high price, as long as you have a pitch-black room and are working with white or light-brown eggs.
Pros and Cons
- Pros:
- Good value for the price
- Simple, durable, and easy to use
- Cons:
- Requires a pitch-black room to be effective
- Struggles with dark shells
- Runs on disposable batteries (can get costly)
3. Incu-Bright Ultra Bright LED Egg Candler – High Intensity Alternative
Key Features and Specifications
- 250-lumen CREE LED bulb (manufacturer-verified)
- Very high-intensity, focused LED beam
- Durable aluminum body
- Runs on 4 AA batteries (included)
- Simple push-button on/off
Real-World Performance Testing The Incu-Bright is another excellent high-power candler that’s very popular with serious hobbyists. It’s a direct competitor to the Brinsea in terms of brightness. It features a manufacturer-verified 250-lumen CREE LED bulb, which is a key selling point. In my tests, this ‘Very High’ intensity light cut through dark and blue-shelled eggs almost as well as the Brinsea, allowing for clear viewing by day 7-8. It’s a no-frills, durable tool built to do one job: be a powerful egg candling light. The battery life is solid, and unlike the Brinsea, the batteries are included, so you can use it right out of the box.
Best Use Cases Hobbyists who want Brinsea-level power for dark shells but prefer a more traditional, flashlight-style body.
Pros and Cons
- Pros:
- Excellent brightness for dark shells
- Simple, durable, and easy to use
- Good value for a high-intensity light
- Batteries are included
- Cons:
- Not as many features (like adjustable light)
- Eats through AA batteries
4. GQF Cool-Lite Candler – Best Budget Plug-in
Key Features and Specifications
- Basic, cool-running light
- Plugs into a standard wall outlet
- Durable, simple plastic housing
- “Box” design (you place the egg on top)
Real-World Performance Testing This is an old-school, reliable candler. It’s not super bright, but it’s been a hatchery staple for years. The “Basic” light is fine for white eggs. You place the egg on top of the light box, which is simple. As a simple, plug-in LED candler, it’s perfect for classrooms. It’s not handheld, but it’s stable and you don’t have to worry about batteries.
Note: The GQF Cool-Lite is being phased out by some suppliers and may become harder to find. It remains available through some retailers, but consider the Incu-Bright or Brinsea as more future-proof investments.
Best Use Cases Classroom projects, 4-H, or anyone who wants a simple, no-fuss plug-in candler for light-colored eggs. This is a perfect egg candling light for beginners because it’s stable and you can’t forget batteries.
Pros and Cons
- Pros:
- Very affordable
- No batteries needed
- Extremely simple to use
- Cons:
- Not bright enough for dark shells
- Bulky “box” design isn’t handheld
5. Magicfly/Generic LED Candler – Best Budget Battery Option
Key Features and Specifications
- Basic LED
- Runs on 3 AAA batteries (usually not included)
- Simple on/off button
Real-World Performance Testing I’ll be straight with you—this type of basic LED candler is just a step above a good flashlight. It’s cheap and it works… on white eggs. If you have Leghorns, it will let you see development by day 7. But on my brown eggs, it was tough, and on my dark Marans eggs, it was useless. But hey, for $10-$15, it’s a good tool for a one-time hatch or a 4-H project on a tight budget.
Best Use Cases Classroom projects, 4-H, or a first-time hatcher with white-shelled eggs who isn’t sure they’ll stick with the hobby.
Pros and Cons
- Pros:
- Extremely cheap
- Better than a regular flashlight
- Cons:
- Weak light, poor penetration
- Useless on dark or thick shells
- Feels cheaply made
How to Choose the Best Egg Candler for Your Flock
Learning how to choose the best egg candlers for your flock starts with one thing: light intensity. A modern LED candler is far safer and more effective than an old-fashioned incandescent bulb, as it runs cool and won’t harm the embryo.
Light Intensity Requirements for Different Shell Colors
This is the most important factor when choosing your egg candling light.
- White Shells (Leghorn): Any candler, even a ‘Basic’ budget model, will work.
- Brown Shells (Rhode Island Red, Buff Orpington): You’ll want a candler with at least ‘Good’ brightness.
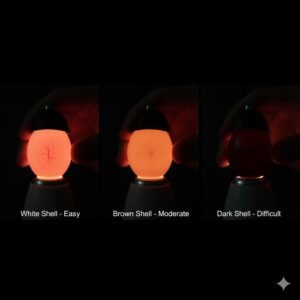
- Dark Shells (Marans, Welsummer) or Blue/Green (Ameraucana): Do not waste your time with basic-intensity candlers. A ‘Very High’ intensity candler (like the Brinsea or Incu-Bright) is highly recommended. Shell pigmentation makes it much harder to see inside, and this is where the best egg candlers really prove their worth.
Battery Life vs. Plug-In: Which is Better?
- Battery-Powered (AA): This is my preference. It’s portable, so you can candle right next to your incubator without dragging cords. High-intensity models use a lot of power, so use rechargeable AA batteries to save money.
- Plug-In: Great for classrooms or if your incubator is far from a convenient spot. You never have to worry about batteries dying. The cord is the only downside.
- Battery-Powered (AAA): Only found in the cheapest candlers. The battery life is poor, and the light is weak. Avoid these if you can.
Budget Considerations
If you hatch 12 eggs once a year, the $15 budget candler or $30 value model is fine. If you run multiple incubators all spring, investing $80 in a Brinsea will save you a ton of time and frustration.
Prices vary, so check current retailer pricing before you buy. The relative ranges ($, $$, $$$) in this guide will help you compare, but specific dollar amounts can change weekly during the peak hatching season.
How to Candle an Egg With a Flashlight
Don’t have a candler? You can try a DIY method, but it has limits.
- Get a very bright, cool-running LED flashlight.
- Find a cardboard toilet paper tube.
- In a pitch-black room, hold the tube against the flashlight and place the blunt end of the egg on the other end of the tube. This creates a seal.
This method works for white eggs, but it’s still not as good as a real egg candling light designed to focus the beam. It’s better than nothing!
How to Candle Chicken Eggs: Step-by-Step Guide
Candling is simple, but your technique matters. Here’s how to get it right.
When to Candle Eggs During Incubation
Timing is critical. Candling too early is the biggest mistake beginners make. Here’s the standard timeline for candling chicken eggs:
- Day 7 (First Check): This is the first, most important candling. By day 7, development is clear. You can easily see the ‘spider’ of blood vessels in fertile eggs and remove any ‘clears’ (infertile eggs).
- Day 14 (Second Check): This is a good time to check again, especially for dark-shelled eggs. You can confirm development and spot any ‘quitters’ (embryos that died mid-incubation).
- Day 18-21 (Lockdown): Do NOT candle during lockdown! The incubator is locked at high humidity. Opening it can ‘shrink wrap’ the chicks, and disturbing the egg can mess up the chick’s hatching position. Just wait.
Proper Candling Technique
To avoid damaging your eggs, follow these steps:
- Prepare Your Space: Candle in a pitch-black room. Any outside light makes it harder to see. Work quickly next to your incubator to keep the eggs warm.
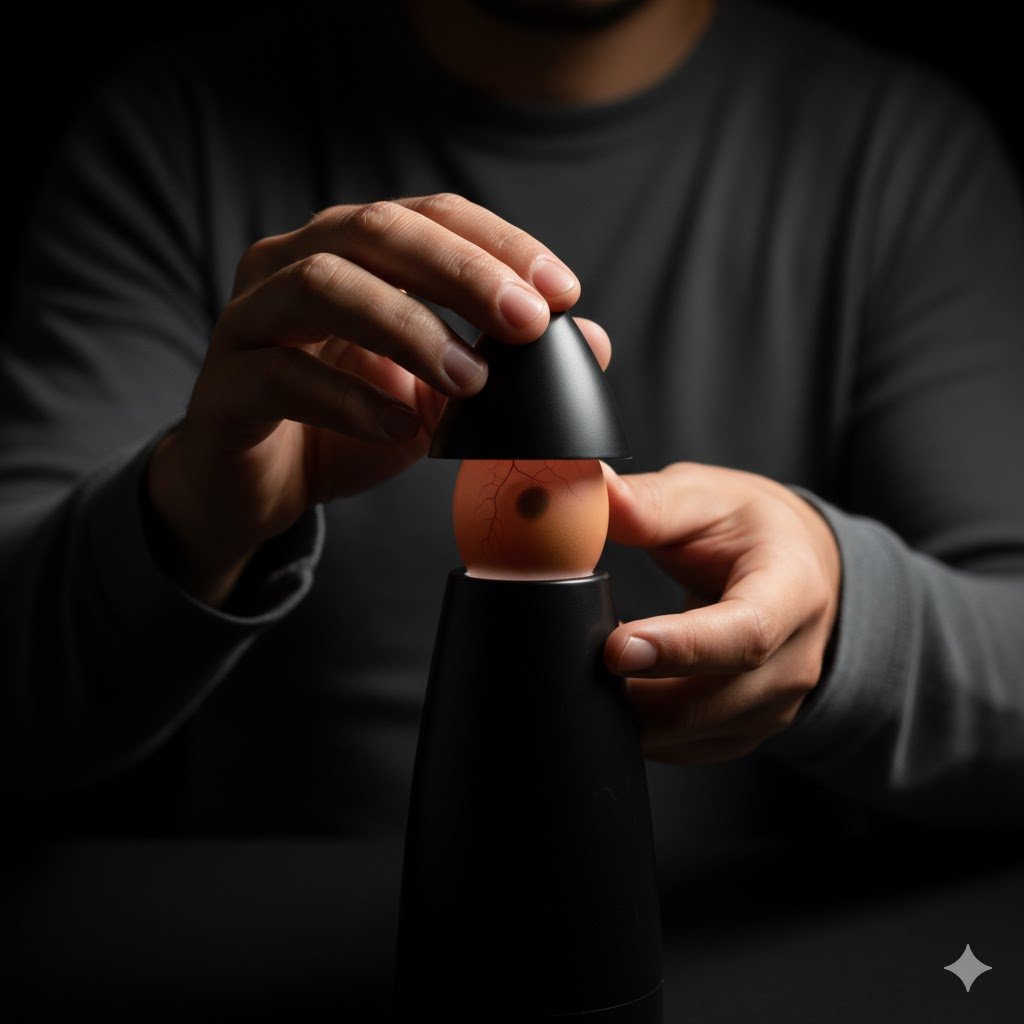
- Handle Gently: Your hands should be clean and dry. Pick up the egg gently. Penn State Extension recommends holding the egg at a slanting position with the large end against the candling light and rotating your wrist to cause the contents to twirl, making blood spots and development visible.
- Find the Air Cell: Place the blunt (wide) end of the egg on the candler first. You should see the air cell (the empty space).
- Don’t Overheat: Keep candling sessions short—under 30 seconds per egg. All of the best egg candlers use cool-running LED technology, so overheating isn’t a huge risk, but the temperature drop outside the incubator is.
How to Tell If Your Eggs Are Fertile or Not When Candling
This is the main reason we candle on day 7. You are sorting the eggs into two simple piles: fertile (keepers) and infertile (toss).
What a Fertile Egg Looks Like
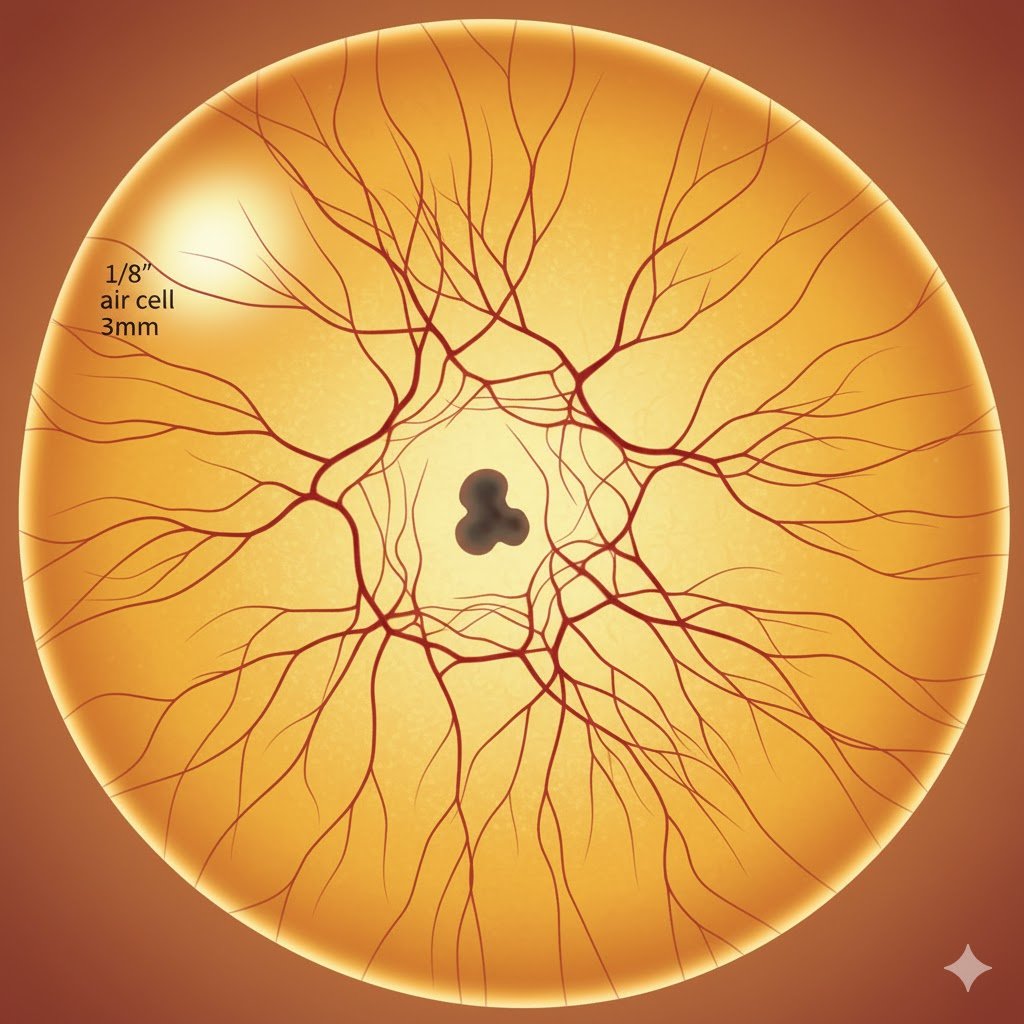
On day 7, a fertile egg will have a small, dark spot (the embryo) with a web of blood vessels radiating out from it. It looks just like a tiny red spider. You may even see the embryo move!
What an Infertile Egg Looks Like
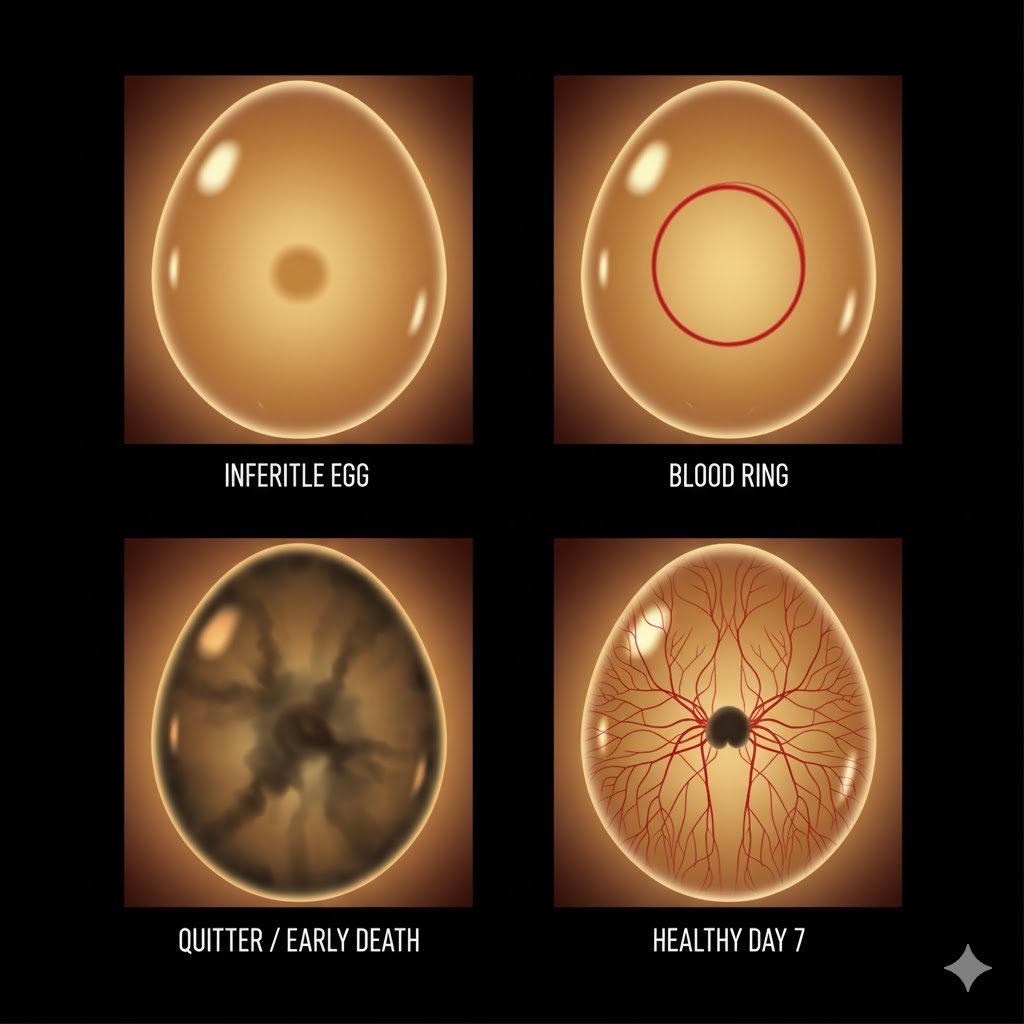
An infertile egg (a ‘clear’) will look almost empty. It will be translucent, and you’ll just see the faint, round shadow of the yolk. There will be no blood vessels, no embryo, and no ‘spider’. It’s safe to remove these from the incubator.
Egg Candling Chart: Day-by-Day Development Guide
Here is what to look for when candling chicken eggs at each stage. This chart will help you spot fertile eggs, non-viable eggs, and check air cell development.
| Day | What to Look For (Fertile Egg) | What Bad Eggs Look Like | Air Cell Check |
|---|---|---|---|
| Day 1-3 | (Don’t candle!) Too early to see clearly. | (No development. Yolk is a faint shadow) | Very small |
| Day 4-6 | Faint “spider” veins may appear in white eggs. | (Still looks clear) | Small |
| Day 7 | (First Check) Clear “spider” veins. Dark embryo spot. | Blood ring (detached red circle) or clear | Growing |
| Day 10 | Embryo is a larger dark mass. Veins are spreading. | Cloudy, no veins (early death) | Taking up ~1/4 of egg |
| Day 14 | (Second Check) Egg is mostly dark. Movement visible. | Cloudy, dark, sloshy (quitter) | Taking up ~1/3 of egg |
| Day 18 | (Lockdown) Egg is almost completely dark. | (Should be removed by now) | Air cell too big (low humidity) or too small (high humidity) |
| Day 21 | (Chick is positioning for hatch) | – | – |
What Does a Bad Egg Look Like When Candled?
Spotting bad eggs is just as important as spotting good ones. Removing them prevents them from rotting and exploding, which can contaminate your whole hatch. Veterinary sources confirm that bacterial growth in ‘quitter’ eggs poses a significant contamination risk to other developing embryos in the incubator.
Bad Egg Candling Chart: Visual Reference Guide
| Problem | Day Detected | Visual Appearance | Action |
|---|---|---|---|
| Infertile (Clear) | Day 7+ | Clear, yolk shadow only | Remove safely |
| Blood Ring | Day 7-10 | Red circle, no veins | Wait 48 hrs, then remove |
| Early Death | Day 7-14 | Cloudy, no clear veins | Remove |
| Quitter | Day 14+ | Dark, sloshy, cloudy | Remove immediately |
| Cracked | Any day | Bright white lines | Remove immediately |
Identifying Infertile (‘Clear’) Eggs
These are the easiest to spot. The egg is bright and clear. You’ll see the yolk shadow, but no blood vessels. These are not developing and will never hatch. Remove them on day 7.
Recognizing Early Embryonic Death (‘Blood Rings’)
A ‘blood ring’ is a clear sign of early embryonic death. It looks like a distinct red ring inside the shell, with no spider veins. This means the embryo died very early. These should also be removed.
Spotting ‘Quitters’ (Mid-Incubation Deaths)
A ‘quitter’ is an embryo that started developing but died mid-incubation. On day 14, instead of a dark, moving mass, you’ll see a dark or cloudy mass with no clear blood vessels. It may be stuck to the shell or slosh around. Remove these immediately.
Detecting Cracked Eggs
Even hairline cracks, invisible to the naked eye, will show up as bright white lines during candling. State agriculture departments, such as Colorado’s, require all eggs destined for off-farm sale to be candled using a device sufficient to view the interior, ensuring meat spots, blood spots, and cracked shells are identified and removed. These cracks allow bacteria in. Remove them immediately.
Understanding Air Cell Problems

The air cell tells you about your humidity. It should start small on day 1 and grow to take up about 1/3 of the egg by lockdown (day 18). According to the USDA Egg Grading Manual, Grade AA eggs have an air cell depth of 1/8 inch or less, while Grade A eggs measure 3/16 inch or less. This gives you a good baseline for what a fresh egg looks like.
- Too Large: Your humidity is too low. Add water.
- Too Small: Your humidity is too high. Reduce water.
- Detached (Saddled): The air cell has broken away, usually from rough handling or shipping. These rarely hatch.
What NOT to Do When Candling Eggs
Mistakes That Reduce Hatch Rates
- Candling Too Early: On days 1-5, you risk tossing a “slow starter” that just hasn’t developed visible veins yet. Wait until day 7.
- Candling Too Often: Every time you open the incubator, you drop the temperature and humidity. Stick to day 7 and day 14.
- Candling During Lockdown: (Day 18+). Don’t do it! This is the most critical time. Opening the incubator can cause the chick to get “shrink-wrapped” and stuck.
- Excessive Handling: The more you handle eggs, the higher the risk of dropping one or introducing bacteria.
- Not Washing Your Hands: Always handle hatching eggs with clean, dry hands to avoid transferring bacteria through the shell pores.
Common Mistakes New Hatchers Make
Beyond the “what not to do” list, new hatchers often make a few common mistakes out of pure excitement. These are the ones I see most often from people I mentor.
- 1. Panicking and Tossing ‘Slow’ Eggs: You candle on day 7 and see 8 clear spiders, but 2 eggs are “iffy.” You can’t quite see veins. The mistake is tossing them. The right move is to wait. Put them back and check again on day 10.
- 2. Tossing “Blood Rings” Too Early: Sometimes, what looks like a blood ring is just the very beginning of the vascular system forming. If you’re not sure, wait 48 hours and check again. A true blood ring (early death) will not change, while a developing embryo will.
- 3. Candling Every Day: It’s so tempting, but it’s the worst thing you can do for your hatch. One beginner I mentored candled her eggs 10 times in the first week, and her hatch rate was terrible. The constant temperature swings doomed the hatch. Beyond candling errors, first-time chicken keepers make several common mistakes that can impact their flock’s health.
When Candling Results Are Unclear
What if you just… can’t tell? It’s day 7, and you see something, but it’s not a clear spider. It’s not ‘clear,’ either. What do you do?
When in doubt, wait.
Mark the egg with a pencil (e.g., “?”) and put it back in the incubator. Wait 2-3 more days and check it again. By day 10, development will either be very obvious, or it will have stopped and faded, making it clear it’s not viable. It’s always better to wait a few days than to toss a slow starter.
Candling Different Poultry Species
While this guide focuses on candling chicken eggs, the same process applies to other poultry, with different timelines:
- Duck Eggs (28-day incubation): Candle on day 7 and day 21. Duck eggs are harder to see through, so a high-intensity candler is a must.
- Goose Eggs (30-day incubation): Candle on day 10 and day 25. Goose shells are very thick and large, requiring one of the best egg candlers you can get (like the Brinsea).
- Quail Eggs (17-18 day incubation): Candle on day 5 and day 10. The eggs are small and often speckled, making a bright, focused beam essential.
Essential Accessories for Egg Candling
- A Dark Room: You can’t see anything without a pitch-black room.
- Marking Pencil: A soft-leaded (graphite) pencil to mark clears or questionable eggs. Never use a marker, as the ink can seep through the shell.
- Egg Crate or Towel: A soft, clean surface to place eggs on as you pull them from the incubator.
- Record-keeping Chart: A simple piece of paper to track how many clears, blood rings, and developers you have.
Where USA Chicken Keepers Buy Candlers
As a hobby farmer, you can find the best egg candlers at several places in the USA. Most candlers ship within 2-3 days to USA addresses. You can find them at (but I’m not linking):
- Tractor Supply Co
- Local farm supply stores
- Hatchery websites
- Incubator Warehouse
- Online retailers
Best Times to Buy Egg Candlers (USA Hatching Calendar)
You can buy an egg candling light anytime, but most backyard keepers start shopping at the beginning of the year, right before the main hatching season.
- January-February: This is “hatching prep” season. People are buying incubators and candlers before they order spring chicks or eggs.
- March-May: This is the peak hatching season. Demand is high.
- September-October: Some homesteaders plan for a fall hatch, so there’s a smaller peak in demand.
Quick Troubleshooting: Can’t See Through Your Eggs?
If you have one of the best egg candlers but still can’t see anything, here are the most common problems:
- Your Room Isn’t Dark Enough: It needs to be pitch-black. Not dim, dark.
- Your Batteries Are Dying: A high-intensity candler with low batteries is a low-intensity candler.
- You’re Candling Too Early: If it’s day 4, just wait.
- Your Candler Is Too Weak for Your Shells: If you have Marans eggs and a budget candler, you’re not going to see much.
- Are you holding it at the wrong angle? Make sure you’re holding the blunt end (the wide end) of the egg against the candler. This is where the air cell forms and where development is easiest to see.
Frequently Asked Questions About Egg Candling
Q: Can candling hurt the developing chick?
A: No. Brief candling (under 30 seconds) with one of the best egg candlers (which use cool-running LEDs) does not harm the embryo. The light doesn’t generate heat. The real risk is from dropping the egg or from the temperature/humidity drop when you open the incubator.
Q: Does moving the egg during candling damage it?
A: Gentle rotation is perfectly safe. Remember, eggs are rotated 40-50 times a day by an automatic turner or a broody hen. The embryo is well-cushioned. Just don’t shake, jolt, or drop the egg.
Q: What are the disadvantages of egg candling?
A: The main disadvantages are:
Temp/Humidity Drops: From opening the incubator.
Misidentification: Risk of tossing a good egg if you candle too early.
Contamination: Risk from handling eggs with unwashed hands.
However, the benefit of removing infertile eggs and preventing rotten egg explosions far outweighs these risks if you candle properly on days 7 and 14.
Q: What are the mistakes for incubation eggs?
A: Besides bad candling, the biggest incubation mistakes are:
Wrong Temperature: Should be 99.5°F for a forced-air incubator, according to poultry hatchery guides.
Wrong Humidity: Should be 40-50% for days 1-18, then raised to 65-75% for lockdown, as recommended by poultry extension services for optimal hatching.
Not Enough Turning: Eggs must be turned 3-5 times a day before lockdown.
Using Old Eggs: Fertility drops fast. The USDA recommends storing hatching eggs no longer than 7-10 days before incubation to maintain optimal fertility rates.
Q: What percentage of eggs should be fertile?
A: This depends on your flock’s health and your rooster. For eggs from your own flock, you should hope for 85-95% fertility. If you’re getting under 50%, you may have a rooster problem or it’s the wrong time of year. For shipped eggs, expect a much lower rate (50-70% is common) due to the stress of travel.
Q: How many eggs fail to hatch even when fertile?
A: This is the difference between “fertility rate” and “hatch rate.” Even if 100% of your eggs are fertile, you won’t get a 100% hatch. A “good” hatch is 80-85% of the fertile eggs. The other 15-20% are “quitters” that may die from small temperature spikes, humidity issues, or genetic problems.
Q: Can I candle through colored shell breeds like Olive Eggers?
A: Yes, but it’s just as hard as candling dark brown Marans eggs. Blue and green-shelled eggs (from Ameraucanas, Araucanas, and Olive Eggers) have pigment throughout the shell, not just on the surface. You absolutely need a high-intensity candler (like the Brinsea or Incu-Bright) and should wait until day 7-10 to see development clearly.
Choosing the Best Egg Candler for Your Backyard Flock
After testing the best egg candlers available, here’s my final recommendation: for most backyard chicken keepers, the Brinsea OvaView High Intensity is worth the investment. Its superior brightness cuts through dark shells, saves you time, and virtually eliminates the frustration of “I can’t see anything!” moments. The upfront cost pays for itself in peace of mind and accuracy.
That said, if you’re hatching only light-colored eggs once or twice a year, the Farm Innovators C-40 or Incu-Bright offer solid value. They’ll get the job done without breaking the bank.
For beginners who want to try hatching without much investment, start with the GQF Cool-Lite plug-in candler. It’s simple, affordable, and teaches you the basics. You can always upgrade later if you fall in love with hatching (and you probably will!).
Ready to start your first hatch? Pick up a quality candler, set up your incubator, enjoy watching the miracle of life unfold, and make sure you’re prepared with everything you need when chicks hatch. There’s nothing quite like seeing that first “spider” of blood vessels or watching a chick tumble inside its shell on day 14. With the right egg candling light and proper technique, you’ll maximize your hatch rates and minimize the guesswork.
Happy hatching!

Oladepo Babatunde is the founder of ChickenStarter.com. He is a backyard chicken keeper and educator who specializes in helping beginners raise healthy flocks, particularly in warm climates. His expertise comes from years of hands-on experience building coops, treating common chicken ailments, and solving flock management issues. His own happy hens are a testament to his methods, laying 25-30 eggs weekly.