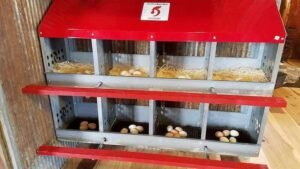
Ready for backyard chickens? Collecting fresh eggs is a simple pleasure.
Before envisioning golden yolks, consider one pivotal question: Where to Put Your Chicken Coop?. Getting this right saves trouble – from neighbor issues to flock illness. I’ve learned from missteps.
This guide helps craft a safe, healthy home for your flock.
It also preserves your peace of mind and good neighbor relationships. We’ll cover sun exposure and local permits.
The goal? Ideal chicken coop placement. Let’s begin.
📍 11 Quick Chicken Coop Placement Tips
- Choose an Elevated, Well-Drained Area: Essential for preventing dampness and promoting hygiene.
- Prioritize Morning Sun, Afternoon Shade: Provides warmth and sanitation without overheating your flock.
- Shield from Strong Winds: Protects chickens from harsh weather, especially in colder months.
- Place Near a Water Source: Simplifies daily watering, crucial for flock health.
- Ensure Easy Access for You: Makes daily chores like feeding, egg collection, and cleaning convenient.
- Maintain Distance from Your Home (10–25 feet): Balances accessibility with minimizing odors and noise.
- Keep Away from Property Lines & Septic Tanks: Prevents neighbor disputes and potential contamination risks.
- Face East or Southeast: Optimizes sunlight exposure for warmth and natural disinfection.
- Avoid Placing Under Large Trees (Unless Managed): Reduces risks from falling branches, wild bird droppings, and predator access.
- Avoid Low, Flood-Prone Areas: Prevents muddy conditions and potential flooding that harms chicken health.
- Comply with Local Zoning Laws & HOA Rules: Ensures your coop meets all legal requirements and avoids fines.
Choosing the Best Place to Put Your Chicken Coop (Backyard Placement Guide)
Choosing the best place to put a chicken coop mirrors selecting a new home. It’s about location!
The right spot greatly influences chicken health, contentment, and egg production. Good planning brings significant results. This is key to how to site a chicken coop.
Key Factors Influencing Chicken Coop Location
Before breaking ground, consider these vital factors. They are key for a thriving flock:
- Sunlight (Tip 2): Chickens need Vitamin D for strong eggshells.Too much direct sun, especially in summer, causes heat stress. This poses a serious health risk.Aim for morning sun and ample afternoon shade. Find that perfect balance!
- Wind Exposure (Tip 3): Shield your flock from harsh winds, particularly in winter.A spot protected by a fence, your house, or dense evergreen shrubs makes a huge difference in their comfort.
- Drainage (Tip 1): This factor is paramount! Chickens hate wet feet.Poor drainage causes damp conditions, breeding bacteria and parasites. Select an elevated area where water naturally flows away.Avoid low-lying spots that become miniature ponds after rain. Your chickens will thank you for a dry home.
- Proximity to Water Source (Tip 4): You’ll refill waterers constantly, especially in hot weather. This is a daily chore.A nearby water hose or spigot simplifies this task. Easy access ensures consistent fresh water, vital for flock health.
- Convenience for You (Tip 5): This is your backyard and your time. Consider how often you’ll visit the coop for feeding, watering, egg collection, and cleaning.An easily accessible location, even in bad weather, simplifies your life. Avoid turning egg retrieval into an arduous expedition!
Chicken Coop Placement Helper
Input your yard’s characteristics to get personalized recommendations for your chicken coop’s ideal spot!
Your Coop Placement Recommendation:
Adjust the settings above to see your personalized recommendation!
Overall Score:
Why Proper Placement Matters for Your Flock and Home
Thoughtful chicken coop placement is fundamental to your chickens’ well-being and your household’s harmony.
A well-chosen spot impacts everything. Strategic coop placement means:
- Healthier, Happier Chickens: Good ventilation, ideal sun/shade balance, and dry conditions reduce respiratory issues, frostbite, and parasitic infestations. This leads to less stress, better egg production, and calmer birds.
- Easier Maintenance: An easy-to-access and clean coop leads to more regular maintenance. This prevents odors and discourages pests. No one wants a foul-smelling, insect-ridden coop.
- Better Neighbor Relations: Chickens can be aromatic and make sounds. Strategic chicken coop location minimizes noise and smell, keeping neighbors content and averting awkward disagreements. A good fence (and a well-placed coop) fosters good neighborly ties!
Expert Tip: My first coop was in a low-lying area. Rain turned it into a muddy quagmire, and my chickens struggled with respiratory issues. The frustration was real!
Moving it to a higher, better-draining area near my garden hose was a turning point for their health and my workload. What a relief to finally have dry, thriving chickens!
Planning your flock size is key to determining your coop’s needs. Curious how many chickens you need for your family? Check out our guide: How Many Chickens Do You Need for a Family of 4?
For more on coop dimensions, explore: How Big Should a Chicken Coop Be? To avoid common pitfalls, read our article on Mistakes Every First-Time Chicken Keeper Makes.
Wondering if you need a rooster for eggs? Find out here: Do I Need a Rooster to Get Eggs? Curious about what kitchen scraps your chickens can safely eat? Read our guide: What Can Chickens Eat From Your Kitchen?
Also, understand the legalities: Is It Really Illegal to Feed Chickens Kitchen Scraps in the U.S.? Starting with chickens soon? Learn about the best age to begin raising them: What’s the Best Age to Start Raising Chickens?.

How Far Should Your Chicken Coop Be From Your House? (Tip 6)
This question frequently concerns aspiring chicken keepers. No one wants their home to carry a barnyard aroma.
Determining chicken coop distance from house balances your convenience with everyone’s comfort. This is especially important for urban chicken coop placement.
Recommended Minimum Distances for Noise and Smell Control
No single universal rule exists. However, here are general guidelines:
- 10-25 feet: A solid starting point for most suburban backyards. It’s close enough for easy access, yet far enough to lessen most odors and noise. It strikes a sensible compromise.
- 25+ feet: If space allows, greater distance is always better. This holds especially true for larger flocks or if you (or your neighbors) are sensitive to smells. Grant everyone more breathing room!
- Consider Prevailing Winds: A clever tactic: position the coop downwind from your house. Any occasional odors will be carried away, not towards your living room. Simple foresight helps.
Chickens aren’t usually vocal all the time (unless you have a boisterous rooster!). However, hens can be chatty.
Odor becomes a concern if the coop isn’t cleaned regularly or drainage is poor. Maintain cleanliness, and you’ll be in excellent shape!
Local Regulations and Neighborhood Considerations (Tip 11)
Before hammering that first nail, you must verify local zoning laws and HOA rules. This step is not optional!
Many municipalities have specific requirements for chicken coop property line distance. Some dictate minimum distances from dwellings. Disregarding these leads to fines or forced coop dismantling. Imagine the disappointment!
Expert Tip: If your yard is small and the coop must be closer, don’t despair! Solutions exist. Consider planting dense hedges or erecting a solid fence between your house and the coop. These barriers muffle sounds and block odors. Naturally, meticulous cleaning becomes even more critical in confined spaces. You’ll become a cleaning virtuoso!
For comprehensive details on local poultry rules, explore our guide: Chicken Laws by State. Understanding chicken coop zoning laws is vital.
Which Direction Should Your Chicken Coop Face? (Tip 8)
Your chicken coop facing direction significantly influences its internal climate. This affects warmth, vital ventilation, and even chicken disposition!
It’s about intelligent design for healthy, content birds.
Benefits of Facing East or Southeast
For most climates, orienting your coop to face east or southeast is optimal. This harnesses the sun’s natural power:
- Morning Sun: This allows gentle morning sun to stream into the coop. It warms things up, dries dampness (excellent for hygiene!), and naturally sanitizes the interior.It also encourages chickens to emerge and forage earlier – they love that first light!
- Avoids Harsh Afternoon Sun: Facing east avoids intense, scorching afternoon sun. That brutal heat rapidly turns a coop into an oven, undesirable for chickens. They tolerate high temperatures poorly, making this crucial.
Climate and Weather Considerations
While east/southeast is a great guideline, consider your specific climate. Weather patterns aren’t one-size-fits-all!
- Hot Climates: In sweltering regions, prioritize shade and ventilation. If afternoon sun is relentless, adjust facing or add robust shade structures. Think umbrellas, tarps, or shade cloths. Keep them cool!
- Cold Climates: Maximizing winter sun exposure is a blessing for warmth. Sunny winter days make a substantial difference. However, protect against biting, prevailing cold winds. It’s a delicate balance.
- Prevailing Winds: Understand local wind patterns. Position the coop so its main opening isn’t directly exposed to strong, cold winds. Such exposure creates drafts, chilling birds and leading to health issues. Good chicken coop ventilation is essential; drafts are undesirable!
To ensure your coop has proper airflow and avoids common pitfalls, read our detailed article: 17 Coop Ventilation Mistakes That Overheat Your Flock.
Should Your Chicken Coop Be Under Trees? (Tip 9)
It seems a natural fit, doesn’t it? Trees offer delightful shade. Who wouldn’t want cool, comfortable chickens on a hot day?
However, considering should chicken coop be under trees involves surprising advantages and disadvantages. It’s not straightforward; concealed dangers exist!
Pros and Cons of Tree Shade vs. Risks
Let’s examine both sides:
- Pros:
- Natural Shade: Trees provide excellent summer shade, vital for preventing heat stress. It’s like a built-in, eco-friendly air conditioner!
- Shelter: They offer protection from unexpected rain and strong winds, enhancing coop security.
- Cons:
- Falling Branches: A genuine, terrifying concern. Storms bring down branches, potentially damaging your coop or injuring birds. Imagine a branch piercing your roof!
- Bird Droppings: Wild birds roost in trees, depositing waste. This falls into the run, potentially introducing parasites or diseases. Unappetizing, and a health risk.
- Predator Cover: A significant red flag. Trees offer superb cover for aerial predators (hawks, owls) to swoop in undetected. Worse, they provide easy access for climbing predators (raccoons, opossums) who use branches as a highway to your coop.
Predator Safety and Dropping Hazards
If you place your coop near trees (sometimes the only option!), exercise extreme vigilance regarding predator protection chicken coop. Your inner security expert must emerge!
- Trim Branches: Meticulously trim branches overhanging the coop or run. Eliminate jumping-off points or climbing routes for predators. Make it challenging!
- Secure Run: Ensure your run is fully enclosed, completely, including a robust hardware cloth top. This is your most effective defense against cunning aerial attacks. Leave no gaps!
- Regular Cleaning: If wild bird droppings accumulate, be exceptionally diligent cleaning the run. You don’t want to inadvertently invite unwelcome guests (parasites, diseases!) to your chickens’ living space.
Expert Tip: I learned the hard way that a tree branch too close to the coop roof invites raccoons. One morning, I found an unwelcome visitor. After that incident, I ensure a clear 5-6 feet around my coop, free from tree limbs. It’s a simple measure, yielding immense, stress-reducing predator protection chicken coop. Better safe than sorry!
For more ways to keep your flock safe, explore: What is the Best Predator Deterrent for Chickens? and Predator-Proofing 101: Easy Fixes for a Safer Coop.
Where NOT to Put Your Chicken Coop (Tip 10)
Knowing where not to put your chicken coop is as crucial as knowing where to place it. Avoiding specific locations prevents major headaches, disappointments, and financial losses. Learn from my experiences – some lessons are too painful to acquire firsthand!
Avoiding Low-Lying, Flood-Prone Areas
This is arguably the most critical “don’t” on this list. Commit this to memory!
- Poor Drainage: Low spots attract water, leading to muddy runs and damp bedding. This compromises chicken coop hygiene, causing respiratory illnesses and painful foot problems. Who wants soggy, ailing chickens? It’s a disaster recipe.
- Flooding Risk: During heavy rainfall, a low-lying coop rapidly inundates, risking drowning or severe chilling. It’s a terrifying prospect, a nightmare for any chicken keeper, entirely avoidable with intelligent placement.
Dangers of Placing Too Close to Property Lines or Neighbors (Tip 7)
This pertains directly to fostering positive neighborly relations. Be the most commendable chicken keeper, not the subject of complaints! Your chickens shouldn’t instigate a feud.
- Odor and Noise Complaints: Chickens, particularly roosters, can be vocal. Coops develop aromas if not managed meticulously. Positioning them too close to a neighbor’s property line is an express route to disputes. Always adhere to chicken coop property line distance regulations. No one desires a quarrel over fowl.
- Pest Attraction: A coop too close to a neighbor’s house or garden inadvertently attracts rodents or insects that then become their problem. That’s an awkward, uncomfortable conversation to avoid.
- Compost Piles/Septic Tanks: Avoid placing the coop near compost piles (notorious rodent magnets!) or septic tanks (potential for contamination if leakage occurs – repulsive! Consider health implications).
Common Mistake: Novice chicken keepers often place coops in shaded, damp yard corners, thinking it’s “out of the way.” This invariably leads to chronic respiratory issues due to persistent moisture and lack of sunlight, and a perpetually muddy, malodorous run. It’s a formula for your frustration and your birds’ misery!
Should Your Chicken Coop Be in Sun or Shade? (Tip 2)
The million-dollar question for chicken comfort! The ideal for chicken coop sun or shade is: a magnificent combination of both! Chickens, like us, need equilibrium to flourish. Envision it as their perfect backyard sanctuary.
Balancing Sunlight for Warmth and Ventilation
Sunlight is indispensable for flock health and the coop’s environment:
- Sunlight Benefits:
- Warmth: In cooler climates or winter, morning sun is a godsend. It naturally warms the coop, keeping birds snug without artificial heat.
- Sanitation: UV rays are natural disinfectants! They eliminate bacteria and parasites. Sunlight also dries moisture, crucial for excellent chicken coop ventilation and preventing unhealthy conditions.
- Ventilation: While sunlight dries, proper ventilation is more critical. Your coop demands constant airflow to remove ammonia fumes (detrimental to lungs!), excess moisture, and accumulated heat. Sunlight helps desiccate, but strategically positioned vents are the unsung heroes of a healthy coop.
Using Shade to Prevent Heat Stress
Just as insufficient sun is detrimental, excessive sun poses a serious, potentially fatal, threat:
- Crucial in Summer: When temperatures soar, shade is a necessity. Chickens are highly susceptible to heat stress, which can rapidly prove fatal. Do not underestimate this risk – it’s a matter of life and death.
- Afternoon Shade: Ensure your coop and, more significantly, the run, have ample shade during the hottest parts of the day. This can be natural (trees with precautions!) or artificial (tarps, shade cloths, patio umbrellas). Be creative to keep them cool!
- Dust Bathing: Chickens adore dust baths – their natural method for staying clean and parasite-free. Providing a sunny area in the run for this is a wonderful bonus for their instincts and hygiene.
Can a Chicken Coop Be on Grass? (Tip 1)
The question of chicken coop on grass versus other surfaces is common, especially for those cherishing a natural, verdant backyard. It sounds idyllic: chickens pecking on lush green grass! However, practical realities exist; significant trade-offs.
Benefits of Grass Flooring vs. Risks of Moisture and Predators
Here’s essential information on grass as a coop or run surface:
- Pros of Grass:
- Natural Foraging: Chickens delight in scratching and pecking at grass, unearthing insects and greens. It’s a complimentary, natural buffet, potentially reducing feed expenses.
- Dust Bathing: Dry grass patches can be effective for dust bathing, allowing their innate cleaning ritual.
- Cons of Grass:
- Moisture Retention: Grass retains moisture, leading to damp conditions. This causes foot problems (bumblefoot) and respiratory issues.
- Harder Cleaning: Droppings intermingle with grass, making effective scooping difficult. The area quickly becomes malodorous and unsanitary.
- Predator Access: Predators, especially diggers like foxes, find it easier to tunnel under a coop on grass. It’s almost an open invitation to your flock!
- Mud: During rainy weather, a grass run rapidly transforms into a muddy, disgusting quagmire. Mud means dirty chickens, dirty eggs, and significant extra cleaning effort for you.
Ground Preparation and Drainage Tips
If you’re set on a grass run, or your coop rests on grass, consider these tips for better management and health:
- Rotate Runs: If space allows, use a mobile coop or rotate chickens between grassed areas. This prevents overgrazing and mud accumulation, allowing grass to recover.
- Gravel Base: For stationary coops, a gravel layer beneath the run enhances chicken coop drainage. Water filters away, maintaining drier conditions.
- Deep Litter Method: Inside the coop, employing a deep litter method (carbon-rich bedding like pine shavings) manages moisture and odors. It’s excellent for keeping the coop floor dry and healthy.
- Raised Coop: Elevating the coop structure itself is crucial, regardless of the run surface. This provides extra protection and hygiene.
Expert Tip: My first coop on grass was a perpetual struggle with mud and cleaning. Maintaining sanitary conditions was frustrating! Eventually, I abandoned the “natural” grass for the main run, applying a thick layer of wood chips. This immensely improved drainage and cleanliness. It’s not “grass,” but it was far more manageable. Sometimes, practicality triumphs over idyllic visions!
For a deep dive into coop flooring options, read our guide: What’s the Best Flooring for a Chicken Coop?. Also, consider the benefits of different run setups with our article on chicken run location: Chicken Run vs. Free Range: Pros & Cons.
Why Should Chicken Coops Be Off the Ground? (Tip 1)
This is an absolute non-negotiable for me. If constructing a coop, this step is imperative. Why should chicken coops be off the ground? The benefits far outweigh any additional effort. It’s a transformative advantage for flock health, safety, and your convenience.
Preventing Moisture and Predator Access
Consider this from a chicken’s (and a hungry predator’s!) perspective:
- Moisture Prevention: Elevating the coop prevents its floor from resting on damp ground. Dampness leads to rot, mold, and unhealthy conditions inside. This is crucial for top-notch chicken coop hygiene and averting respiratory issues.
- Predator Protection: This is perhaps the most significant reason. Ground-dwelling predators (raccoons, snakes, rats, opossums) find it incredibly challenging to access an elevated coop. They can’t easily dig underneath, and climbing smooth posts is harder than strolling in at ground level. It’s like placing valuables on a high shelf – harder for thieves to reach!
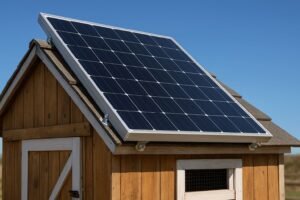
- Airflow: An elevated coop facilitates significantly better airflow beneath it. This contributes to chicken coop ventilation by preventing heat radiation from the ground and assisting in keeping the coop cooler in summer.
Improving Ventilation and Cleaning Ease
Advantages extend beyond moisture and predator deterrence; they also enhance daily chores:
- Better Ventilation: Air circulating underneath isn’t solely for cooling; it prevents ground heat buildup and fosters a healthier, fresher coop environment. No one appreciates stale, ammonia-filled air, especially chickens!
- Easier Cleaning: Many elevated coop designs are practical. They allow collecting droppings or cleaning underneath without crawling into confined, awkward spaces. This makes managing chicken coop size and spacing for cleaning more efficient. You’ll be more inclined to clean regularly, maintaining a healthy, happy flock.
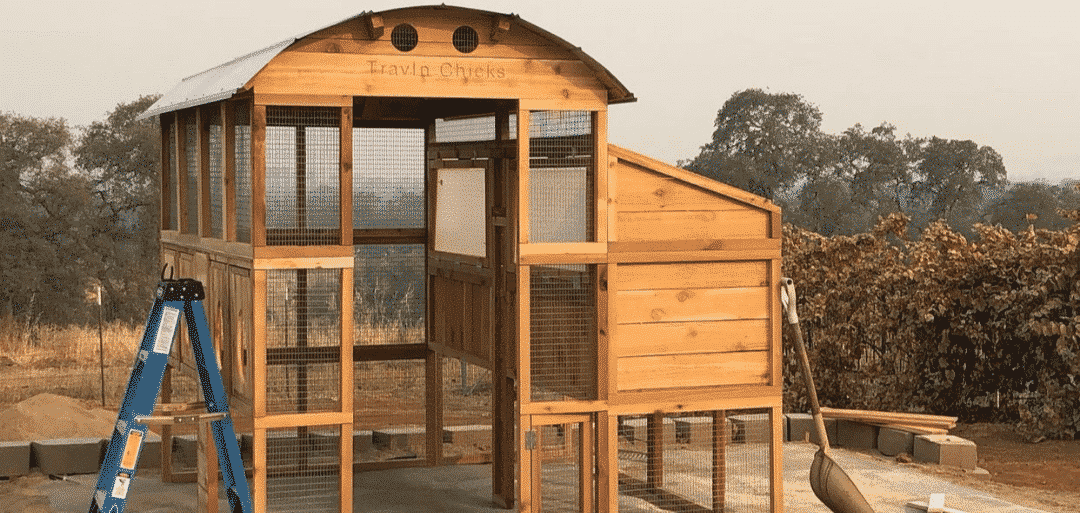
- Common Elevated Designs: Coops are typically constructed on sturdy stilts, concrete blocks, or a raised wooden platform. Aim for 12-18 inches off the ground – sufficient to deter ground threats and permit easy cleaning.
Thinking about alternative coop structures? See if a dog house can work: Can You Use a Dog House as a Chicken Coop?. Also, ensure your internal coop setup is optimal by checking: How High Should Roosting Bars Be in a Coop?.
Do You Need a Permit to Build a Chicken Coop? (Tip 11)
Let’s delve into the practical, vital aspect: the legalities! Local regulations are key; compliance is critical. So, do you need a permit to build a chicken coop? The answer, almost invariably, hinges entirely on your location. Never assume; assumptions lead to considerable difficulties!
Understanding Local Zoning Laws and Restrictions
Regulations governing backyard chickens and coops vary remarkably. They differ city to city, county to county, and even within HOAs. It’s a complex patchwork of rules; pinpoint your specific square! This includes understanding chicken coop zoning laws.
- Vary by Location: Some areas are lenient, permitting chickens freely. Others impose stringent limits on bird numbers, coop size/height, or minimum distances from property lines. Some outright prohibit them, a profound disappointment if you desire fresh eggs. This is a frustrating reality for many aspiring chicken keepers.
- Common Restrictions: During research, pay close attention to rules concerning:
- Precise number of hens allowed (roosters often banned due to noise – can you blame neighbors?).
- Minimum distance from your house, neighbor’s house, and property lines (significant for avoiding disputes and cultivating positive relationships!).
- Maximum coop size or height (they don’t want a chicken skyscraper!).
- Specific fencing requirements for the run, ensuring safe containment.
How to Check and Apply for Permits
This is the practical segment – how to navigate the bureaucratic labyrinth. It’s not as daunting as it sounds, but it requires legwork!
- Check Online: Your initial step: visit your city or county’s official website. Search for sections pertaining to zoning, animal control, or building permits. Often, they provide a clear FAQ or a downloadable PDF outlining all the relevant rules. It’s a sensible starting point, though information can be convoluted.
- Call the Planning Department: If online resources perplex you (common, isn’t it?!), contact your local planning or zoning department. These individuals are the definitive source for accurate, up-to-date information. Don’t hesitate – they assist in avoiding costly errors!
- HOA Rules: If you reside in an HOA community, their rules might supersede municipal laws in strictness. Your HOA covenants are your definitive guide. Disregarding them is a formula for trouble and potential fines – a headache to circumvent.
- Application Process: If a permit is required (often straightforward for a small structure like a coop), you’ll likely submit an application, a basic site plan illustrating your proposed backyard chicken coop placement, and potentially a small fee. The procedure is typically uncomplicated, but necessary for compliance.
Expert Tip: Seriously, do not bypass this crucial step! I’ve heard too many heartbreaking accounts of individuals investing time and money into beautiful coops, only to be forced to dismantle them for failing to obtain a permit or adhere to regulations. Can you fathom the frustration and wasted effort? A swift call to your city hall today saves immense heartache, vexation, and financial loss. Prudence dictates caution, wouldn’t you agree?
For a detailed breakdown of poultry laws across the U.S., refer to our comprehensive guide: Chicken Laws by State.
How Much Does It Cost to Put Up a Chicken Coop in Your Backyard?
Alright, let’s address the often-dreaded “B” word: budget! The chicken coop cost spans a vast range. It can be nearly negligible (if you’re a DIY wizard with reclaimed materials and free time) or several thousand dollars, depending on your approach and desired features. It’s a broad spectrum; let’s dissect the components for clear expectations.
Cost Factors Based on Location and Materials
Several elements significantly influence the total cost of your chicken coop site selection and construction. It’s more than just wood!
- Size of Coop: Larger coops demand more materials and labor. Chicken coop size and spacing for your flock is a primary cost driver. More chickens mean more space, translating to higher expenditure!
- Materials:
- New Lumber: Can be costly, especially for durable, pressure-treated wood. Lumber prices fluctuate, adding a “fun surprise” to the budget!
- Recycled/Reclaimed Materials: A champion for your wallet! Using pallets, old fencing, or salvaged wood dramatically reduces expenses. It requires effort to find and prepare, but financial savings are substantial.
- Hardware Cloth: Non-negotiable for predator proofing. Good quality hardware cloth (1/2 inch mesh) is a significant expense. Please, do not economize here – it’s your chickens’ security system; their lives depend on its integrity!
- Roofing: Shingles, metal roofing, or heavy-duty tarps contribute to cost. Keep your birds dry and protected!
- Foundation: A simple dirt floor is economical but least ideal (hello, mud and pests!). A gravel base, concrete slab, or elevated wooden platform increases costs but are worthwhile investments for durability, hygiene, and peace of mind.
- Features: Nesting boxes? Roosting bars? An automatic pop door (a lifesaver on chilly mornings!)? Feeders, waterers, sophisticated ventilation systems? All these additions naturally augment the price. It’s easy to get carried away with clever gadgets!
DIY vs. Pre-Built Coop Cost Considerations
This often represents the most substantial budget decision: build it yourself, or opt for convenience?
- DIY (Do-It-Yourself) Costs:
- Pros: Often the most budget-friendly. Ideal if you’re adept with tools and can source reclaimed materials. You gain complete control over design and chicken coop site selection. It’s your unique masterpiece!
- Cons: Demands time, tools, and construction proficiency. Mistakes can be costly (I’ve had “oops” moments requiring hardware store trips!), entailing significant time commitment.
- Typical Cost: As low as $100-$300 for a basic coop from recycled materials. For a larger, robust build with new materials, anticipate $500-$1000+.
- Pre-Built/Kit Coop Costs:
- Pros: Convenient! Quicker to assemble, typically includes instructions. Excellent if you’re pressed for time, lack tools, or are less confident in building.
- Cons: Considerably more expensive for the quality. Many aren’t genuinely predator-proof or weather-resistant without modifications. Read reviews meticulously; be prepared to reinforce them.
- Typical Cost: A small, flimsy coop around $300. Larger, robust models range from $1000 to $3000+. High-end, custom-built coops can exceed these figures!
Optional: Table Comparing Costs by Coop Size and Materials
| Coop Size (Approx.) | DIY (Recycled Materials) | DIY (New Materials) | Pre-Built Kit (Basic) | Pre-Built (High-End) |
|---|---|---|---|---|
| Small (2-4 hens) | $100 – $300 | $500 – $800 | $300 – $700 | $800 – $1500 |
| Medium (5-8 hens) | $300 – $600 | $800 – $1500 | $700 – $1500 | $1500 – $3000 |
| Large (9-15 hens) | $600 – $1200 | $1500 – $2500+ | $1500 – $2500+ | $3000 – $5000+ |
Note: These are rough estimates and vary widely based on location, material availability, and features. Don’t forget chicken and feed costs! All expenses accumulate!
Looking to build on a budget? Our guide can help: How to Build a Chicken Coop for Under $200.
Frequently Asked Questions (FAQs)
Where is the best place to put a chicken coop in your yard?
An elevated spot with good drainage, morning sun, afternoon shade, wind protection, and easy water access. This is the best location for chicken coop.
How far away from the house should the chicken coop be?
Aim for 10-25 feet from your house to balance convenience with minimizing noise and odor. This addresses chicken coop distance from house. Check local regulations.
How far does a chicken coop need to be from property line?
This varies by local zoning laws. Always check your city/county ordinances and HOA rules for specific minimum distances.
Which direction should a chicken coop face?
Face your coop east or southeast for beneficial morning sun and to avoid harsh afternoon heat. Consider prevailing winds. This is a key chicken coop placement tip.
Should a chicken coop be under trees?
Trees offer shade but pose risks like falling branches, bird droppings, and predator cover. If under trees, trim branches and ensure strong predator protection.
Where not to put a chicken coop?
Avoid low-lying, flood-prone areas, spots too close to property lines or neighbors, and areas near compost piles or septic tanks. This answers where should a chicken coop go (or not go).
Should a chicken coop be in sun or shade?
Chickens need both. Morning sun warms and sanitizes the coop. Afternoon shade is crucial to prevent heat stress, especially in the run.
Can a chicken coop be on grass?
Yes, but grass retains moisture, makes cleaning harder, and increases predator access. Consider a gravel base or raised coop for better drainage.
Why should chicken coops be off the ground?
Elevating the coop prevents moisture issues, deters ground predators, and improves ventilation. It also makes cleaning easier.
Do you need a permit to build a chicken coop?
It depends on your location. Always check local city/county zoning laws and HOA rules. Regulations vary widely on coop size, distance from property lines, and bird limits.
How much would it cost to put up a chicken coop in my backyard?
Costs vary widely ($100 to $5000+) based on size, materials (new vs. recycled), and whether you build it yourself (DIY) or buy a pre-built kit. DIY is generally cheaper.
Conclusion
Optimal coop location is a critical decision for backyard chicken keepers. It’s more than just placing a box.
Considering sunlight, drainage, proximity to home/neighbors, and local regulations establishes a foundation for a healthy, happy, productive flock.
If in doubt, go high, dry, and near water. For more chicken-keeping insights, explore our other resources or leave a comment below!

Oladepo Babatunde is the founder of ChickenStarter.com. He is a backyard chicken keeper and educator who specializes in helping beginners raise healthy flocks, particularly in warm climates. His expertise comes from years of hands-on experience building coops, treating common chicken ailments, and solving flock management issues. His own happy hens are a testament to his methods, laying 25-30 eggs weekly.