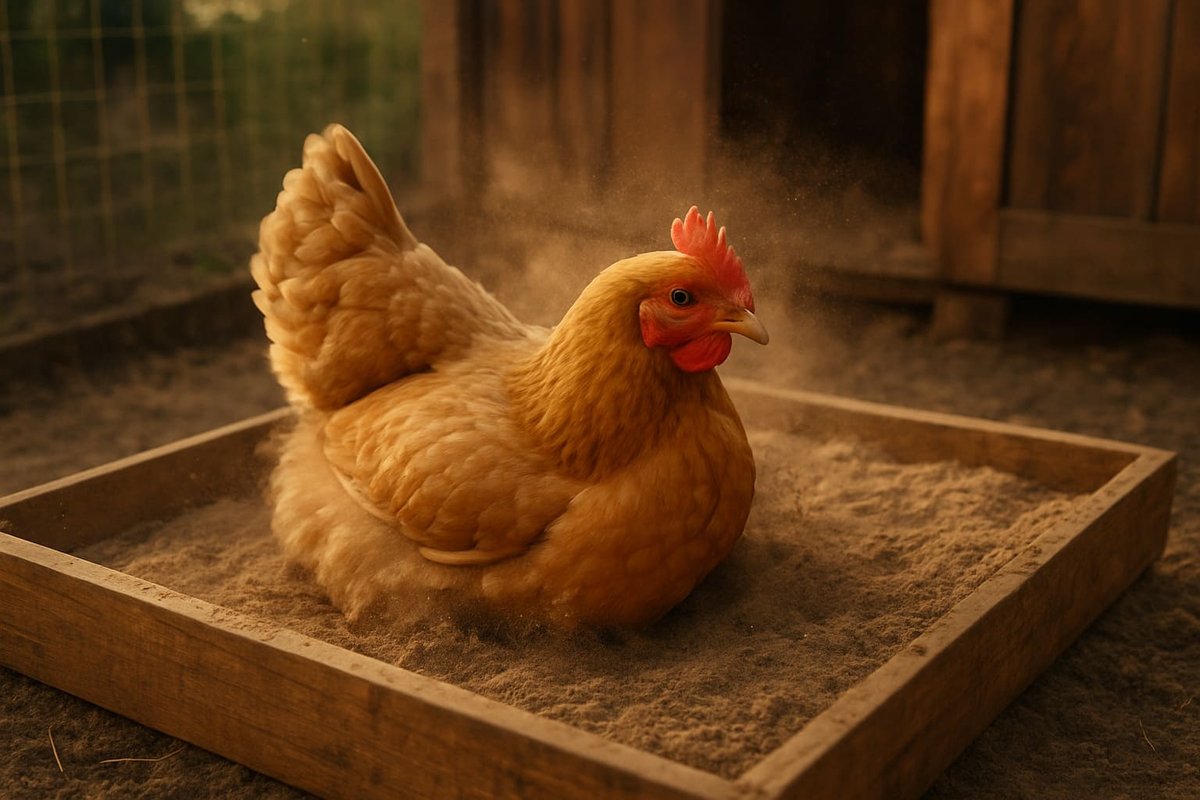
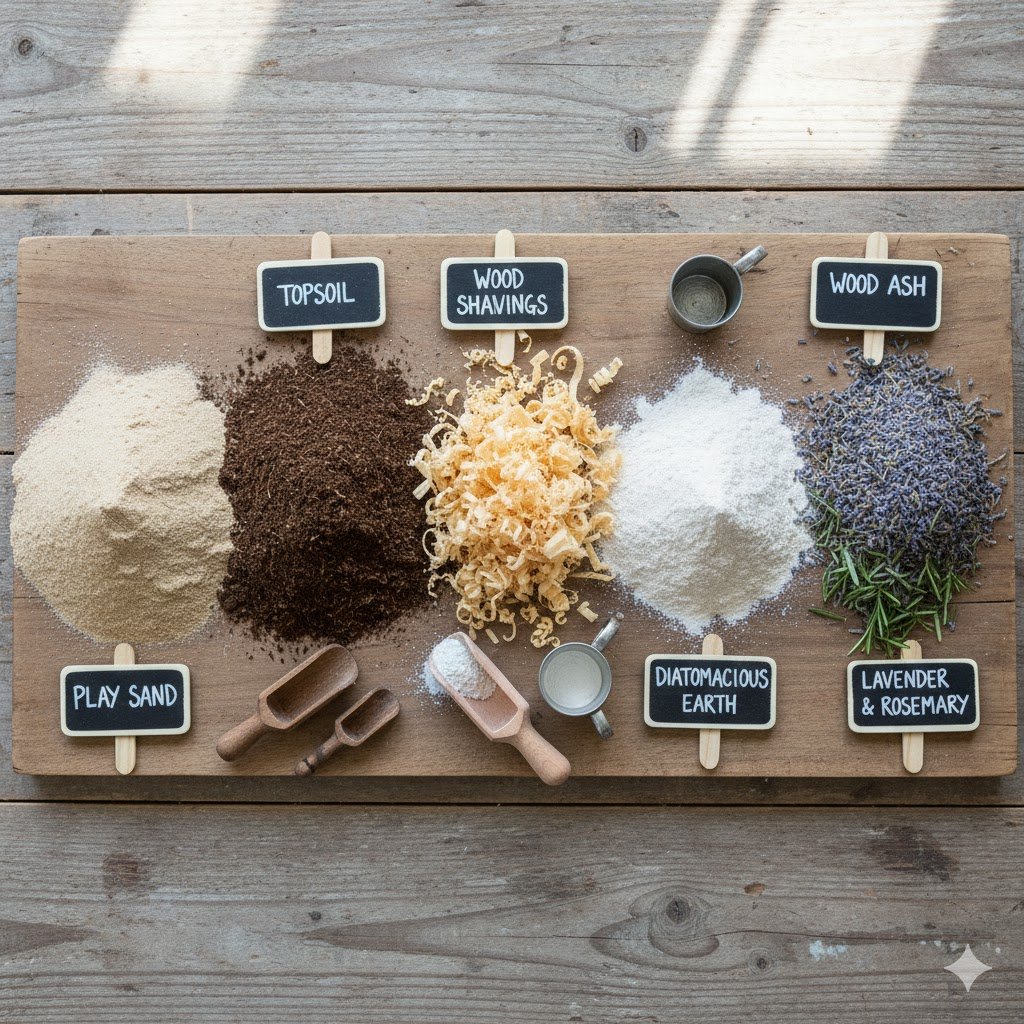
After more than a decade of raising chickens, I can tell you one thing for sure: nothing signals a happy, healthy flock quite like the sight of them blissfully wiggling in a dust bath. It’s their spa, their social club, and your first line of defense against mites. Creating the perfect dust bath involves setting up a shallow container (I’ve found that at least 24 inches or 60cm wide and 8 inches or 20cm deep works best) filled with a precise mixture. My go-to recipe? 40% fine sand, 20% dry topsoil, 20% wood shavings, 10% sieved wood ash, 5% food-grade diatomaceous earth, and 5% dried herbs. This blend lets your chickens do what they do best, naturally smothering mites and lice. Place it in a dry, sheltered spot, and you’ve built a critical tool for maintaining your flock’s health.
🚀 Quick Start Summary
- Container: 24″+ (60cm+) wide, 8″+ (20cm+) deep (a kiddie pool or wooden box works great).
- Location: A dry, sheltered spot, like a covered run or inside a well-ventilated coop.
- Recipe: 40% sand, 20% topsoil, 20% shavings, 10% wood ash, 5% food-grade DE, 5% dried herbs.
- Maintenance: Scoop droppings daily and completely refresh the mix every 2-4 weeks.
- Time to Build: About 30 minutes.
Why Dust Baths Are Essential for Mite Prevention
So, why all the fuss about a patch of dirt? A dust bath is absolutely essential because it’s a chicken’s natural, instinctual way to stay clean and kill parasites. I remember watching my first flock, a lively bunch of Buff Orpingtons, instinctively find a dry patch of earth and go to town. It was fascinating. This behavior allows them to work fine particles deep into their feathers, right down to the skin. This simple act does two things: it suffocates mites by clogging their breathing holes, and it helps abrade their waxy shells, causing them to dehydrate. A total game-changer. For a basic overview, you can also review how to set up a simple dust bath for chickens.
But it’s more than just pest control. This behavior is a key sign of a happy flock. It’s how they cool down, keep feathers in top shape (especially during the dreaded chicken molting season), and just plain relax. By providing a great dust bath, you’re not just fighting mites—you’re giving your chickens a vital tool to manage their own health.
The Bottom Line: Don’t underestimate the power of a good dust bath. It’s your flock’s single most important line of defense against common external parasites, and it’s something you should prioritize from day one.
Understanding Chicken Mites and External Parasites
To win the war, you have to know your enemy. And trust me, when it comes to your flock, mites are public enemy number one. An infestation can pop up seemingly overnight and cause real trouble. According to the University of Arizona Extension’s guide to external parasite control, the most common culprits you’ll face are Red Mites, Northern Fowl Mites, and Scaly Leg Mites. For a deep dive on identification, see our article on mites and lice on chickens.
Here’s the rundown on these nasty critters:
- Red Mites (Dermanyssus gallinae): The vampires of the chicken world. I dealt with a nasty outbreak one humid July, and it wasn’t fun. These pests hide in coop crevices by day and feed on your chickens’ blood at night, causing anemia and stress.
- Northern Fowl Mites: These guys are different—they live their whole life on the chicken. This causes constant irritation and can lead to scabby skin and feather loss, especially around the vent.
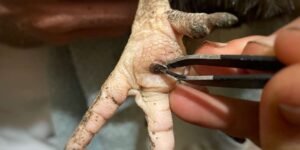
- Scaly Leg Mites: These microscopic troublemakers burrow under the leg scales, making them lift and become crusty and painful. If you don’t catch it, it can lead to lameness.
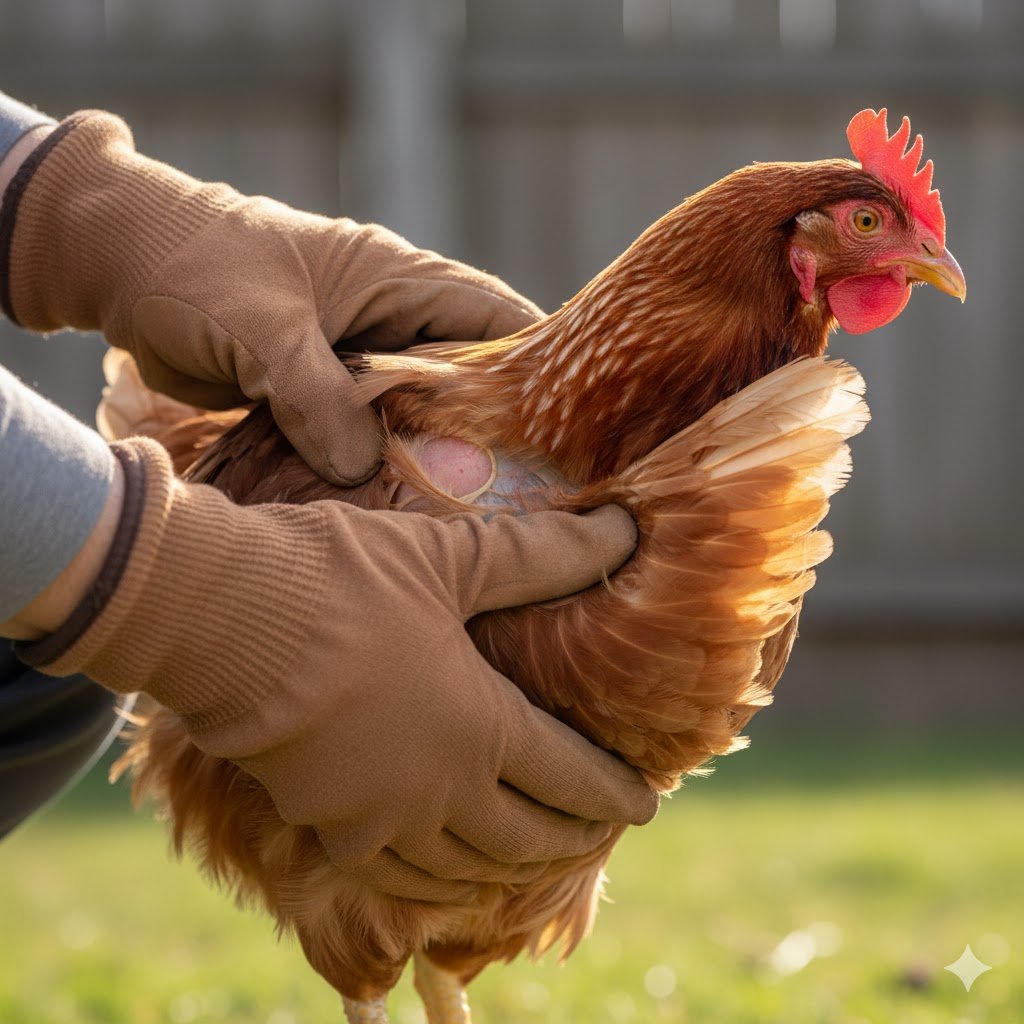
Knowing the signs—pale combs, frantic scratching, or a sudden drop in egg-laying—is a critical part of a regular chicken health check. A dust bath helps disrupt the life cycle of these pests before they ever get a foothold.
My Pro Tip: Make a habit of checking your flock for mites, especially under the wings and around the vent. Your dust bath is your direct weapon against these specific threats, so make it a good one.
What to Put in a Chicken Dust Bath: A Guide to the Best Mite-Fighting Materials
The real secret to a dust bath that mites hate is the recipe. It’s all about the blend. Over the years, I’ve tinkered with different combinations, and I’ve found that a balanced mix of ingredients is far more effective than any single material on its own. It’s about creating a texture that’s abrasive, absorbent, and absolutely hostile to parasites.
At-a-Glance: My Go-To Dust Bath Recipe
| Material | Purpose | Recommended Percentage | Estimated Cost (USD) |
|---|---|---|---|
| Fine Sand | Base texture, abrasive action | 40% | $5-$10 per 50lb (approx. 22.7 kg) bag |
| Dry Topsoil | Provides natural texture & microbes | 20% | $2-$5 per 40lb (approx. 18.1 kg) bag |
| Wood Shavings | Light texture, prevents clumping | 20% | $6-$8 per bag |
| Wood Ash | Anti-parasitic, drying agent | 10% | Free (from safe wood source) |
| Diatomaceous Earth | Kills mites through desiccation | 5% | $15-$20 per 10lb (approx. 4.5 kg) bag |
| Dried Herbs | Natural pest repellent, aromatic | 5% | Varies (low if homegrown) |
The Foundation: Sand for Your Chicken Dust Bath
The foundation of any great dust bath is fine sand (40%) and dry topsoil (20%). The sand acts as the gritty exfoliant that scrubs away dirt, while the topsoil provides that natural, earthy texture chickens just love. A word of advice I always give: use clean play sand and grab soil from a part of your yard you know is chemical-free.
The Power-Additives: Wood Ash and Diatomaceous Earth
Wood ash is the old-timer’s secret weapon, and for good reason. The fine particles and high pH create a terrible environment for mites. The best part? It’s free! Just be sure to use only cool, sifted ash from untreated hardwoods from your fireplace or bonfire.
⚠️ Safety Warning: This is a big one. Never use ash from treated lumber, painted wood, cardboard, or charcoal briquettes. You’ll do more harm than good.
Next up is food-grade diatomaceous earth (5%). On a microscopic level, its sharp edges shred the waxy exoskeletons of mites, causing them to dry out and die. As Oregon State University Extension explains, DE works by damaging the parasite’s protective outer layer. For a complete guide, see diatomaceous earth for chickens mites.
⚠️ Critical Safety Info: You must use food-grade DE only. And please, wear a mask when you’re mixing it in. Your lungs will thank you.
Herbs Good for a Dust Bath: Nature’s Repellents
Finally, here’s where you can have some fun and boost effectiveness. Adding dried herbs (5%) is a fantastic way to naturally repel pests. My favorites are lavender, rosemary, and mint. They have insect-repelling properties and make the whole coop smell better. It’s a win-win. Fine pine shavings (20%) are also a key part of the mix to keep the mixture light and fluffy, so it doesn’t turn into a brick after a few uses.
Simple Chicken Dust Bath Recipe for Beginners
If you’re just starting out, don’t get overwhelmed. Here is the simple, no-fail recipe I recommend to everyone. Just mix these parts by volume in a wheelbarrow or large tub:
- 4 parts Fine Sand
- 2 parts Dry Topsoil
- 2 parts Fine Pine Shavings
- 1 part Sieved Wood Ash
- 1/2 part Food-Grade Diatomaceous Earth
- 1/2 part Dried Herbs (optional, but recommended!)
The Key to Success: Don’t just use dirt. The real magic is in combining these materials to create a super-powered, multi-pronged defense against mites that your flock will absolutely love.
Step-by-Step Guide: How to Create Your Dust Bath Area
Alright, let’s get our hands dirty. Creating a great dust bath area is simple when you break it down. I follow these four steps every time I set up a new one, and it works like a charm.
Step 1: Choose the Right Container
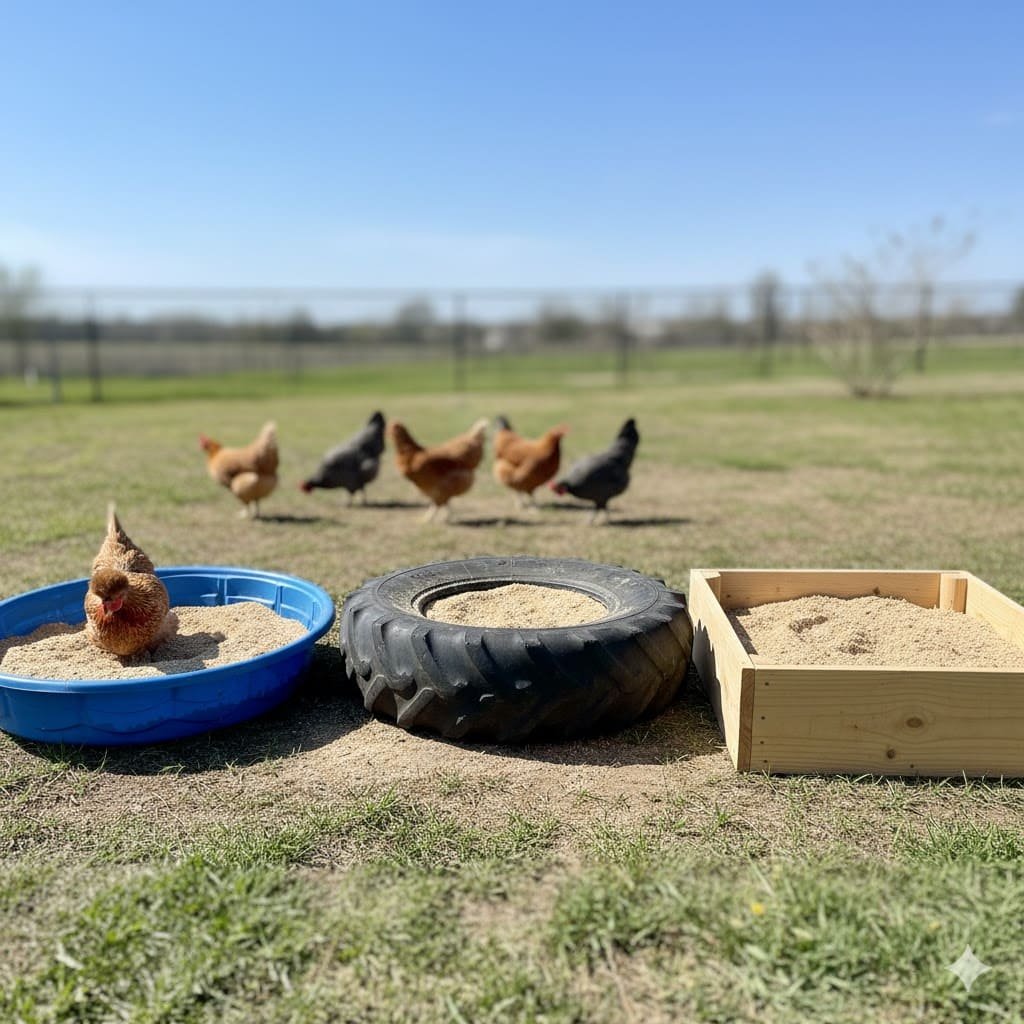
First things first, you need something to hold all that good stuff. Your container needs to be big enough for a hen to really get in there and flop around. I’ve found that anything less than 24 inches (60 cm) wide and 8 inches (20 cm) deep is just too small. What works well? Shallow kiddie pools are fantastic and cheap. I’m also a big fan of using old tractor tires or building a simple wooden frame. For bigger flocks, you’ll want more than one. You can find some great ideas in these chicken coop plans for 20 chickens.
Step 2: Select the Perfect Location
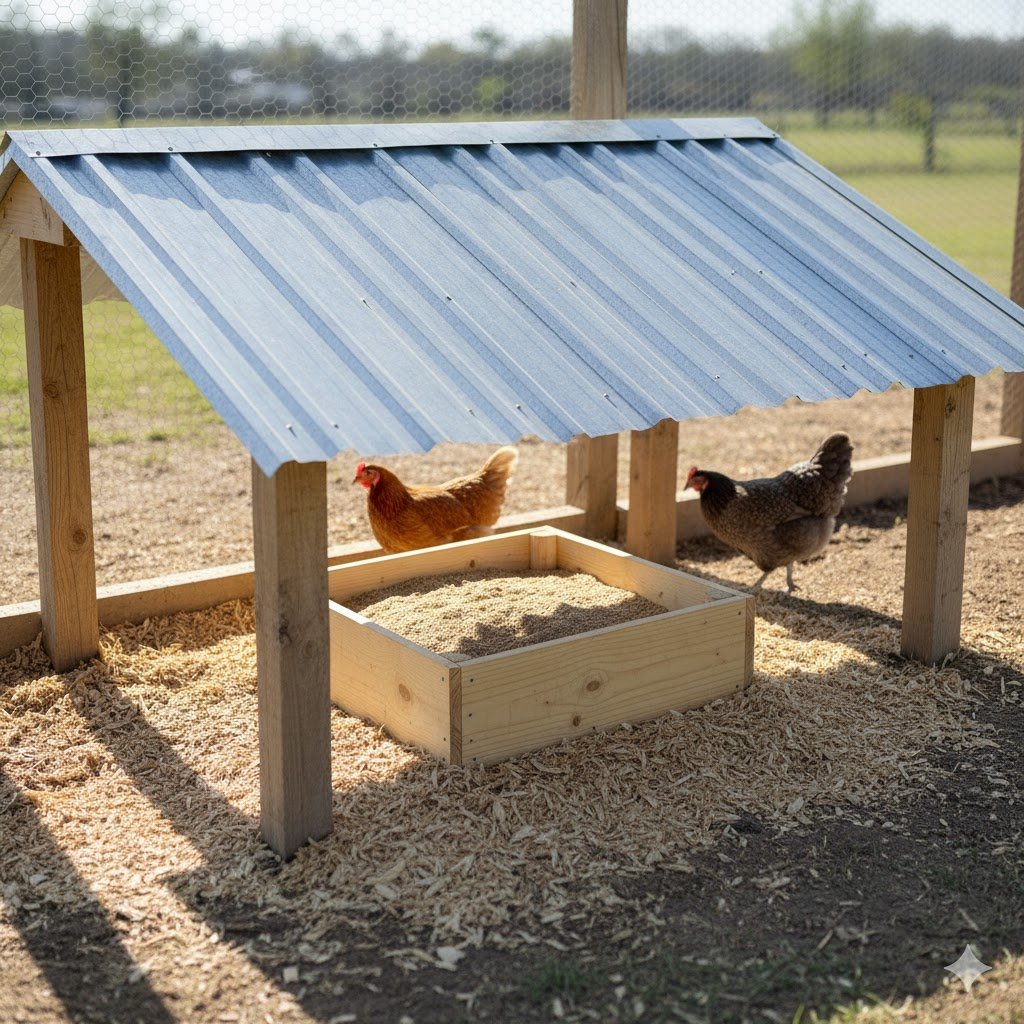
Where you put it matters. A lot. A damp dust bath is a useless one. The best place to put your chicken coop usually has a covered spot that’s perfect. Your goal is to keep it bone-dry. An ideal spot is inside the coop (if it’s well-ventilated) or in a covered part of the run.
Step 3: Mix the Perfect Recipe
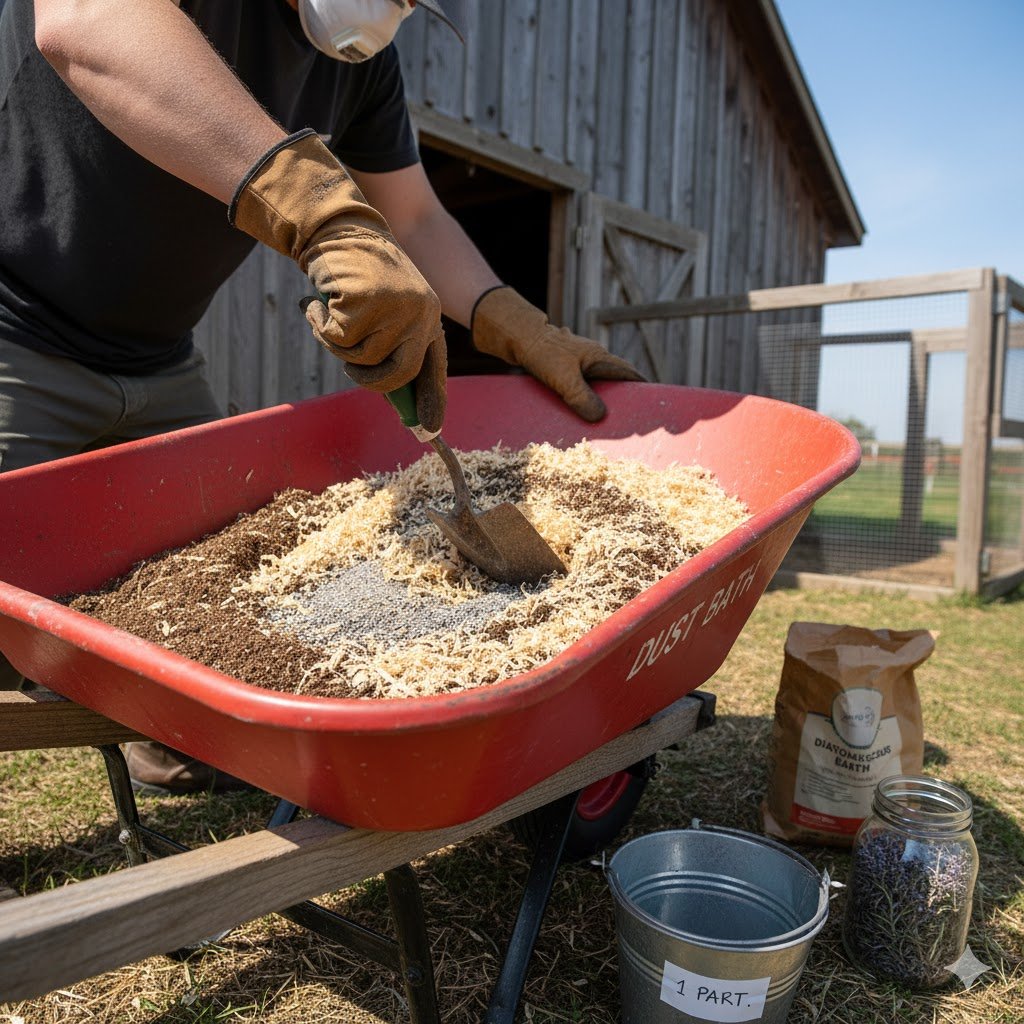
Now for the fun part. Grab a wheelbarrow and let’s mix. Remember to measure by volume (I use an old bucket), not weight. And I’ll say it again: wear a dust mask, especially for the DE.
✅ Quick Recipe Checklist
- 4 parts Fine Sand
- 2 parts Dry Topsoil
- 2 parts Fine Pine Shavings
- 1 part Sieved Wood Ash
- 1/2 part Food-Grade Diatomaceous Earth
- 1/2 part Dried Herbs (lavender, mint, etc.)
Mix it all up until it’s light, uniform, and just begging for a chicken to jump in.
Step 4: Maintain the Dust Bath
Finally, fill your container with 4-6 inches (10-15 cm) of your mix. Your flock will probably know what to do, but if not, a sprinkle of scratch grains on top usually does the trick. For it to keep working, you’ve got to maintain it. Scoop droppings daily and completely change out the mix every 2-4 weeks. A clean bath helps keep the whole chicken coop from smelling.
Your Weekend Project: Following these steps to build and maintain a dust bath is a small project with a huge payoff. It’s one of the best things you can do for your flock’s well-being.
How to Make Wood Ash for Chickens Safely
Making your own wood ash is easy and free, but you have to do it right. I’ve been using ash from our wood stove for years, and it’s a fantastic resource. Here’s my process to ensure it’s safe for the flock.
First, only use ash from clean, untreated hardwoods. Think oak, maple, or fruitwoods. Never use ash from treated lumber, painted wood, glossy paper, cardboard, or charcoal briquettes. These contain chemicals that can be toxic.
Let the ash cool down completely in a metal container for at least 48 hours. Seriously, don’t rush this part. Hot embers can be a fire hazard. Once it’s completely cool, sift it through a screen or a colander with small holes to remove any large charcoal chunks or debris. You want a fine, powdery consistency. Store your finished ash in a dry, sealed container, like a metal bucket with a lid, to keep it from getting damp.
Remember This: Safe sourcing is everything. Stick to clean hardwoods, let it cool completely, and sift it well.
Do Dust Baths Get Rid of Mites? Understanding Effectiveness
So, here’s the bottom line: Yes, a properly maintained dust bath is incredibly effective at preventing and controlling mild to moderate mite populations. It works. This isn’t just my experience; scientific research backs it up. In fact, research published in the Journal of Economic Entomology demonstrated that dust bathing in diatomaceous earth and similar materials reduced northern fowl mite infestations by 80-100% within one week. The mechanical killing action—suffocating and dehydrating the mites—is a powerful, natural solution.
But, and this is important, a dust bath is a preventive tool. It’s not a silver bullet for a severe infestation. If you find a chicken that is just crawling with mites, you’ll need to intervene more directly. Think of the dust bath as daily hygiene—it keeps you from getting sick, but it won’t cure a major illness on its own. For a complete strategy, combine it with other natural ways to keep parasites out of your coop.
The Reality Check: Trust your dust bath as your number one tool for mite prevention. But always be ready to step in with other treatments if a serious infestation occurs.
Common Dust Bath Mistakes to Avoid
The biggest mistake I see new chicken keepers make is thinking that any old pile of dirt will do. To get real mite-prevention benefits, you have to be intentional. Here are the most common errors I’ve seen that can make your dust bath useless—or worse.
- Using Too Much DE: It’s tempting to think more is better, but it’s not. Exceeding a 5% ratio of diatomaceous earth can kick up too much fine dust, which isn’t great for your flock’s respiratory systems. A little goes a long way.
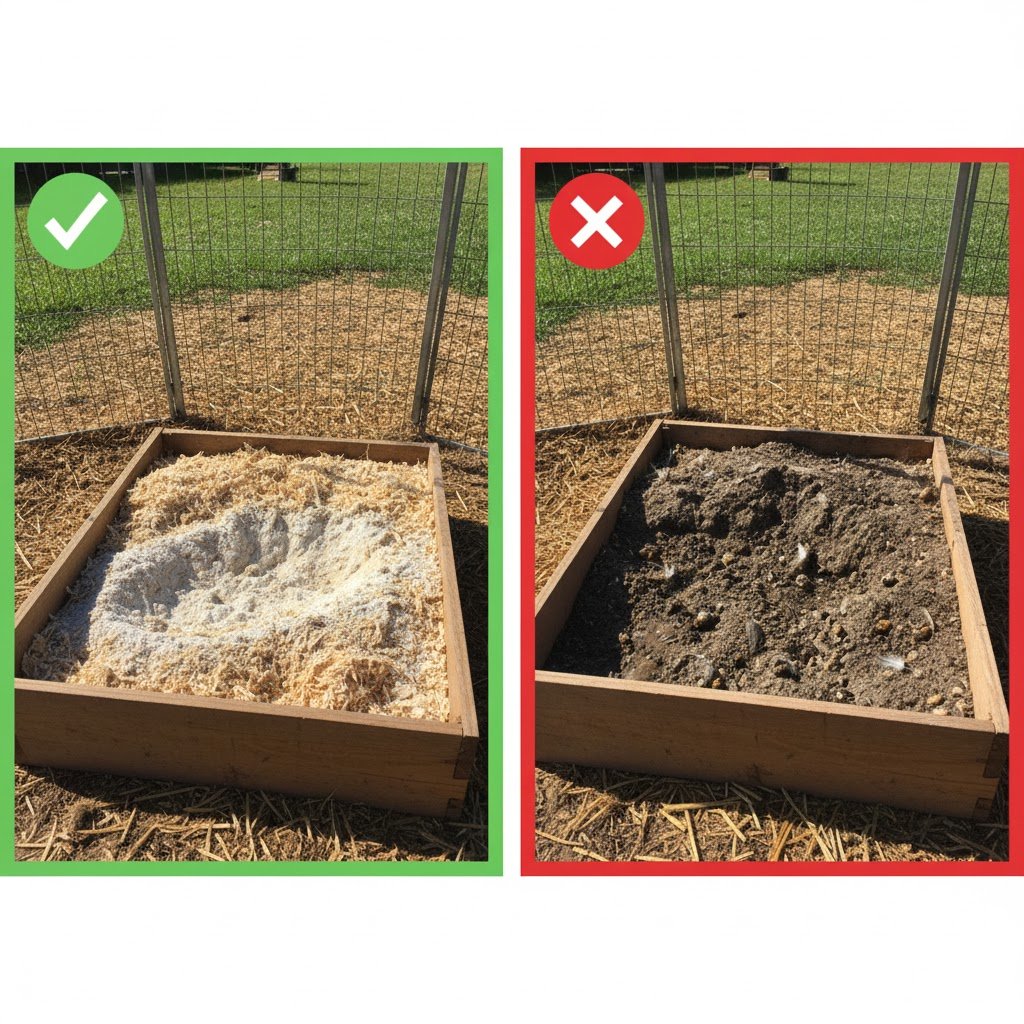
- Letting it Get Wet: I can’t stress this enough. A damp dust bath is a disaster. It clumps up, becomes a potential breeding ground for mold, and your chickens won’t touch it. Keep it dry, always.
- Using the Wrong Wood Ash: Never, ever use ash from treated wood, charcoal briquettes, or trash fires. You risk poisoning your flock. Stick to clean, sifted ash from hardwoods.
- Making it Too Small: Chickens need room to flop, wiggle, and kick. A tiny container just won’t cut it. They need to be able to get their whole body covered.
- Forgetting Maintenance: A dust bath full of poop is not a spa. It’s a toilet. As the University of Florida Extension emphasizes, consistent access to a clean dust bath is a primary prevention method. Your chickens will avoid a dirty one. You’ve got to scoop it daily and refresh it regularly.
Remember This: Avoid these five simple mistakes, and you’ll have a dust bath that is a safe, inviting, and powerful health tool for your flock.
Adapting Your Dust Bath for the Seasons
One thing I learned quickly here in Nigeria is that a dust bath isn’t a “set it and forget it” project. You have to adapt your strategy based on the season to keep it effective.
Summer & Rainy Season Strategy
During the hot, dry months, a dust bath is a chicken’s best friend for cooling down. The biggest challenge is keeping it in the shade to prevent the sand from getting scorching hot. I move my bath to the north side of the coop where it gets consistent shade. High humidity during the rainy season is the main enemy. You’ll need to refresh the mixture more often, maybe every couple of weeks, to prevent clumping and potential mold growth. Adding a bit of barn lime to the coop floor near the bath can also help manage overall dampness.
Winter & Harmattan Strategy
During the cooler, drier Harmattan season, the dust can get very fine and airborne. Ensuring your coop has good airflow is key. For those in colder climates dealing with snow and frost, an outdoor dust bath is a no-go. This is when a portable indoor solution, like a rubber tub or wooden box inside a well-ventilated coop, is essential. A great resource for this is the winterizing chicken coop guide.
The Main Idea: Stay ahead of the weather. Keep it dry in the wet season and accessible in the cold season.
Troubleshooting: What If My Chickens Won’t Use the Dust Bath?
It’s rare, but every once in a while, I hear from someone whose flock seems to be snubbing their brand-new dust bath. Don’t worry, it’s usually an easy fix.
First, play detective. Is the mixture damp? Chickens hate a muddy bath. Is the container too deep or hard to get into? Young pullets can sometimes be intimidated by high walls.
If everything looks right, it’s time for a little encouragement. My go-to trick is to sprinkle a handful of scratch grains or mealworms on top of the mixture. Their natural instinct to forage and scratch will get them in the box, and they’ll quickly figure out what it’s for. You can also try gently placing one of your more confident hens in the bath. Usually, once one starts, the rest of the flock will follow her lead.
Your Quick Fix Plan: Check for dampness first. If it’s dry, make it more tempting with treats.
My Trusted Brands and Product Tips (Optional)
While you can find most of these ingredients locally, some people prefer the convenience of ordering specific products. Here are a few brands I’ve personally used and can recommend for their quality and consistency.
- For Sand: I just use generic Quikrete Play Sand from a local hardware store. It’s washed and has a fine, consistent texture that’s perfect.
- For Diatomaceous Earth: It’s critical to get the right stuff. I trust Harris Food Grade Diatomaceous Earth. It’s pure and comes with a handy duster for other coop applications.
- For Herbs: If you’re not growing your own, Scratch and Peck Feeds Cluckin’ Good Herbs is a fantastic, high-quality blend designed specifically for poultry.
- For Pine Shavings: Any brand of fine pine shavings from a farm supply store works well, but I’ve had good results with the dust-extracted bags from Standlee or Tractor Supply’s store brand.
A Final Thought: You absolutely don’t need fancy brands to make a great dust bath. But if you want a reliable starting point, these are products I’ve found to be worth the money.
Frequently Asked Questions (FAQ)
I get asked a lot of questions about dust baths. Here are the answers to the most common ones.
Q: What to put in chicken dust bath for best mite prevention?
A: For the best results, you’ll want a mix: 40% fine sand, 20% dry soil, 20% wood shavings, 10% sieved wood ash, 5% food-grade diatomaceous earth, and 5% dried pest-repelling herbs.
Q: Can I use only sand for a dust bath?
A: You can, but it won’t be nearly as effective against mites. It’s the combination of ingredients that gives you the real pest-fighting power.
Q: How deep should a chicken dust bath be?
A: Aim for at least 4-6 inches (10-15 cm) of mixture. This gives them enough depth to really dig in and get covered.
Q: Is diatomaceous earth safe for chickens to breathe?
A: In small, controlled amounts (like the 5% in this recipe), food-grade DE is considered safe. However, the dust can be an irritant, which is why you don’t want to overdo it and should always wear a mask when mixing.
Q: How often should chickens dust bathe?
A: They’ll do it whenever they feel the need. Sometimes that’s daily, sometimes every few days. The important thing is that a clean dust bath is always available for them.
Q: How often should I change the dust bath?
A: Scoop droppings daily and completely refresh the mixture every 2-4 weeks, or sooner if it becomes damp or heavily soiled.
Q: Can I make a dust bath without diatomaceous earth?
A: Yes, but it will be less effective against mites. You can substitute with extra wood ash (increase to 15%) for similar anti-parasitic benefits.
Q: Where should I put my chicken dust bath?
A: Place it in a dry, sheltered location—either inside a well-ventilated coop or in a covered section of the run. Avoid areas exposed to rain or sprinkler systems.
Q: Will chickens naturally use a dust bath?
A: Yes, dust bathing is an instinctive behavior. Most chickens will use it immediately, but you can encourage first-timers by sprinkling scratch grains on top.
Q: What should I do for a severe mite infestation?
A: For severe infestations that dust baths alone cannot control, it’s crucial to take further action. Mississippi State University Extension provides comprehensive treatment protocols, which may include approved chemical treatments when necessary. Always consult an expert or veterinarian in these cases.
Conclusion: A Simple Step for a Healthy Flock
Look, providing a well-maintained dust bath is one of the easiest and most rewarding things you can do for your flock. It’s cheap, it’s natural, and it taps into their own instincts to help them stay healthy and pest-free.
When you use the right mix of materials, you’re creating a powerful tool that does more than just kill mites—it reduces stress, improves feather quality, and helps your birds feel good. A busy dust bath is one of the surest signs you have a thriving flock. And at the end of the day, that’s what it’s all about. You’re giving your chickens a space to just be chickens. And they’ll thank you for it.

Oladepo Babatunde is the founder of ChickenStarter.com. He is a backyard chicken keeper and educator who specializes in helping beginners raise healthy flocks, particularly in warm climates. His expertise comes from years of hands-on experience building coops, treating common chicken ailments, and solving flock management issues. His own happy hens are a testament to his methods, laying 25-30 eggs weekly.