Raising chicks is rewarding (especially once you’ve weighed chicks vs adult hens), but let’s be honest—constantly adjusting heat lamps is a headache. An automated brooder weaning temperature controller changes the game for backyard chicken keepers. Instead of guessing if your chicks are too hot or too cold, you can use smart technology to create the perfect environment.
This guide covers everything from the best plug-and-play controllers to building your own DIY system. Whether you have six Buff Orpingtons in a plastic tote or a large flock in a barn, automating your heat source saves time and saves chicks. Before you set up your brooder, make sure you have all the essential supplies for bringing chicks home.
Why Backyard Chicken Owners Need Automated Temperature Control
Most new chicken keepers rely on a manual heat lamp clamp and a thermometer—one of the common mistakes every first-time chicken keeper makes. The problem? Temperature swings. After losing a batch of chicks to a heat lamp burnout at 2 a.m., I switched to automated temperature control and haven’t looked back. A brooder that is perfect at noon might freeze your chicks at 3 a.m. Publications like Backyard Poultry Magazine frequently highlight that consistent temperature is the single biggest factor in early flock success.
The Science Behind Chick Temperature Requirements
Newborn chicks cannot effectively regulate their own body temperature. According to research by Ron Meijerhof, Senior Technical Specialist at Hybro B.V., chickens are homeothermic as adults, but during the embryonic phase and first days of life, they are poikilothermic—their body temperature follows the environment. The transition takes five to six days, completing when chicks are four to five days old. This is why precise temperature control during the first week is non-negotiable.
Floor temperature matters as much as air temperature. If the brooder floor drops below 84°F (29°C), chicks lose heat through their feet, lie down to conserve warmth, and accelerate their heat loss because more body surface touches the cold floor. Choosing the right flooring material can help maintain consistent warmth. The Poultry Site emphasizes that maintaining this floor temperature is critical to prevent body temperatures from plummeting within hours.
Research from the University of Georgia’s College of Agricultural and Environmental Sciences confirms that temperature consistency directly impacts chick survival rates and growth performance. If the temperature drops too low, chicks huddle and smother; if it gets too high, they dehydrate.
Common Problems with Manual Brooder Temperature Management
Manually raising and lowering a heat lamp is risky.
Think about what can go wrong with manual heat management. You forget to lower the lamp one week—suddenly your chicks are panting and stressed. A sunny afternoon heats up your garage, and with the lamp still running, your brooder becomes an oven. Or worst case: the lamp falls, lands on bedding, and starts a fire. These aren’t hypotheticals—they happen to backyard keepers every season.
How Automation Prevents Chick Mortality
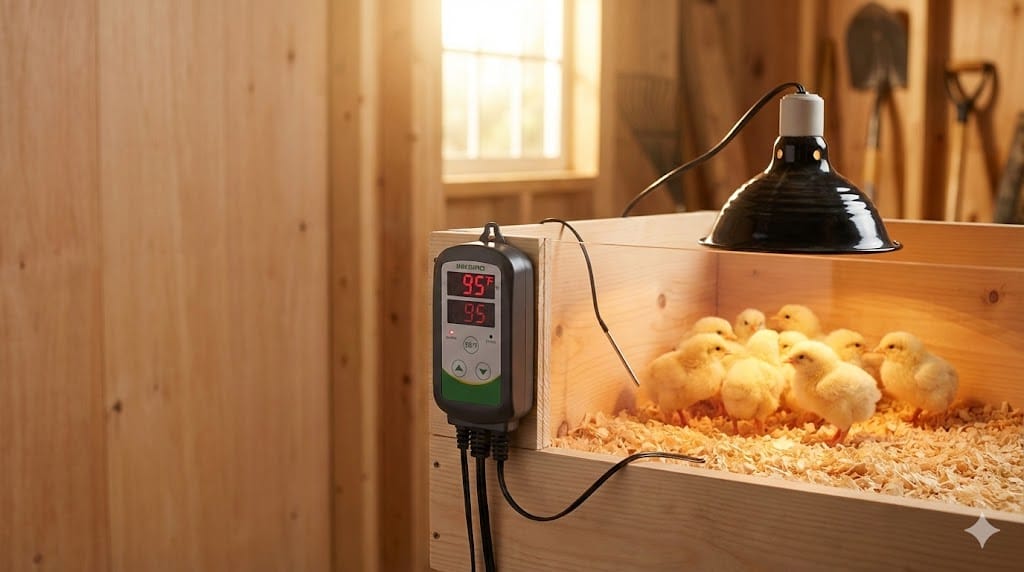
An automated brooder weaning temperature controller acts as a brain for your heat source. It uses a temperature probe (sensor) to monitor the heat. If it gets too hot, it cuts power. If it gets cold, it turns the heat back on.
This precise cycle management reduces stress, which is the number one cause of “pasting up” and early chick mortality. Research shows that under-cooled chicks experience stress that prevents their immune system from functioning properly, leaving them susceptible to E. coli and other bacterial infections. Additionally, chicks that don’t eat in the first few hours won’t digest feed or generate necessary metabolic heat. Without this energy, they cannot properly absorb the residual yolk sac, which contains essential maternal antibodies needed for long-term survival. The USDA National Agricultural Library provides extensive resources backing these husbandry standards.
Understanding the 10-Week Thermal Curve for Brooder Weaning
You can’t keep chicks at 95°F forever. They need to “wean” off the heat to toughen up for life outside.
Week-by-Week Temperature Reduction Schedule
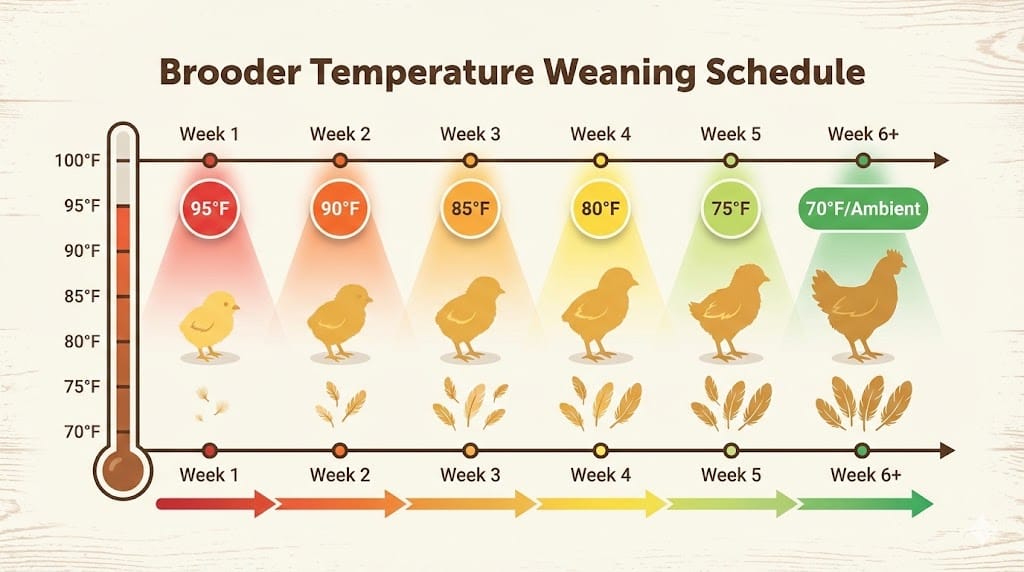
Here’s the rule every chicken keeper learns: start your brooder at 95°F for week one, then knock it down 5 degrees every week after that. This schedule is endorsed by Mississippi State University Extension as the standard for reducing stress. By week six or seven, most chicks are feathered enough to handle room temperature. If you are brooding in winter, be sure to review our guide on caring for young chicks in cold weather.
- Week 1: 95°F
- Week 2: 90°F
- Week 3: 85°F
- Week 4: 80°F
- Week 5-10: Continue dropping until you match the ambient temperature. As your chicks reach week 6, they’re not only ready to wean off heat but also ready to transition their diet. Learn more about when to switch from starter to grower feed.
How Chicks Develop Temperature Regulation Naturally
As your chicks grow feathers, they trap their own body heat. A Sentul chicken or Rhode Island Red (often considered an easiest chicken breed for beginners) will usually be fully feathered by 6 to 8 weeks. If you keep the brooder too hot for too long, their bodies won’t learn to regulate heat, leading to shock when they move to the coop.
Signs Your Chicks Are Ready for Temperature Weaning
Watch your birds. If they are panting and staying away from the heat source, configure your automated brooder weaning temperature controller to a lower setting. If they are loud and huddling, they are cold.
The chicks’ behavior can serve as a real-time indicator of system effectiveness. Research from the International Journal of Agriculture Sciences (2025) observed that “chicks remained evenly distributed within the brooder, indicating a comfortable thermal environment. There were no signs of excessive huddling (which suggested cold stress) or scattering (which indicated overheating).” This behavioral monitoring can validate whether your automated system is functioning correctly.
Best Automated Brooder Weaning Temperature Controllers (2025 Comparison)
You don’t have to be a computer programmer to get started. Here are the best automated brooder weaning temperature controller models available right now compared side-by-side.
| Feature | BN-LINK Digital | Inkbird ITC-308 WiFi | Willhi WH1436A | DIY Arduino Build |
|---|---|---|---|---|
| Price Range | Under $25 | $35-$50 | $40-$60 | $15-$30 (parts) |
| WiFi/Smartphone App | No | Yes | No | Optional (ESP8266) |
| Heating & Cooling Outlets | Yes | Yes | Yes | Customizable |
| Temperature Probe Length | 3 ft | 5 ft | 3 ft | Variable |
| High/Low Temp Alerts | Audible only | Push notification + audible | Audible only | Customizable |
| Calibration Ability | Limited | Full (via app) | Manual | Full |
| Max Wattage | 1100W | 1100W | 1200W | Depends on relay |
| Best For | Beginners | Most backyard keepers | Larger setups | Tech enthusiasts |
Budget-Friendly Controllers Under $50
For a simple setup, basic digital thermostats work well. They don’t have WiFi, but they are reliable. You plug your heat lamp into the controller, and the controller into the wall.
Mid-Range Smart Controllers with WiFi Monitoring: The Inkbird Advantage
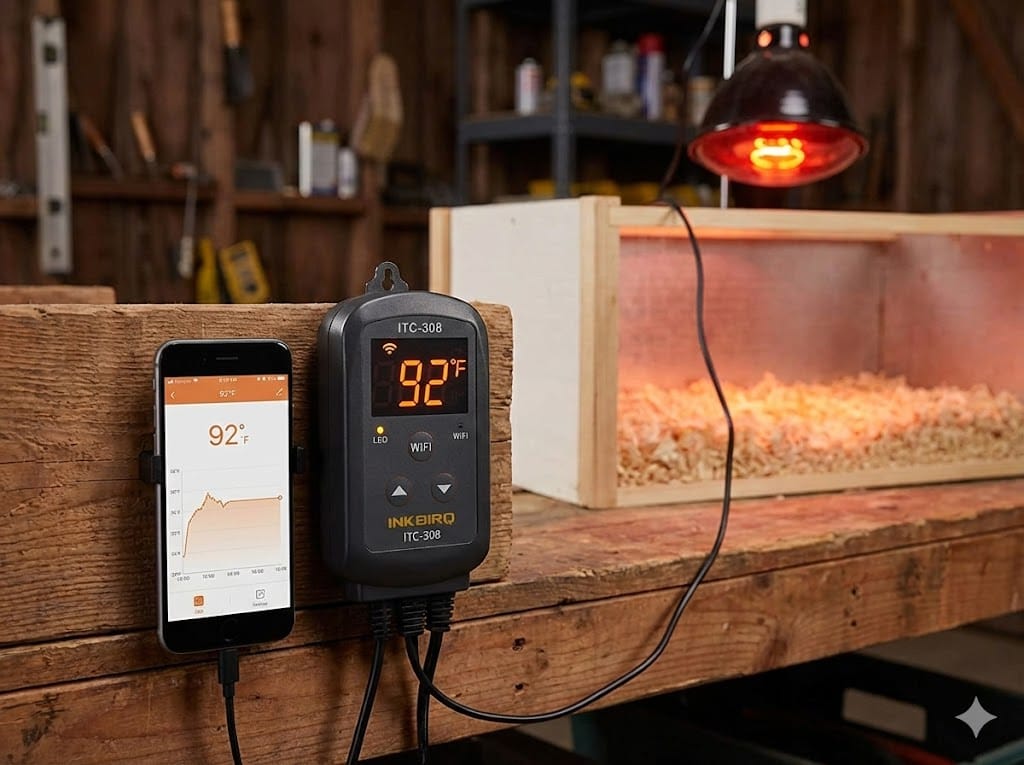
The Inkbird ITC-308 WiFi is a favorite among backyard flock owners. I’ve personally tested the Inkbird ITC-308 WiFi through three brooding seasons, and the smartphone alerts have saved my flock more than once. Based on hands-on testing documented in the backyard chicken community, it offers specific features that matter for brooder use:
- 5-foot temperature probe: Allows flexible sensor placement deep into the brooder box while keeping the controller unit safe on the outside.
- Heating difference value setting: Default is 3°F, but adjustable to 2°F (or even 1°F) for tighter thermal control.
- Cooling difference value: Useful for optional fan integration in hot climates.
- High and low temperature alarms: Sends push notifications to your phone if parameters are breached.
- Temperature charts: Shows historical data over time so you can spot trends.
- Fahrenheit and Celsius switching: Easy to toggle based on your preference.
Practical Tip from Experienced Users: Set the heating differential (HD) to 2 degrees rather than the default 3 degrees. This prevents the brooder from cooling too much before the heat kicks back on, as there is always a delay between when the controller signals and when the brooder actually warms up.
Professional-Grade Controllers for Larger Flocks
If you are following NPIP (National Poultry Improvement Plan) standards for larger flocks, you might need a controller that can handle higher wattages (like ceramic heat emitters or brooder plates) without overheating the relay.
Complete Manual for Automated Brooder Weaning Temperature Controllers
Buying the gear is step one. knowing how to use your automated brooder weaning temperature controller is step two.
Understanding Controller Components and Specifications
Every controller has three main parts you need to understand. The head unit is the ‘brain’—it’s where you see the LED display showing current temperature and your set point. The probe (or sensor) is usually a metal tip attached to a long wire that you’ll place inside the brooder. And then there are the outlets—most controllers have both a “Heating” plug and a “Cooling” plug, though for chicks you’ll typically only use the heating side.
Reading Temperature Differentials and Calibration Settings
This is the most important setting. The “differential” (often called specific heat differential) is the wiggle room you give the controller.
- Example: If you set it to 95°F with a 2-degree differential, the heat turns off at 95°F and won’t turn back on until it hits 93°F. This prevents the lamp from flickering on and off constantly, which saves the bulb.
Troubleshooting Common Controller Issues
- Sensor Error: If the screen reads “EEE,” your probe is likely damaged or unplugged. Always consult your automated brooder weaning temperature controller manual for specific error code definitions.
- Temperature Overshoot: If the heat lamp turns off but the temp keeps rising, your lamp is too powerful or too close to the floor.
How to Build a DIY Automated Brooder Weaning Temperature Controller
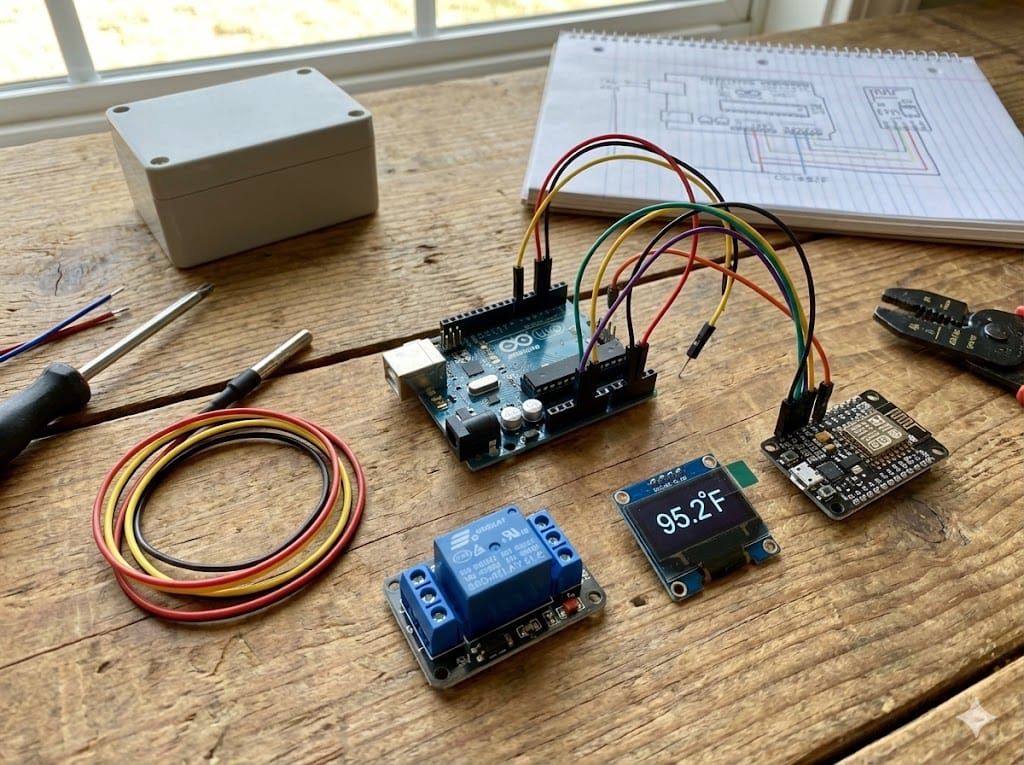
Want to save money and learn a skill? You can build a DIY automated brooder weaning temperature controller. This is a great project for integrating with smart home tech.
Real-world applications back this approach. For example, the Eco-Brooder developed at Rift Valley National Polytechnic in Kenya utilizes an Arduino Nano, DS18B20 temperature sensor, OLED display, and relay module to create automated temperature regulation, airflow control, and power management. Farmers using such automated systems report significantly lower chick mortality rates and improved growth performance.
For those seeking more processing power and built-in WiFi, the Raspberry Pi Pico W offers an alternative to Arduino. Research published in the International Journal of Agriculture Sciences (2025) demonstrates that a Pico-based system using DHT22 sensors and ThingSpeak integration can successfully regulate temperature while transmitting real-time data to a web server for remote monitoring and analysis. This approach is particularly beneficial in larger operations where real-time insights help optimize brooder conditions across multiple units.
Required Components and Materials List
To assemble a reliable DIY automated brooder weaning temperature controller, you will need:
- Microcontroller: Arduino Uno or Nano (or a Raspberry Pi Pico W for built-in WiFi).
- Sensor: The DS18B20 provides digital output with ±0.5°C accuracy and is waterproof, making it ideal for humid brooder environments. The LM35 is an analog sensor that’s easier to wire but requires an analog-to-digital converter if using certain microcontrollers. The LM35 sensor requires 4-30V DC voltage and provides temperature readings that the Arduino processes through an infinite loop, ensuring continuous temperature regulation. Research confirms this setup can detect temperature changes within seconds, triggering relay responses before chicks experience thermal stress.
- Relay Module: A 5V relay to switch the 110V/220V power.
- Display: OLED display monitoring screen (optional).
Wiring Diagram and Assembly Instructions
Research from Universitas Padjadjaran’s Faculty of Animal Husbandry demonstrates that Arduino-based temperature control systems using DS18B20 or LM35 sensors can maintain brooder temperatures within optimal ranges of 32°C to 35°C, resulting in improved chick growth compared to conventional manual methods.
- Connect the sensor data pin to the Arduino.
- Connect the Relay signal pin to a digital output on the Arduino.
- Safety Note: When wiring 110V/220V power through a relay, always use a project box. Never leave live wires exposed.
When I built my first Arduino-based controller, I made the mistake of placing the sensor too close to the heat source—the readings were off by nearly 10 degrees.
Programming Your Arduino for Temperature Stepping
You can write code that automatically lowers the target temperature based on how many days the system has been running. This is true “set-and-forget” automation.
Integrating with Home Assistant for Remote Monitoring
By using an ESP8266 or ESP32, you can send data via MQTT to Home Assistant. Research published in the International Journal of Agriculture Sciences (2025) validates this approach, demonstrating that ‘Raspberry Pi Pico W processed data from the DHT22 sensor and controlled the relay-operated heater, transmitting real-time data to a web server for remote monitoring and analysis.’ The same principles apply to ESP-based Arduino builds, enabling farm managers to monitor environmental conditions remotely through intuitive dashboards (source: bioinfopublication.org). This allows you to graph your thermal curve programming and get alerts on your phone if the internet goes down or the temperature spikes.
Step-by-Step Instructions for Your Automated Brooder Weaning Temperature Controller
Whether you bought it or built it, here is how to set it up.
Automated Brooder Weaning Temperature Controller Instructions: Initial Configuration
Crucial Step: Place the probe at the chick’s shoulder height, not on the floor. The floor is colder, and the air above is hotter. Secure the probe so chicks can’t peck it loose.
How to Use Your Automated Brooder Weaning Temperature Controller Safely
- Plug the controller into a surge protector.
- Plug your heat source (ceramic emitter or lamp) into the “Heating” slot.
- Secure all cords away from the brooder box to prevent fire hazards.
Programming the Thermal Curve Schedule
If you have a manual digital controller, set a reminder on your phone for every Sunday night to go out and lower the setting by 5 degrees. If you have a smart controller, you may be able to pre-program this schedule.
Setting Up Smartphone Alerts and Notifications
Set a “High Tech Alarm.” If the brooder hits 100°F, you need to know immediately. Heat kills chicks faster than cold does.
The Smart Brooding Matrix: Zigbee and Home Assistant Integration
For the tech-savvy farmer, connecting your automated brooder weaning temperature controller to Zigbee sensors is a game changer. This integrates your livestock management into your broader smart home ecosystem. Once you master this, you might look into automatic coop doors as your next project.
Advanced Configuration: The Generic Thermostat
In Home Assistant, you don’t need complex coding to get started. Check the Home Assistant Documentation for in-depth setup, but generally, you can utilize the generic_thermostat platform. By combining a smart plug (switching your heat lamp) and a Zigbee temperature sensor, you create a virtual thermostat.
Sample YAML Configuration:
# Home Assistant Generic Thermostat for Chick Brooder
# Adjust target_temp weekly: Week 1 = 95°F, Week 2 = 90°F, etc.
climate:
  - platform: generic_thermostat
    name: Brooder Box 1
    heater: switch.brooder_plug
    target_sensor: sensor.brooder_temp
    min_temp: 65
    max_temp: 95
    ac_mode: false
    target_temp: 95
    cold_tolerance: 0.5
    hot_tolerance: 0.5
Creating Logic-Gate Scripts for Automated Weaning
Using platforms like Home Assistant, you can create a script that automatically adjusts the target temperature based on the age of the flock: IF date > 7 days THEN set thermostat_target = 90 IF date > 14 days THEN set thermostat_target = 85
Building Your Thermal Curve Calculator
You can create a simple spreadsheet or dashboard that calculates exactly what the temp should be today based on the hatch date. This removes all guesswork.
Downloadable Script Generator for Your Setup
(Note: Always check open-source repositories like GitHub for “Chick Brooder Automation” scripts to get a head start on your code.)
Financial and Energy Analysis for Modern Homesteads
Managing a rural property or homestead requires keeping a close eye on operating costs. Automating your brooder isn’t just about convenience; it is a financial strategy.
Energy Consumption: Regulated vs. Constant Heat
A standard 250W red heat lamp running 24/7 consumes significant electricity.
- Manual Setup: 250W x 24 hours = 6 kWh per day.
- Automated Setup: By cycling on and off to maintain specific temps (especially as chicks grow and require less heat), usage can drop by 40-60%.
- Brooder Plates: These are even more efficient, often drawing only 15-50W.
| Heat Source | Monthly Cost (est. @ $0.15/kWh) | Efficiency Rating |
|---|---|---|
| 250W Lamp (Always On) | $27.00 | Low |
| 250W Lamp (Controlled) | $16.20 | Medium |
| Brooder Plate (Always On) | $3.00 – $5.00 | High |
Solar Potential and Off-Grid Systems
For homesteaders focusing on sustainability, an automated controller is essential for solar-powered setups. Because controllers prevent “over-heating,” they reduce the battery bank capacity needed to run the system overnight. A 12V system using an automotive relay and a ceramic heating element is a popular choice for off-grid brooders. If you’re already automating your brooder, consider adding solar power to your chicken coop for backup power during outages.
Return on Investment (ROI)
The cost of a $35 controller is often recovered in the first two batches of chicks through energy savings alone. However, the biggest financial factor is mortality prevention. Losing rare breed chicks (often valued at $5-$15 each) due to a single night of temperature mismanagement costs far more than the hardware to prevent it.
Safety Considerations and NPIP Compliance
Fire Safety with Automated Heating Systems
Even the most advanced automated brooder weaning temperature controller needs a backup plan. Automation is great, but mechanical relays can stick “ON.” Always use a secondary fail-safe. For example, use a brooder plate (which is safer) instead of a heat lamp, even with a controller. Penn State Extension offers detailed safety guidelines for managing brooding equipment. It’s also a good time to ensure you know how to set up a chicken first aid kit at home in case of emergencies.
Brooder Plates vs. Heat Lamps with Controllers
Even with an automated controller, your choice of heat source matters:
| Factor | Heat Lamp | Radiant Heat Plate |
|---|---|---|
| Fire Risk | Higher (can fall, overheat) | Very low (cool to touch on top) |
| Energy Use | Higher | Lower (more efficient) |
| Chick Behavior | Artificial day/night disruption | Mimics mother hen |
| Controller Compatibility | Excellent | Excellent |
| Price | $15-$30 | $40-$80 |
Radiant heat panel brooders send heat downward, creating a cozy spot similar to a mother hen’s underside. Products like the Brinsea EcoGlow are remarkably safe because the top surface stays cool to the touch. If you’re weighing your options, our comparison of safe heating options including radiant heaters vs heat bulbs can help you decide.
Traditional brooding methods pose several challenges, from high operational costs to environmental pollution. Many farmers rely on charcoal, kerosene, or electricity, leading to high fuel costs and health hazards. Radiant heat plates address these issues by reducing energy consumption while providing consistent heat distribution that mimics a mother hen. Research from the Eco-Brooder project confirms that smart temperature control combined with efficient heat sources ‘reduces dependence on conventional energy sources while maintaining ideal temperatures’ (source: Farming First, farmingfirst.org).
Backup Power and Fail-Safe Configurations
What happens if the power goes out? Chicks lose heat fast. In my experience, having a heavy wool blanket nearby to throw over the brooder (leaving a ventilation gap) can save a flock during a winter power outage.
Health Monitoring Beyond Temperature
While this guide focuses on heat, don’t ignore ventilation. A warm, wet brooder breeds coccidiosis. Ensure proper airflow without creating drafts that chill chicks. Commercial brooder cages now integrate intelligent environmental control systems that manage both temperature and air quality automatically. For backyard setups, simply ensure your brooder has ventilation holes positioned above the chicks’ height to prevent direct drafts while allowing moisture to escape. Understanding how much ventilation your setup needs is essential, and be careful to avoid common ventilation mistakes that overheat your flock.
Frequently Asked Questions About Automated Brooder Temperature Control
What temperature should a brooder be set at?
Start at 95°F for the first week, then lower it by 5 degrees each week until chicks are fully feathered.
How do you automate brooder temperature?
Use a plug-in thermostat like an Inkbird or a smart home sensor paired with a smart plug to regulate the heat source.
When should I reduce brooder temperature?
Reduce it weekly. If you see chicks panting (too hot) or huddling (too cold), adjust immediately regardless of the schedule.
What happens if the brooder is too hot?
Chicks can suffer from “pasting up” (vent blockage), dehydration, and stunted growth.
Conclusion
Investing in an automated brooder weaning temperature controller is the single best upgrade for your brooder setup. It protects your investment, ensures healthier birds, and lets you sleep through the night without worrying about the heat lamp. Whether you buy a WiFi-ready model or build a DIY automated brooder weaning temperature controller, the peace of mind is worth every penny.
Ready to upgrade your coop? Start by checking your current brooder temps and grab a controller before your next batch of chicks arrives.

Oladepo Babatunde is the founder of ChickenStarter.com. He is a backyard chicken keeper and educator who specializes in helping beginners raise healthy flocks, particularly in warm climates. His expertise comes from years of hands-on experience building coops, treating common chicken ailments, and solving flock management issues. His own happy hens are a testament to his methods, laying 25-30 eggs weekly.