This post contains affiliate links. As an Amazon Associate, I earn from qualifying purchases at no extra cost to you. Product recommendations are based on my personal experience raising backyard chickens.
Pasty butt (pasted vent) occurs when a chick’s droppings dry and block the vent opening, preventing waste elimination. To treat it, soften the dried droppings with warm water for 30 to 60 seconds, gently wipe away the debris without pulling, dry the chick completely, and optionally apply a thin protective barrier to surrounding feathers. The condition is usually caused by improper brooder temperature, shipping stress, dehydration, or poorly digestible feed ingredients (particularly soy) and is most common in chicks under one week old.
Bringing home your first fluffy baby chicks is incredibly exciting, but discovering one has pasty butt can be alarming. I remember the first time I spotted it on a two-day-old Buff Orpington chick: a crusty, dark mass completely covering her tiny vent. My heart sank, but I quickly learned this is one of the most common and treatable issues for new chicks.
This guide will provide a calm, step-by-step process to fix the problem and prevent it from happening again, ensuring your new flock gets a healthy start.
Disclaimer: I am not a veterinarian. This guide covers common, mild cases of pasted vent based on my experience and established poultry husbandry practices. If your chick is weak, bleeding, or multiple chicks are affected, contact a poultry veterinarian.
Note: This guide is for baby chickens (poultry) only. For human infant concerns, contact a pediatrician.
Quick Fix Summary
| Step | Action |
|---|---|
| 1 | Gather warm water and soft cotton pad |
| 2 | Moisten and soften the dried droppings (do not pull) |
| 3 | Gently wipe debris away once softened |
| 4 | Dry the chick completely |
| 5 | Optional: Apply tiny barrier (petroleum jelly or coconut oil) to surrounding feathers |
| 6 | Return to brooder; fix temperature and hydration issues |
| 7 | Recheck in 6 to 8 hours |
What Exactly Is Pasty Butt?
Pasty butt (also called “pasting up,” “pasted vent,” “paste up,” or “sticky bottom”) is a symptom, not a disease. It occurs when a chick’s droppings stick to the delicate downy feathers around its vent (the opening where waste is expelled), then dry into a hard plug that creates a blockage.
A fully blocked vent can become life-threatening quickly because the chick cannot eliminate waste. According to the Chicken Health Academy, chicks poop around 14 times per day, so feces builds up inside fairly quickly, potentially leading to toxin buildup and death within 24 hours if not treated.
The vent is the single external opening for the digestive, urinary, and reproductive tracts.
Critical distinction: Do not confuse the vent with the chick’s belly button (navel), located just below the vent on the belly. The navel is where the chick absorbed the yolk sac before hatching. It should be left alone to dry and fall off naturally. Disturbing it can cause infection.
How to Identify Pasty Butt
Early identification is key to a quick recovery. I make “butt checks” part of my routine twice daily for the first week, then daily through week two.
Visual Signs
- Pasted-on droppings: A distinct ball or crust of dried droppings covering the vent
- Dirty, matted feathers: The soft downy feathers around the rear are stuck together or discolored
- Swollen or reddened vent area: Indicates the blockage has been present for some time
Behavioral Signs
- Lethargy: The chick sits or squats for long periods, showing little interest in food or water
- Straining: Visible effort to pass droppings without success
- Excessive chirping: Louder or more frequent vocalizations indicating discomfort
- Isolation: The affected chick separates from the group
In my experience, behavioral signs often appear before the visual ones become obvious. A chick that suddenly becomes quiet and stops exploring while others are active warrants an immediate vent check.
What Pasty Butt Looks Like
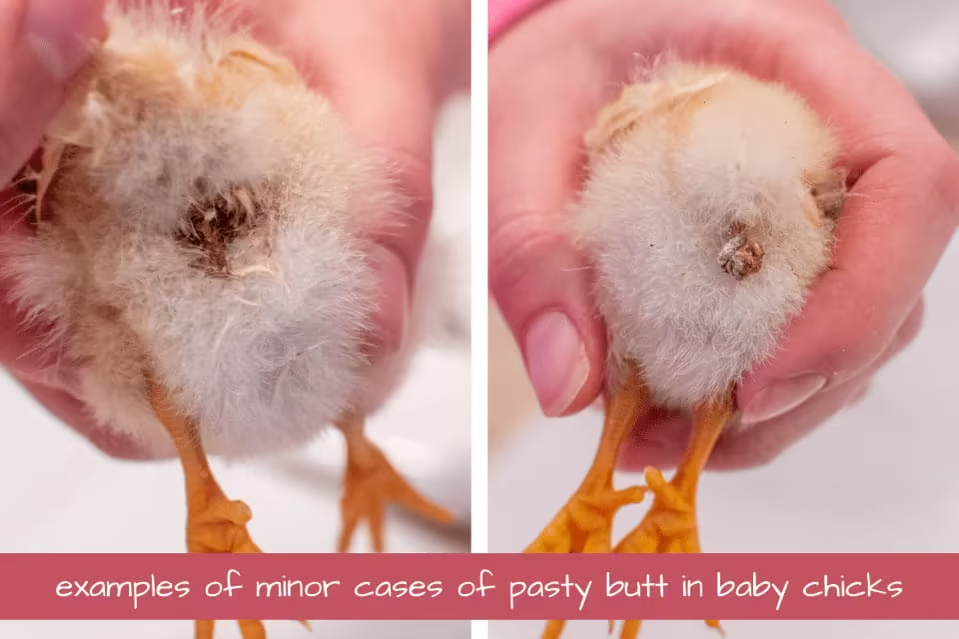
When you lift a chick and examine its rear, a healthy vent area shows clean, fluffy down feathers with the vent opening visible or easily accessible. In contrast, pasty butt presents as:
- Mild cases: A small clump of soft or semi-dried droppings stuck to feathers near the vent
- Moderate cases: A larger mass of hardened droppings forming a visible “plug” over the vent
- Severe cases: A dark, crusty ball completely covering the vent, often with matted and discolored feathers extending outward
The sooner you catch it, the easier it is to treat. Mild cases with soft droppings can be wiped away in seconds, while severe cases with hardened buildup require several minutes of careful soaking.
Not All Poop Near the Vent Is a Problem
Important clarification: a small amount of droppings on the feathers near the vent is not necessarily pasty butt. According to poultry expert Kathy Shea Mormino of The Chicken Chick, “not all poop near the vent is concerning or actionable; a vent blockage is a problem, not mere droppings surrounding the vent.”
If the vent opening itself is clear and the chick is passing waste normally, a little mess on the surrounding feathers is not an emergency. Focus on cases where the vent is actually blocked or becoming blocked.
What Causes Pasty Butt in Chicks?
Understanding the causes helps you prevent recurrence. Most cases stem from a combination of stress and an immature digestive system.
1. Improper Brooder Temperature (The Number One Cause)
A chick’s ability to properly digest food is directly tied to environmental temperature.
Too cold (chilling): When chicks get cold, their digestive system slows dramatically. The body diverts energy to maintaining core temperature instead of digestion, resulting in improperly processed food that creates sticky, pasty droppings.
Too hot (overheating): Excessive heat causes dehydration, which concentrates the droppings and makes them sticky. According to The Chicken Chick, overheating from heat lamps is a common culprit, which is one reason radiant heat plates are often recommended as a safer alternative.
According to the University of Kentucky Cooperative Extension Service, proper brooder temperatures are:
| Age | Temperature |
|---|---|
| Week 1 | 92 to 95°F (33 to 35°C) |
| Week 2 | 87 to 90°F (31 to 32°C) |
| Week 3 | 82 to 85°F (28 to 29°C) |
| Week 4 | 77 to 80°F (25 to 27°C) |
| Week 5 | 72 to 75°F (22 to 24°C) |
| Week 6 | Room temperature (fully feathered) |
For detailed guidance on temperature management, see my article on bringing chicks home: 15 must-haves.
2. Shipping and Environmental Stress
The stress of being shipped from a hatchery is a major contributor. Chicks may spend 24 to 72 hours in transit, experiencing temperature fluctuations, vibration, and no food or water. This is why pasty butt is most common in the first 3 to 5 days after arrival.
In my tracking across multiple batches, pasty butt appears in approximately 1 in 10 shipped chicks compared to only 1 in 30 locally sourced chicks from breeders or feed stores. According to Hobby Farms, chicks raised in natural situations by a mother hen almost never experience pasty butt.
Other stressors that trigger pasty butt:
- Overcrowding in the brooder
- Loud noises or sudden movements
- Drafts (even warm air blowing directly on chicks)
- Presence of pets
- Bullying from stronger chicks
- Handling too frequently in the first few days
- Being left in the incubator too long during a slow hatch
I learned the hard way that placing my brooder near a washing machine caused enough vibration and noise to stress the chicks. After relocating to a quieter room, pasty butt cases dropped significantly.
3. Diet and Feed Quality Issues
Soy in feed: Multiple poultry sources indicate that soybeans, commonly found in cheaper chick starter feeds, can contribute to pasty butt. Poorly digestible ingredients cause the digesta in the intestine to become thicker and more viscous, making droppings stickier and more likely to adhere to the vent area.
According to Purina Mills, the bird’s own digestive enzymes are not produced in enough quantity to break down certain feed ingredients in the first week of life. This is why the issue typically clears itself around 10 days of age, when chicks are producing digestive enzymes at peak production and the vent is getting larger.
Recommendation: Check your chick starter feed ingredients. If pasty butt is a recurring problem in your brooder, consider switching to a higher-quality or soy-free chick starter feed.
Improper feed types: Using anything other than chick starter feed in the first weeks causes problems. According to Penn State Extension poultry guidelines, feeding layer feed to chicks can damage their developing kidneys due to excessive calcium content.
Do not feed baby chicks:
- Scratch grains (too hard to digest, wrong nutrient balance)
- Adult layer feed (excessive calcium damages developing kidneys)
- Treats of any kind in the first two weeks (digestive system is not ready)
- Bread, rice, or kitchen scraps
- Excessive sugar water (can cause pasting)
For proper feeding guidance, see my article on when to switch from starter to grower feed.
4. Hydration Issues
Dehydration: Newly arrived chicks may not immediately find their water source. I always dip each chick’s beak in the water when I first place them in the brooder to teach them where to drink.
Cold water: According to Cackle Hatchery and Grubbly Farms, chicks that drink cold water are more prone to pasty butt. Pasting is less likely to occur when the chicks’ first drink is no less than brooding temperature (95 to 100°F) and the chicks are drinking well before they start eating.
Excessive electrolytes: While electrolytes can help rehydrate stressed chicks, giving too much to dehydrated chicks who drink more than usual can cause an excessive dose, leading to pasty butt. Follow label directions carefully and do not exceed recommended amounts.
5. Genetic Predisposition
Some hatchery chicks, particularly from high-production commercial lines, seem more prone to pasty butt. I have noticed that chicks from local breeders or heritage breeds tend to have fewer issues, possibly because they experience less shipping stress and may have more robust digestive systems.
How to Treat Pasty Butt: Step by Step
Be calm and gentle; patience is essential.
Supplies Checklist
- Small bowl of warm water (about 100°F or 38°C, not hot)
- Cotton swabs and pads or soft paper towels
- Clean, dry towel
- Optional: vegetable oil, petroleum jelly, or coconut oil
- Optional: hair dryer with low and cool setting
- For irritated vents: hemorrhoid cream (see Step 5)
Step 1: Hold the Chick Securely
Gently cup the chick in your hand with its rear facing away from your palm. The warmth of your hand helps keep it calm. You can wrap the chick’s body loosely in a small towel to provide security and warmth during treatment.
Step 2: Moisten and Loosen the Blockage
This step requires patience. Dip a cotton swab or soft cotton pad in warm water and gently dab the dried droppings. Keep the material moist for 30 to 60 seconds to soften it.
Critical warning: Do not pull or pick at the dry plug. The dried feces bonds to the delicate down feathers, and pulling can tear the chick’s skin, causing bleeding and potential infection. I have seen keepers cause more harm than the pasty butt itself by rushing this step.
Continue moistening and gently dabbing until the droppings soften and begin to release on their own. This may take 2 to 5 minutes. If the water cools, refresh it.
Alternative soaking method: For larger or more stubborn buildup, you can hold the chick securely over a small bowl of warm water with just the affected area submerged (keep the rest of the body dry). Let the chick stand in an inch or two of warm water for at least a minute with the vent completely submerged. This allows the droppings to soak and often causes some to fall off on their own. You can also hold the chick under warm, running water while gently rubbing the feces off.
Step 3: Gently Remove the Debris
Once softened, the droppings should wipe away with light pressure. Gently rub the feces between your fingers so it dissolves in the water or wipe using a downward motion. Work from the outside edges toward the vent. Continue until the vent is completely clear and you can see the opening.
If a stubborn piece remains attached to down feathers, continue moistening rather than pulling. In extreme cases, you may need to carefully trim the affected feathers with small scissors, but avoid this if possible.
If you accidentally cause bleeding: Wrap the chick’s body in a towel to keep it warm, and apply pressure to the wound with a paper towel for several minutes. If bleeding persists, apply a styptic (blood-stopping) powder such as cornstarch, powdered yarrow, or commercial styptic powder.
Step 4: Dry the Chick Thoroughly
A wet chick can become chilled within minutes, which creates a cycle of stress that causes more pasty butt. Gently pat the area dry with a clean towel.
If you have a hair dryer, use it on the lowest heat setting from at least 12 inches away. Keep your hand between the dryer and the chick to monitor temperature. The goal is warm air, not hot. Keep the hair dryer moving so the chick does not overheat. Many chicks actually enjoy this and may start to fall asleep.
I typically spend 2 to 3 minutes drying to ensure the down is completely dry before returning the chick to the brooder. This is important because a wet chick with a visible pink vent area may be at risk of pecking from other curious chicks.
Step 5: Apply a Protective Barrier or Treatment (Optional)
For normal, non-irritated vents:
There are differing opinions among poultry experts about using petroleum jelly or oils as a barrier.
In favor: Many keepers (and I have found this helpful) apply a small dab of vegetable oil, petroleum jelly, or coconut oil to the feathers surrounding the vent (not directly on the vent opening itself). This creates a barrier that prevents future droppings from adhering as easily and protects the affected area from chafing.
Against: Poultry expert Kathy Shea Mormino advises against using Vaseline or oils on the vent area, noting they “tend not to be effective at achieving the intended result and can have the undesirable effect of drawing attention to that area of the chick from other chicks,” potentially causing a dangerous pecking situation.
My recommendation: If you have a chick with recurring pasty butt, the barrier can be helpful. If you use it, apply only a tiny amount to the surrounding feathers (not the vent opening), and monitor the chick for any pecking behavior from flockmates. If you notice other chicks showing interest in the treated area, skip the barrier and simply monitor more frequently.
For irritated, red, or protruding vents:
If the vent area appears red, swollen, or irritated from repeated pasting or cleaning, some experienced keepers recommend applying a tiny dab of hemorrhoid ointment or cream to the irritated area. The medication helps reduce swelling and soothe the tissue. Use only a very small amount and monitor for improvement.
Step 6: Return to the Brooder Immediately
Place the chick directly under or near the heat source so it can finish warming up. Observe for a few minutes to ensure it begins eating and drinking normally. Inspect the vent area carefully before releasing: make sure there are no signs of redness or blood visible that might attract pecking from other chicks.
Important: Check the same chick again in 6 to 8 hours. Pasty butt often recurs in the same individual until the underlying stress factor is resolved.
Treatment Quick Reference
| Do | Do Not |
|---|---|
| Use warm (not hot) water | Pull or pick at dry droppings |
| Soften debris patiently | Rush the process |
| Dry completely before returning to brooder | Return a wet chick to the brooder |
| Wipe gently, rubbing to dissolve | Yank or pull on stuck feathers |
| Recheck in 6 to 8 hours | Assume it is fixed after one cleaning |
Expected Recovery Timeline
With proper treatment, most chicks recover quickly. Here is what to expect:
| Timeframe | Expected Progress |
|---|---|
| Immediately after cleaning | Chick should attempt to pass droppings within 30 to 60 minutes |
| 6 to 8 hours | Recheck vent; mild cases often do not recur |
| 24 to 48 hours | Most chicks show no further pasting if environment is corrected |
| 3 to 5 days | Persistent cases usually resolve as digestive system matures |
| 7 to 10 days | Risk drops significantly; chicks are producing digestive enzymes at peak levels |
| 2 weeks and beyond | Pasty butt is very uncommon after this point |
According to Purina Mills and multiple other sources, the condition typically clears itself around 10 days of age as the chicks’ digestive systems mature and the vent opening gets larger.
If pasty butt persists beyond 7 to 10 days despite environmental corrections, the chick may have a digestive weakness, an underlying infection, or may be reacting to something in the feed. Continue daily vent checks and consider switching to a higher-quality or soy-free starter feed.
How to Prevent Pasty Butt
Prevention is far easier than treatment.
Maintain Proper Brooder Temperature
Use a reliable thermometer placed at chick level (not hanging from the top of the brooder). Better yet, use your chicks as a living thermometer:
| Chick Behavior | What It Means | Action Needed |
|---|---|---|
| Huddled tightly under heat, loud chirping | Too cold | Lower heat source or increase wattage |
| Spread far from heat, panting, wings out | Too hot | Raise heat source or reduce wattage |
| Spread evenly, active, quiet contentment | Just right | Maintain current setup |
I prefer radiant heat plates over heat lamps for several reasons: they are safer (no fire risk), create a more natural day and night cycle, eliminate the possibility of overheating chicks, and allow chicks to self-regulate by moving toward or away from the heat source. The Chicken Chick specifically recommends radiant heat sources like the EcoGlow brooder for preventing overheating-related pasty butt.
See my guide on automated brooder weaning temperature controllers for more options.
Offer Water Before Food
One prevention method recommended by multiple hatcheries: offer newly arrived chicks water alone for several hours before offering feed. This ensures they are well-hydrated before their digestive systems have to process solid food.
According to Cackle Hatchery, “Pasting is less likely to occur when the chicks’ first drink is no less than brooding temperature (95 to 100°F) and the chicks are drinking well before they start eating.”
Implementation:
- When chicks arrive, dip each beak in warm water (brooder temperature, not cold)
- Allow them to drink freely for 2 to 4 hours
- Then introduce chick starter feed
This simple step can significantly reduce pasty butt cases in shipped chicks.
Provide Adequate Brooder Space
Overcrowding is a major stress factor that contributes to pasty butt. According to the Merck Veterinary Manual, proper space allocation is essential for chick health:
| Age | Minimum Space Per Chick |
|---|---|
| Week 1 to 3 | 0.5 sq ft (72 sq inches) |
| Week 4 to 6 | 1 sq ft (144 sq inches) |
| Week 6 and beyond | 2 to 3 sq ft |
More space is always better. Crowding increases stress, poop buildup, and ammonia levels, all of which can worsen pasty butt and lead to other health issues like respiratory problems and pecking.
Choose High-Quality, Soy-Free Feed
Since soy is a common contributor to pasty butt, consider feeding a high-quality chick starter that is soy-free. According to Grubbly Farms, soy-free feeds that use alternative protein sources (like insects or other plants) can reduce pasting issues.
Feed quality checklist:
- Check that feed is fresh and free from mold
- Store feed in a sealed container to keep out rodents and moisture
- Look for feeds with prebiotics and probiotics already included
- Consider soy-free options if pasty butt is a recurring problem
If you suspect feed quality is the issue, switching to a better brand like Purina or Manna Pro, or a soy-free alternative, may resolve the problem.
Ensure Proper Hydration
Water temperature matters: Keep water at room temperature or brooder temperature (95 to 100°F for new arrivals). Cold water can shock the chick’s digestive system and contribute to pasty butt.
Dip beaks on arrival: When chicks first arrive, dip each one’s beak in the water before releasing it into the brooder. This “teaches” them where to drink and ensures they take their first sip.
Electrolyte guidelines: For the first 3 to 5 days, you can add chick-specific electrolytes and probiotics to the water. However, do not overdo it. Excessive electrolytes in dehydrated chicks who drink more than usual can actually cause pasty butt. Follow label directions exactly and do not exceed recommended amounts.
Important safety notes for supplements:
- Use a chick-specific product and follow label directions exactly
- Mix fresh daily; do not leave supplemented water sitting warm for extended periods
- Plain, clean water is always acceptable if you do not have supplements
- If your chick starter feed already contains probiotics (check the label), you may not need to add more to the water
Apple Cider Vinegar: Use With Caution
There are differing opinions about apple cider vinegar (ACV) for chicks. Multiple hatcheries and experienced keepers recommend it, while others advise caution.
Arguments in favor: Many sources, including Cackle Hatchery and Chicken Health Academy, recommend raw, unfiltered apple cider vinegar “with the mother” to promote gut health and prevent pasty butt. Proponents say it provides beneficial probiotics and makes water more palatable.
Arguments against: Some keepers find the acidic taste causes chicks to avoid drinking. Very young chicks may be more sensitive to acidity.
If you choose to use ACV:
| Source | Recommended Ratio |
|---|---|
| Conservative approach | 1 teaspoon per quart of water |
| Standard recommendation | 1 tablespoon per quart (or 4 tablespoons per gallon) |
| Cackle Hatchery (for active pasty butt) | 1/3 cup per quart for 3 to 5 days |
My recommendation: Start with the lowest ratio (1 teaspoon per quart) and observe whether your chicks drink normally. If they avoid the water, reduce the concentration or offer plain water alongside. Always use raw, unfiltered ACV with the mother, not regular distilled vinegar. Never use ACV in metal waterers, as it can cause corrosion.
Provide Appropriate Nutrition
Use only high-quality chick starter feed (18 to 22% protein) for the first 6 to 8 weeks.
Dietary additions that may help prevent pasty butt (from experienced keepers):
- A small sprinkle of ground raw oats or cornmeal mixed into feed can add fiber for smoother digestion
- Probiotic powder mixed into feed (if not already included in your starter)
- For chicks a few days old: a clean grass or herb clump with dirt attached to the roots can provide natural grit and beneficial microbes
Skip the treats: According to The Chicken Chick, treats are not helpful for baby chicks and “can cause digestive tract upset, wonky droppings, nutrient imbalance, behavioral, growth and development problems.” Stick to starter feed only for the first two weeks.
Medicated feed note: Medicated starter feed containing amprolium can help prevent coccidiosis, a parasitic disease that causes diarrhea (often confused with pasty butt). However, according to poultry extension guidelines, if your chicks were vaccinated for coccidiosis at the hatchery, use unmedicated feed, as the medication interferes with the vaccine. Check with your hatchery to confirm vaccination status.
Maintain a Clean, Stress-Free Environment
Bedding: Use 3 to 5 inches of dry pine shavings, straw, or other absorbent litter. Keep bedding dry; wet bedding harbors bacteria that cause digestive issues. Use a kitty litter scoop to remove droppings daily without changing all the bedding. For bedding options, see my comparison of hemp vs straw vs sand chicken bedding.
Location: Place the brooder in a quiet area away from household traffic, loud appliances, and pets. Brooder sides should be at least 12 inches high for 1 to 2 week old chicks and ideally 24 inches high for 3 to 4 week old chicks.
Handling: Limit handling for the first few days. Excessive handling increases stress during their most vulnerable period.
Pasty Butt vs Diarrhea: Critical Differences
Understanding the difference is essential because they require different responses.
| Characteristic | Pasty Butt | Diarrhea |
|---|---|---|
| Cause | Stress, temperature issues, feed quality | Illness, parasites, infection |
| Droppings consistency | Normal but sticky | Watery, loose, possibly bloody or foamy |
| Contagious? | No | Often yes |
| Number affected | Usually individual chicks | Often multiple chicks |
| Treatment | Clean vent, fix environment | May need medication, veterinary care |
Red Flags That Indicate Something More Serious
- Watery, bloody, or foamy droppings
- Multiple chicks affected simultaneously
- Droppings with unusual color (bright green, pure white, or containing mucus)
- Rapid weight loss
- Severe lethargy affecting multiple birds
If you observe these signs, especially in multiple chicks, you may be dealing with coccidiosis (a parasitic infection) or a bacterial illness. According to Cackle Hatchery, “If pasty butt is from coccidiosis it can kill baby chicks if sporozoites have formed. That’s why prevention is best.”
Do not use antibiotics to treat pasty butt. Antibiotics kill both good and bad bacteria, and chicks with pasty butt need good bacteria to recover. Save antibiotics for diagnosed bacterial infections under veterinary guidance.
For guidance on digestive issues in older birds, see my article on chicken diarrhea health problems.
Pasty Butt vs Cecal Droppings
New chicken keepers sometimes panic when they see cecal droppings, mistaking them for a health problem.
Cecal droppings are normal. They are darker, smellier, and have a pudding-like consistency compared to regular droppings. Chickens produce cecal droppings several times a day as their digestive system processes food in the ceca (pouches in the intestine).
If you see darker, odorous droppings but the vent area is clean and clear, your chick is healthy. Only droppings that are stuck to and blocking the vent are a concern.
When to Call a Veterinarian
While pasty butt is usually a simple problem to solve at home, certain situations warrant professional help.
Seek veterinary care if:
- The condition persists despite daily cleaning and environmental corrections
- Multiple chicks are affected (suggests infection or disease)
- The chick refuses to eat or drink for more than a few hours
- Bloody droppings appear
- The vent area becomes red, swollen, or develops sores
- The chick is extremely weak or unresponsive
A poultry-experienced veterinarian can diagnose underlying conditions like bacterial infections, coccidiosis, or vent gleet (a yeast infection of the vent area that affects older birds). For guidance on recognizing when professional help is needed, see my article on when to call the vet for a backyard chicken.
My Recommended Pasty Butt Treatment Kit
These are the supplies I keep on hand for treating pasty butt and other chick health issues:
| Item | Product | Why I Recommend It |
|---|---|---|
| Cleaning supplies | Saline and Cotton Pads | Gentle on delicate skin, sterile for wound care |
| Drying | Low-Heat Hair Dryer | Multiple heat settings, quiet operation |
| Barrier (optional) | Coconut Oil or Petroleum Jelly | Prevents droppings from sticking to feathers |
| Temperature monitoring | Digital Probe Thermometer | Accurate floor-level readings |
| Electrolytes | Chick Electrolyte Supplement | Reduces shipping stress, aids hydration |
| Bedding | Hemp Bedding | Superior absorption, reduces bacterial growth |
Frequently Asked Questions
How often should I check for pasty butt?
Check at least twice daily for the first week, then daily through week two. After two weeks, the risk decreases significantly as the chicks’ digestive systems mature.
Can older chickens get pasty butt?
The term specifically refers to this common chick condition and would be very uncommon in chicks over 3 weeks old and nearly unheard of after that. Adult chickens can develop dirty or blocked vents due to illness, obesity, mites, or severe diarrhea, but this indicates a different underlying problem. See my article on why chickens might be lethargic for adult health issues.
Is apple cider vinegar good for preventing pasty butt?
Multiple hatcheries recommend it. If you choose to use ACV, use raw, unfiltered apple cider vinegar “with the mother.” Start with 1 teaspoon per quart of water and observe whether chicks drink normally. Some keepers use 1 tablespoon per quart, and Cackle Hatchery recommends 1/3 cup per quart for active cases. Always offer plain water as an alternative if chicks seem reluctant to drink.
Should I separate a chick with pasty butt from the others?
Generally no, unless the chick is being bullied, is too weak to compete for food and water, or you notice other chicks pecking at the cleaned vent area. Isolation itself causes stress, which can worsen the condition.
My chick has pasty butt every single day. What am I doing wrong?
Persistent pasty butt usually indicates:
The brooder temperature is not right (check with a thermometer at chick level)
There is a draft hitting that chick’s sleeping spot
The water is too cold
The feed contains poorly digestible ingredients (consider switching to a soy-free or higher-quality starter)
The individual chick has a digestive weakness that may resolve with age
Ensure you are using proper prevention methods including warm water, high-quality feed, and correct temperature. Repeated problems after the first week may warrant switching feeds.
Can pasty butt be fatal?
Yes, if left untreated. According to the Chicken Health Academy, chicks can die within 24 hours if the blockage is not cleared, as waste builds up inside and essentially poisons their system. This is why twice-daily checks in the first week are so important.
How do I treat multiple chicks with pasty butt at once?
If treating several chicks, work in a warm room and keep untreated chicks in a small, towel-lined box near the brooder’s heat source while you work. Treat one chick at a time, fully drying each before returning to the brooder. If many chicks are affected simultaneously, this often indicates an environmental problem (usually temperature or feed quality) rather than individual issues.
Does the type of feed affect pasty butt?
Yes. According to multiple sources, feeds containing soybeans or other poorly digestible ingredients can contribute to pasty butt. If you are experiencing repeated cases, consider switching to a higher-quality or soy-free chick starter feed.
Summary: Your Pasty Butt Action Plan
Pasty butt is a common, stress-related condition that is easily treated when caught early.
If you find pasty butt:
- Moisten with warm water (do not pull dry material)
- Gently remove softened debris using a rubbing motion to dissolve
- Dry thoroughly
- Optional: Apply protective barrier to surrounding feathers
- Return to brooder immediately
- Recheck in 6 to 8 hours
To prevent pasty butt:
- Maintain correct brooder temperature (92 to 95°F week one, decreasing 5°F weekly)
- Offer warm water before food when chicks first arrive
- Keep water at brooder temperature, not cold
- Provide adequate space (0.5 sq ft per chick weeks 1 to 3, increasing as they grow)
- Use high-quality, preferably soy-free chick starter feed
- Add electrolytes and probiotics to water for first 3 to 5 days (following label directions exactly)
- Consider apple cider vinegar (1 teaspoon per quart to start)
- Keep brooder clean, dry, and stress-free
- Check vents twice daily for first week
By keeping a watchful eye on your new flock and addressing issues promptly, you can confidently handle this common challenge and ensure your chicks grow into healthy, productive hens. For comprehensive guidance on raising healthy chicks from day one, explore my complete guides on bringing chicks home and common mistakes first-time chicken keepers make.

Oladepo Babatunde is the founder of ChickenStarter.com. He is a backyard chicken keeper and educator who specializes in helping beginners raise healthy flocks, particularly in warm climates. His expertise comes from years of hands-on experience building coops, treating common chicken ailments, and solving flock management issues. His own happy hens are a testament to his methods, laying 25-30 eggs weekly.