This post contains affiliate links. As an Amazon Associate, I earn from qualifying purchases at no extra cost to you. Product recommendations are based on my personal experience raising backyard chickens.
Last Updated: January 2026 – Added expert timing variations, expanded feed storage and rodent-proofing section with treadle feeders and hardware cloth specifications, updated transition schedules based on current manufacturer guidelines, and refreshed product recommendations.
Most backyard chicken owners should switch from starter to grower feed between 6 to 8 weeks of age, once birds are fully feathered and weigh roughly 1.5 to 2 pounds. This transition timeline is supported by agricultural experts at the University of Georgia Extension and multiple feed manufacturers, marking a critical nutritional shift as your chicks’ protein needs decrease from 18 to 20% to 16 to 18%.
However, some experts including Purina Mills recommend keeping chicks on starter feed until 18 weeks, skipping the grower phase entirely. Both approaches can produce healthy birds when followed consistently. This guide covers all options so you can make the best choice for your flock.
Making this switch correctly supports skeletal growth without stressing the kidneys, while also reducing your feed costs. To ensure you have everything else needed for this stage, check out our guide on essential supplies for raising healthy chicks.
Understanding Chicken Feed Types: The Foundation
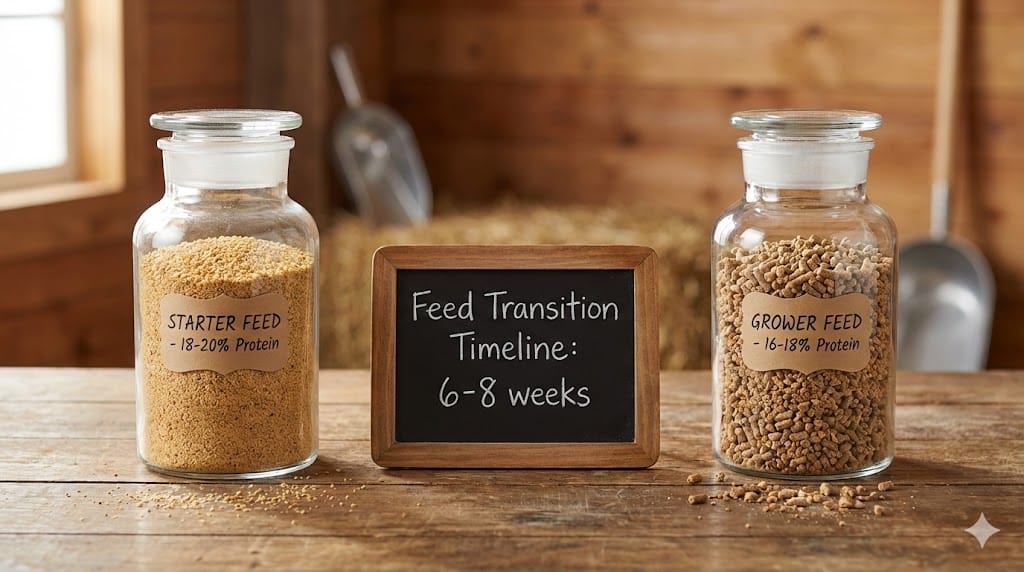
Before we dive into the timeline, it is crucial to understand exactly what is in the bag. Many new chicken keepers get confused by the colorful bags at the feed store. Why does protein percentage matter so much? Why can not you just feed one type of food forever?
What is Starter Feed?
Starter feed is the high-octane fuel your chicks need for their first weeks of life. When a chick hatches, it needs to do a massive amount of growing very quickly.
Protein Content: Starter feed provides 18 to 20% protein to support the rapid growth chicks need during their first weeks, according to Penn State Extension’s poultry nutrition guidelines.
Texture: Usually a “crumble.” This looks like coarse sand or granola, making it easy for tiny beaks to pick up and swallow.
Purpose: The high protein supports rapid muscle growth and the development of internal organs.
Medicated vs. Non-Medicated: You will often see “medicated” starter. This contains Amprolium, a thiamine analog that prevents coccidiosis. According to Purdue University Extension’s poultry management resources, it is not an antibiotic and is approved for safe use in preventing this common parasite.
Recommended Starter Feed: I use Manna Pro Chick Starter for my broods because it provides the 18% protein chicks need with a fine crumble texture perfect for small beaks. A 10-pound bag typically lasts 6 chicks through their first 3 weeks.
What is Grower Feed?
Grower feed for chickens is designed for the “teenage” stage. Once the initial growth spurt slows down, chicks need a diet that supports steady development without pushing them too hard.
Protein Content: 16 to 18%, slightly lower than starter. This level is optimal for steady development during weeks 6 to 18, as recommended by the LSU AgCenter.
Texture: You might find this as a larger crumble or small pellets.
Purpose: It builds strong bones and adult feathers. If you keep feeding high-protein starter too long, birds can grow too fast, leading to leg problems or kidney issues.
Best grower feed for chickens includes premium options from Purina, Nutrena, Blue Seal Feeds, and Manna Pro. These established brands invest heavily in poultry nutrition research and formulate feeds meeting or exceeding National Research Council guidelines for growing poultry. For a deeper dive, you can compare top organic and non-GMO chicken feed options to find the best fit for your flock.
Grower Feed vs Layer Feed
This is the most dangerous confusion point for new owners.
Layer Feed (16% protein) has a massive amount of calcium (3.5 to 4.5%) added to it. This calcium is vital for hens making eggshells, as noted in feeding guides by Tractor Supply. For more on why this mineral is critical later in life, read our guide to understanding calcium requirements for healthy egg production.
The Danger: You must never feed layer feed to chickens younger than 16 to 18 weeks (or before they lay their first egg). According to Purina Mills, feeding layer feed to young birds before 16 weeks can contribute to permanent kidney damage due to the extra calcium that young birds do not need. Grower feed has low calcium (around 1%), which is safe for growing bodies.
Feed Comparison Chart
| Feed Type | Protein % | Calcium % | Ideal Age Range | Primary Purpose | Texture |
|---|---|---|---|---|---|
| Starter | 18-20% | ~1.0% | 0-6 or 8 weeks | Rapid muscle and organ growth | Fine Crumble |
| Grower | 16-18% | ~1.0% | 6-18 weeks | Steady skeletal development | Crumble or Pellet |
| Layer | 16% | 3.5-4.5% | 16-20+ weeks | Eggshell production | Pellet or Mash |
| All-Flock | 18-20% | ~1.5% | Any Age | Mixed flock maintenance | Pellet or Crumble |
Expert Timing Variations: Understanding the Debate
One thing that confuses new chicken keepers is that experts disagree on the exact timing. Here is what different authorities recommend:
| Source | Starter Phase | Grower Phase | Notes |
|---|---|---|---|
| Purina Mills | Day 1 to Week 18 | None | Transition directly to layer at 18 weeks |
| Nutrena | 0-16 weeks (combined) | Start transition at 16 weeks | To layer feed |
| Tractor Supply | 0-6 weeks | 6-20 weeks | Traditional three-phase approach |
| Mile Four | 0-7 weeks | 7-20 weeks | Gradual transition starting week 7 |
| Small Pet Select | 0-8 weeks | 8-18 weeks | Slightly later transition |
| Star Milling | 0-6 weeks | 6-18 weeks | Standard approach |
The Bottom Line: Both the two-phase approach (starter then layer) and three-phase approach (starter, grower, layer) can produce healthy birds. If you are using a combined “Starter/Grower” feed, follow the manufacturer’s guidelines and transition to layer feed when you see the first egg or around 18 weeks.
For this guide, I will focus on the traditional three-phase approach since it offers more nutritional precision during the critical growth period.
Week-by-Week Development Timeline
Knowing what to feed chickens by age chart standards is helpful, but watching your specific birds is better. Here is what is happening inside your chicks and what they need from you.
Week 1-6: The High-Growth Starter Phase
Feed: 18-20% Starter Feed (Crumble)
During these first six weeks, your chicks are basically eating machines.
Physical Markers: They will triple their hatch weight in the first week. By week 4, they look awkward and dinosaur-like as they lose fluff and grow teeny feathers.
Consumption: They eat small amounts frequently. LSU AgCenter guidelines note that you should expect to use at least 4 lbs of starter feed per bird during this period.
Nutritional Needs: They need maximum amino acids (the building blocks of protein) to build tissue. Protein needs are highest right after hatching.
Observation: If you see “pasting up” (poop sticking to their vent), clean it immediately. Learn how to treat pasty butt in chicks quickly to prevent health issues. This is common in week 1 to 2 but should stop by week 3.
Week 6-8: The Transition Window
This is the specific window when to change from chick starter to grower.
The Sign: Look at your chicks. Do they look like miniature chickens? Are they fully feathered, with almost no baby fuzz left on their heads or bodies? According to experienced poultry keepers, once chicks are “feathering out and looking less like cotton balls and more like actual chickens,” it is time to transition.
Weight: For standard dual-purpose breeds (like Rhode Island Reds or Plymouth Rocks), they should weigh roughly 1.5 to 2 pounds, a benchmark often cited by hatchery standards.
Behavior: They are now hardy enough to go outside for short trips (weather permitting).
Decision Time: If they are fully feathered and active, it is time to buy your first bag of grower feed.
Week 6-18: The Grower Feed Phase
Feed: 16-18% Grower Feed (Crumble or Pellet)
After transitioning at 6 to 8 weeks, your birds will stay on grower feed until weeks 16 to 20, or when the first egg appears. During this 10 to 14 week period:
Growth Rate: Growth slows down. They are filling out, getting taller, and their combs (the red thing on top of their head) might start turning pink.
Nutrition: They need “maintenance” energy. They are burning more calories moving around and exploring. The slightly lower protein in grower feed vs layer feed is perfect for this steady pace. According to Dine-A-Chook, this lower protein content “allows for steady growth without the risk of excessive weight gain that could strain their developing bones.”
Consumption: Their appetite increases significantly. According to Auburn University Extension, properly managing feed intake is critical as birds approach laying age to ensure they have the body reserves for egg production.
Week 16-20+: Pre-Layer Transition
Feed: Switch from Grower to Layer Feed
The Final Switch: Around 16 to 20 weeks, or when the first egg appears (whichever comes first), you switch to layer feed.
Why wait? Remember, calcium is toxic to young kidneys. Only once their bodies start the hormonal process of making eggs do they need that extra calcium.
According to Bowen’s Farm Supply, “Most breeds start laying between 20 and 24 weeks of age. It’s important to start providing your hens with a quality layer feed before they begin laying. To prime your hen’s bodies for producing great eggs in the healthiest way possible, you should begin the switch to layer ration at around 16 weeks.”
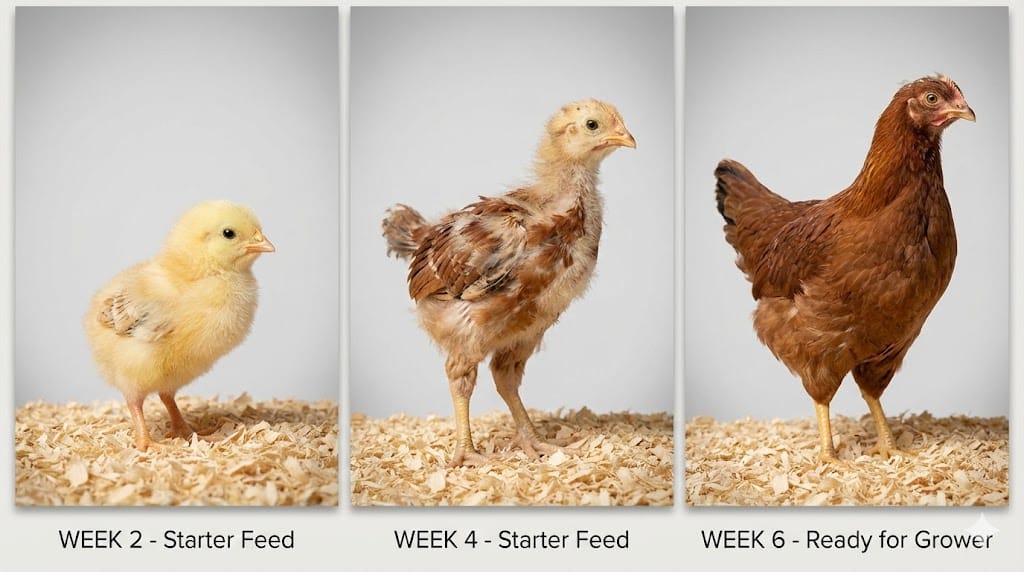
Visual Development Tracker: What to Feed Chickens by Age Chart
To help you judge if your birds are ready without a scale, use this visual progression guide.
Week 2 (Starter Feed):
- Look for: Chick loses fluff on wings; first “pinfeathers” (spiky new feathers) become visible.
- Action: Keep heat lamp on; ensure high protein intake.
Week 4 (Starter Feed):
- Look for: Body feathering is about 50% complete. They look “moth-eaten” or awkward. Active flying attempts and roosting on low bars.
- Action: Start introducing a small perch; maintain starter feed.
Week 6 (Transition Time):
- Look for: Fully feathered bodies; head might still have some fuzz. Wattles (skin under beak) might turn slightly pink.
- Action: Start the switch. If they look like miniature hens rather than fuzzy balls, they are physically ready for grower feed.
When to Skip Grower and Go Straight to Layer (Not Recommended)
A common search query we see is: “When to switch from chick starter to layer feed?” implying skipping the grower phase entirely.
The Short Answer: Never skip directly to layer feed from starter.
Unless you are using a combined “Starter/Grower” feed (which is formulated for this exact purpose), you should never jump straight from high-protein starter to high-calcium layer feed.
The Myth: Some owners think, “They are big enough, let us just get the cheaper layer pellets.”
The Reality: Layer feed contains 4x the calcium of grower feed. If fed to a 6-week-old bird, this calcium overload cannot be processed. The excess calcium can accumulate in the kidneys, potentially causing urolithiasis (kidney stones) and visceral gout. Research published in PLOS ONE shows that laying hens exposed to nutritional stress experience increased oxidative damage and renal fibrosis, confirming that inappropriate calcium levels during development can cause permanent kidney damage.
The Result: You might save $5 on a bag of feed now, but you will lose hens to kidney failure at 6 to 12 months of age, just as they enter their prime laying months.
The Exception: If you cannot find “Grower” feed, buy a bag of “All-Flock” or “Flock Raiser.” This has the right protein (18 to 20%) but safe low calcium levels. You can feed this from hatch until egg-laying safely. However, once hens begin laying, they will need supplemental oyster shell offered free-choice to meet calcium needs, as All-Flock does not contain the 3.5 to 4.5% calcium found in layer feed.
How to Switch Feeds Properly: The Mixing Method
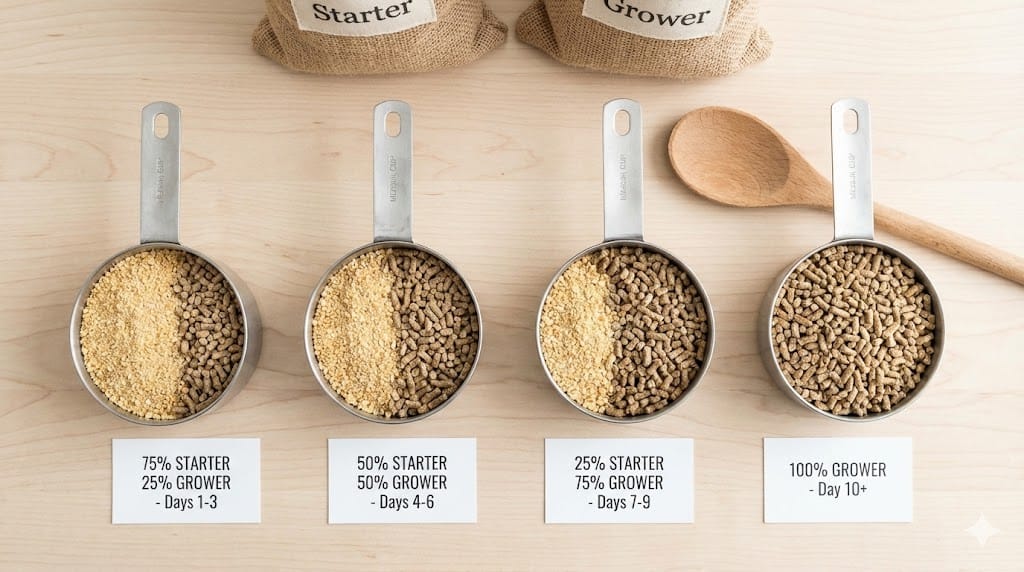
One of the most common questions is, “Can I mix starter and grower feed together?”
Yes, you absolutely must.
Chickens have sensitive digestive systems. If you switch their food abruptly (“cold turkey”), they can suffer from diarrhea, stop eating, or get stressed. This stress can invite illness.
Why Mix? Chickens have a crop (a storage pouch in their throat) and specific bacteria in their gut that digest food. These bacteria need time to adapt to new ingredients or textures.
The 7 to 10 Day Mixing Schedule
I have used this method with my own flocks for years, and it works every time. This gradual approach aligns with recommendations from Mile Four and other premium feed manufacturers.
| Days | Starter Feed | Grower Feed |
|---|---|---|
| Days 1-3 | 75% | 25% |
| Days 4-6 | 50% | 50% |
| Days 7-9 | 25% | 75% |
| Day 10 | 0% | 100% |
Mix it up with your hand so they cannot just pick out the pieces they like.
Pro Tip: Use a large bucket or storage bin to pre-mix each day’s ration. This ensures even distribution and prevents picky eaters from sorting through to find only their preferred feed. Store feed in cool, dry places to prevent mold.
Personal Experience: In my flock of 12 Rhode Island Reds, I once tried to switch feed in just 3 days because I ran out of starter. It was a mistake. Two of my birds developed loose, watery droppings, and the flock was unusually quiet. When I raised my next batch of Barred Rocks, I used the 10-day mix above. Their droppings remained firm and healthy, and their energy levels never dipped.
Storing Your Feed Properly: Rodent-Proofing Essentials
Proper feed storage is just as important as choosing the right feed. Contaminated feed from rodent droppings, urine, or saliva can cause serious health issues in your flock, including digestive problems and disease transmission.
Quick Start: Rodent-Proofing in 3 Steps
🚨 Already Have a Rodent Problem? Start Here:
1. Transfer all feed to metal containers TODAY
2. Remove feeders at night or switch to treadle feeder
3. Seal holes with hardware cloth (1/4″ mesh minimum)
Why Rodent-Proof Storage Matters
According to Fresh Eggs Daily, mice and rats are attracted to chicken feed for its nutritional value and easy access. These pests can squeeze through surprisingly small openings, and plastic storage bins with snap-on lids are not sufficient.
According to VEVOR, “Always keep feed in airtight, chew-proof containers. Metal bins are ideal because rats cannot gnaw through them. Avoid plastic bins, as determined rodents can chew holes in them.”
As documented in one chicken keeper’s YouTube video on rodent-proof storage, metal trash cans are “the only way that I found that you can actually store chicken food without rodents being able to get into it.”
Signs of rodent infestation in your feed:
- Droppings near or inside storage containers
- Chewed packaging or gnawed bin edges
- Sour or off smell when opening containers
- Holes in feed bags
- Gnaw marks on plastic containers
Feed Storage Solutions Compared
| Storage Option | Rodent Protection | Cost | Capacity | Best For |
|---|---|---|---|---|
| Metal trash can with lid | Excellent | $30-50 | 50-100 lbs | Most backyard flocks |
| 5-gallon buckets with gamma lids | Very good | $15-25 each | 25 lbs each | Smaller flocks, multiple feed types |
| Galvanized steel bin | Excellent | $40-80 | 50-100 lbs | Long-term storage |
| Old chest freezer (unplugged) | Excellent | Free (repurposed) | 100+ lbs | Large flocks with space |
| Plastic wheelie bins | Fair | $30-50 | 50-100 lbs | Temporary solution only |
Option 1: Metal Containers (Best Protection)
Metal containers with tight-fitting lids are the gold standard for rodent-proof feed storage.
I recommend using a feed storage container with a gamma seal lid for your grower feed. The gamma lid creates an airtight seal that keeps feed fresh, blocks rodents from smelling the contents, and prevents moisture from causing mold. A quality container holds a full 50-pound bag of feed and pays for itself by preventing waste.
According to the BackYard Chickens forum, experienced keepers recommend using “a metal trashcan with a lid and bungee cord” for extra security.
Option 2: 5-Gallon Buckets with Gamma Lids (Budget-Friendly)
For smaller flocks or tighter budgets, food-grade 5-gallon buckets with gamma seal lids provide excellent protection at lower cost. It takes two 5-gallon buckets to hold a 50-pound bag of feed.
According to The Prairie Homestead, “A food-grade bucket with a smart seal lid creates an airtight seal that is moisture and rodent-free.”
Benefits of gamma lids:
- Spin-off, spin-on design for easy daily access
- Creates airtight seal when closed
- Food-safe BPA-free HDPE plastic
- Fits standard 3.5 to 7-gallon buckets
- Costs approximately $8 to $15 per lid
This system works well if you buy feed in smaller quantities or want to separate different feed types (starter in one bucket, grower in another).
Option 3: Repurposed Chest Freezer
According to The Prairie Homestead, “If you have the space to keep an old chest freezer, this really is a great feed storage idea. It is an airtight container that will keep rodents out of your feed.”
This is a great way to repurpose an old chest freezer that was broken beyond repair. Instead of sending it to the dump, simply reuse it to hold animal feed. The rubber gasket seal keeps rodents out completely.
Option 4: Plastic Wheelie Bins (Temporary Only)
According to one UK-based chicken keeper’s documented experience, “What we’re using now is these plastic wheelie bins. So far none of the rodents have managed to get in. However they do try and they’ve been chewing the plastic quite a lot.”
While plastic wheelie bins can work temporarily, they are not a long-term solution. Determined rodents will eventually chew through plastic. Use this option only if metal containers are unavailable in your area, and inspect regularly for damage.
Additional Storage Tips
- Store feed in a cool, dry place away from direct sunlight to prevent nutrient degradation
- Elevate containers off the ground to deter rodents and prevent moisture absorption
- Leave space between containers and walls for air circulation and easy inspection
- Rotate your supply using oldest feed first (first in, first out)
- Never store feed inside the coop as it attracts pests and creates unsanitary conditions
- Inspect storage areas regularly for signs of pest activity
- Keep containers in a covered shed or feed room for ideal protection from elements
Feed Freshness Timeline
| Storage Method | Maximum Freshness |
|---|---|
| Original bag (opened) | 2-3 weeks |
| Plastic container (not recommended) | 2-4 weeks |
| Airtight container (no temperature control) | 4-6 weeks |
| Airtight metal container (cool, dry location) | 6-8 weeks |
| 5-gallon bucket with gamma lid | 4-6 weeks |
When purchasing grower feed, buy only what you can use within 4 to 6 weeks. Feed loses nutritional value over time, and improper storage accelerates degradation.
Rodent-Proof Feeding Solutions
Beyond storage, how you feed your flock matters just as much for rodent control.
Treadle Feeders (Premium Solution)
According to ChickenGuard, “The treadle feeder is a metal box with a levered lid. The lever that controls the lid is attached to a metal plate. When a chicken steps on the metal plate in front of the feeder, the metal lid raises, and the hen has access to the food. When they are not eating, the lid will remain closed.”
According to VEVOR, “Switching to rat-resistant feeders is one of the smartest steps in how to keep rats away from chicken feed. These feeders only open when a chicken steps on a small platform, preventing lighter rodents from accessing the food.”
Benefits of treadle feeders:
- Completely blocks rodent access when not in use
- Keeps feed dry in rainy weather
- Reduces feed waste from scratching and billing out
- One-time investment that lasts for years
Tips for treadle feeder success:
- Choose strong, chew-proof metal feeders instead of plastic
- Keep feeders inside the coop rather than outside
- Clean under feeders daily to remove spilled crumbs
Treadle feeders cost more upfront ($50 to $150 depending on size and brand) but can pay for themselves through reduced feed waste and eliminated rodent problems.
Hanging Feeders with Weight-Sensitive Closure
According to ChickenGuard, “This is similar to squirrel proof wild bird feeders. You hang the feeder at chicken shoulder height. If a rat tries to reach up, they will put weight onto a step that will pull a closure down over the opening to the food.”
A standard hanging chicken feeder positioned at chicken shoulder height keeps feed off the ground where rodents can easily access it and minimizes spillage.
Enamelware Roasting Pans with Lids (Simple Daily Solution)
For a low-cost daily feeding solution, Fresh Eggs Daily recommends using enamelware roasting pans: “Using an enamelware roasting pan for feed out in the run allows you to simply place the cover on top at dusk when you lock up your coop, thereby keeping any leftover feed safe from mice and other rodents overnight.”
This prevents you from having to toss out leftover feed or dump it back into storage containers. In the morning, you just remove the lid and stash it somewhere out of the way until that evening.
Additional benefits:
- The pan is deep enough that chickens have trouble kicking or tossing feed out
- Does not crack in winter like plastic or glass
- Does not rust like thin metal
- Vintage sets available inexpensively at antique shops or garage sales
DIY Rat-Proof Feeder
According to ChickenGuard, “If you prefer to make your own feeder, or need a low cost solution, you can build your own rat proof feeder with a five gallon bucket and an eyebolt. This will be a hanging style feeder so make sure you have a sturdy place to attach it.”
Another innovative DIY option documented at Revolutionary Chicken uses a transparent box with PVC elbow ports. The smooth plastic surface prevents mice from climbing up to access the feed. After extensive testing with live mice, the designer confirmed that “mice could certainly smell the peanut butter. But as they tried to climb up the cinder block that the feeder was placed on, they were stopped. Their little front paws would just go around in circles on the smooth plastic of the feeder.”
Feeding Best Practices for Rodent Control
According to VEVOR, “After feeding your chickens, close the container tightly and remove any spilled feed immediately. Sweep the area daily to prevent leftovers from attracting pests.”
- Never feed chickens inside the coop where spilled feed attracts rodents to sleeping areas
- Remove or cover feeders at night when rodents are most active
- Feed scraps on a tray well away from the coop and remove any uneaten portions before dusk
- Give only what chickens can finish in one sitting and never leave extra food out overnight
- Clean under feeders daily to remove spilled crumbs
Natural Rodent Deterrents
Mint and Cayenne in Chicken Feed
According to Fresh Eggs Daily, “Rodents also don’t like the taste of mint, nor do they like cayenne pepper. Chickens don’t have the taste receptors for ‘heat’, so they won’t be bothered if you add a sprinkle of cayenne pepper to your chicken feed. A sprinkle of each stirred into your chickens’ daily feed should do the trick. Rodents can’t tolerate either scent or taste and hopefully will go elsewhere in search of food.”
How to use:
- Add a sprinkle of dried peppermint leaves and cayenne pepper to your chickens’ daily feed
- Scatter fresh mint leaves in the coop and nesting boxes
- Stuff peppermint oil-saturated cotton balls into any mouse holes you find
Bonus benefit: Cayenne pepper actually helps improve circulation in chickens during winter, which can reduce the chances of frostbitten combs and wattles. Both ingredients have health benefits for your flock.
Plant Mint Around the Coop
According to Fresh Eggs Daily, “Scents that are especially effective in repelling mice are balsam fir or pine, citrus, rosemary, lavender and mint.”
According to VEVOR, “Making mint grow in that area can provide a natural fence that will look good and yet be useful.”
Planting mint around your coop perimeter creates a natural barrier. Since mint grows like a weed and is perennial in most climates, it provides ongoing protection with minimal effort.
Hardware Cloth for Coop Protection
If rodents are burrowing into your coop or run, hardware cloth provides physical exclusion.
Recommended Mesh Specifications
According to VEVOR, “Use mesh with holes no larger than 1/4 inch to block even the smallest intruders.”
According to ChickenGuard, “Most rats can squeeze through a space as small as a quarter, so be thorough as you search for holes.”
| Pest to Exclude | Mesh Size | Notes |
|---|---|---|
| Rats only | 1/2″ x 1/2″ (12mm) | 19 gauge recommended |
| Rats and mice | 1/4″ x 1/4″ (6mm) | Industry standard for pest control |
| All rodents | 10mm x 10mm or smaller | Maximum opening for complete exclusion |
Installation Tips
According to VEVOR:
- Bury hardware cloth at least 12 inches deep around the coop perimeter to stop digging
- Cover windows and vents with hardware cloth
- Secure floor edges and under the run where rodents commonly enter
- Seal any gaps in walls or doors with hardware cloth
According to ChickenGuard:
- Put 10mm galvanized hardware cloth on the ground under your coop if your coop has a study floor
- Place a skirt of hardware cloth around the pen going out a few feet; you can either cover this with sod or staple it into the ground and let the grass grow through it
- Stuff smaller gaps with steel wool before sealing with wood or caulk
For more information on choosing the right mesh, see our comparison of hardware cloth vs chicken wire.
Elevated Coop Structures
According to VEVOR, “Raising up your coop is also a cleaning and a pest measure. By leaving at least a foot of open space below the coop, rats will have difficulty hiding, nesting, or digging.”
Benefits of elevating your coop:
- Better circulation and drier conditions beneath the coop
- Easily visible burrows and droppings for early detection
- Less pest and predator access
- Reduces nesting spots for rodents
Soy-Free and Corn-Free Grower Feed Options
Some chicken keepers prefer to avoid soy or corn in their flock’s diet due to concerns about allergies, GMOs, or wanting eggs free of these ingredients. Research indicates that trace amounts of what chickens eat can appear in their eggs.
Alternative Protein Sources in Soy-Free Feeds
- Peas and lentils
- Fish meal
- Dried distiller’s grains
- Flaxseed
- Crab meal
- Black soldier fly larvae
Brands offering soy-free grower options include New Country Organics, Scratch and Peck, and Leland Mills. These feeds typically cost 2 to 3x more than conventional options but may be worth it for keepers with specific dietary goals.
Organic Grower Feed Pricing
As of January 2026, organic grower feed pricing is approximately 4x higher than conventional options:
| Brand | Price | Per Pound Cost |
|---|---|---|
| Scratch and Peck Organic Grower | $42-48 per 25 lbs | $1.68-1.92/lb |
| New Country Organics | $38-44 per 25 lbs | $1.52-1.76/lb |
| Conventional Grower Feed | $18-22 per 50 lbs | $0.36-0.44/lb |
If you choose organic, budget roughly $24 to $28 per bird for the grower phase alone, compared to about $6.00 for conventional feed. For those interested in maximizing nutrition naturally, consider the advanced feeding technique: fermenting feed for enhanced nutrition.
Specific Scenarios Requiring Different Timing
The 6 to 8 week rule is a general guideline. Here is how to adjust for your specific situation.
Meat Birds (Broilers like Cornish Cross)
Meat birds are bred to grow unnaturally fast.
The Difference: They need high protein for longer.
Protocol: Many keepers keep meat birds on a high-protein (20 to 22%) “Meat Bird Grower” or “Finisher” from start to finish. If you switch them to a 16% grower too early, you might reduce their final harvest weight.
Timing: If you do switch, wait until 3 to 4 weeks, but ensure the protein stays high (18%+).
Heritage Breeds vs. Production Hybrids
Production Reds / Leghorns: These mature fast. You can switch them safely at 6 weeks.
Heritage Breeds (Brahmas, Cochins, Orpingtons): These are big birds that grow slowly. They need to build massive skeletons. It is often smart to keep them on starter feed until 8 to 10 weeks. The extra protein helps build strong bones to support their heavy bodies later.
Transition Timeline by Scenario
| Scenario | Recommended Transition Age | Key Consideration |
|---|---|---|
| Standard layers (Leghorns, RIR) | 6-7 weeks | Fast maturation rate |
| Heritage breeds (Brahmas, Cochins) | 8-10 weeks | Slower skeletal development |
| Meat birds (Cornish Cross) | 3-4 weeks to high-protein grower | Rapid growth needs |
| Winter chicks | 8-9 weeks | Extra calories for warmth |
| Summer chicks | 6 weeks | Standard development |
Seasonal Considerations
Winter Chicks: If you are raising fall or winter babies in a cold climate (like Michigan or New York), they burn massive calories just staying warm. Keep them on the higher-energy starter feed for an extra 2 weeks (until week 8 or 9). We have complete winter feeding strategies for cold-weather flocks to help you manage this season.
Summer Chicks: Warm-weather chicks can transition right at 6 weeks as they do not need the extra energy for heat. However, be sure to review feeding strategies for extreme heat conditions if you are raising birds during mid-summer.
When You Run Out of Starter Early
If you completely run out of starter feed before your chicks reach 6 weeks, you have two safe options:
Best Option: Buy another bag of starter and continue the original schedule. A partial bag can be stored in an airtight container for future use or shared with other chicken keepers.
Acceptable Alternative: If chicks are 4 to 5 weeks old and well-feathered, you can begin an extended 14-day transition to grower feed, using even more gradual mixing ratios. Monitor closely for any digestive issues.
Never skip straight to layer feed in an emergency. According to Dine-A-Chook, “If grower feed is not available, it’s better to continue feeding starter feed rather than risking calcium overload.”
Special Feeding Situations
The 90-10 Rule Explained
As your chicks enter the “grower” phase, you might want to give them treats. Maybe some scratch grains, mealworms, or kitchen scraps (lettuce, watermelon).
The Rule: The 90-10 rule, widely adopted by poultry nutritionists and agricultural extension services, ensures your chickens receive complete balanced nutrition. According to Small Pet Select, “90% of a hen’s diet should consist of a high-quality, complete layer feed that provides a balanced and nutritious foundation. The remaining 10% can be supplemented with healthy additions.”
Why It Matters: Commercial feeds are formulated with precise amino acid profiles, vitamin ratios, and mineral balances. When treats exceed 10% of total diet, you risk creating nutritional imbalances, particularly protein dilution during the critical grower phase when skeletal development is occurring. Learn more about safe kitchen scraps and treats for chickens to keep your flock healthy.
Practical Limit: For every 9 cups of feed, give no more than 1 cup of treats.
Can Chickens Eat Too Much Grower Feed?
Not usually, but it depends.
Unlike dogs, most chickens are good at self-regulating their intake to match their energy needs. However, the idea that they cannot overeat is a misconception.
Boredom and Confinement: If birds are kept in small runs with nothing to do, they may eat out of boredom.
Palatability: They are more likely to overeat fatty treats or scratch grains than standard grower pellets.
The Exception: Meat birds (Cornish Cross) lack the genetic “off switch” for hunger and will eat themselves to death if allowed. For standard laying breeds, obesity is less common but can happen. Feel the keel bone (breastbone); if you cannot feel it through the fat, cut back on treats.
Common Mistakes to Avoid
Even experienced owners make these slips.
Mistake #1: The “Cold Turkey” Switch
Problem: Switching straight from starter to grower one morning.
Result: Diarrhea, stress, and refusal to eat. Make sure to perform regular health checks on your growing flock to catch any digestive issues early.
Solution: Plan ahead. When you have about 1/4 bag of starter left, buy the grower feed and start mixing.
Mistake #2: Rushing to Layer Feed
Problem: Feeding layer pellets at 12 or 14 weeks because “it is cheaper” or “all the same.”
Result: Kidney damage. The excess calcium forms crystals in their kidneys (Visceral Gout). This can kill your hens months later, often right when they should start laying.
Solution: Patience. Wait for the first egg or until at least 16 weeks.
Mistake #3: Mixing Medicated and Non-Medicated Abruptly
Problem: Your starter was medicated (Amprolium), but your grower is organic (non-medicated).
Result: If you switch abruptly, their immunity to Coccidiosis might drop just as they go outside and encounter the parasite in the soil.
Solution: If switching from medicated to non-medicated, watch them closely for lethargy or bloody poop. The gradual mixing method also helps their immune system adjust.
Mistake #4: Improper Feed Storage
Problem: Storing feed in the original bag or flimsy plastic containers.
Result: Rodent contamination, mold growth, nutrient loss, and wasted money. Contaminated feed can make your entire flock sick.
Solution: Transfer feed immediately to a metal or heavy-duty container with a gamma seal lid. The airtight seal keeps feed fresh and completely blocks rodent access.
Mistake #5: Leaving Feed Out Overnight
Problem: Allowing chickens 24/7 access to feeders in the run or leaving feeders uncovered at night.
Result: Attracts rodents who are most active after dark. According to VEVOR, “never leave extra food out overnight.”
Solution: Use treadle feeders that close automatically, cover feeders with lids at dusk, or bring feeders inside each evening.
Cost Analysis: What This Transition Means for Your Budget
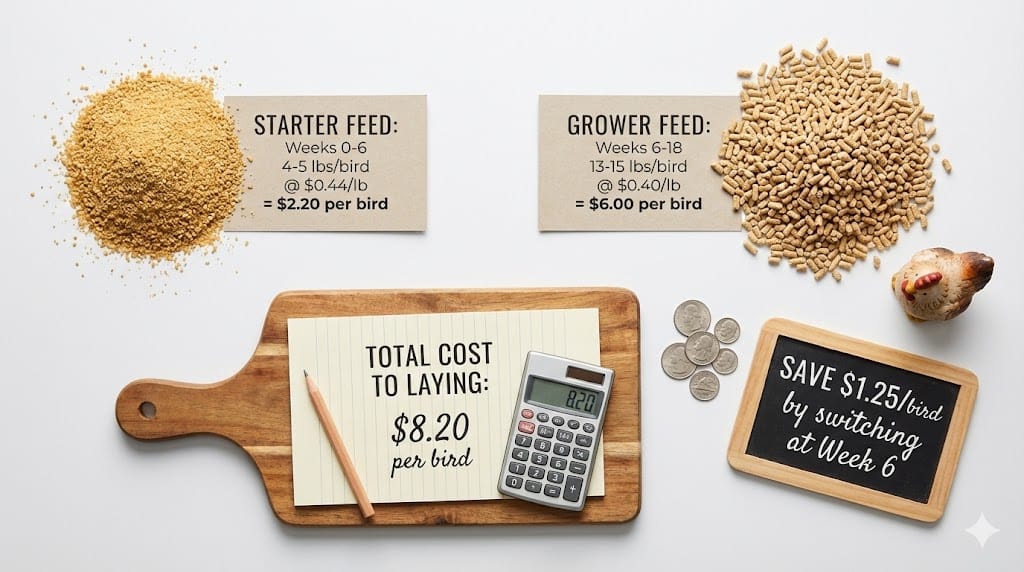
Let us talk money. Raising chickens can get expensive, and understanding feed costs helps you budget. You can calculate exact feed costs for your flock size to plan even more accurately.
Based on current 2026 prices at Tractor Supply and Rural King, raising one pullet from hatch to point-of-lay costs approximately $8.20 in feed:
| Phase | Feed Amount | Cost Per Pound | Total |
|---|---|---|---|
| Starter Phase (0-6 weeks) | 4-5 lbs | $0.44/lb | $2.20 |
| Grower Phase (6-18 weeks) | 13-15 lbs | $0.40/lb | $6.00 |
| Total per bird | 17-20 lbs | $8.20 |
The Savings: By switching to grower feed at Week 6 instead of keeping birds on expensive starter until Week 12, you save approximately $1.25 per bird.
For a standard 25-bird flock, that is $31.25 in savings, enough to buy quality oyster shell supplements for the entire first laying year.
This calculation assumes standard feed prices; savings are even higher if you use premium or organic brands.
My Recommended Feed Supplies
These are the products I use for feeding my flock through each growth stage:
| Item | Product | Why I Recommend It |
|---|---|---|
| Starter Feed | Manna Pro Chick Starter | 18% protein, fine crumble texture, consistent quality |
| Feed Storage | Container with Gamma Seal Lid | Airtight, rodent-proof, keeps feed fresh |
| Feeder | Hanging Chicken Feeder | Reduces waste, keeps feed off ground, easy to refill |
| Electrolytes | Chick Electrolyte Supplement | Supports stressed chicks during feed transitions |
FAQ: Common Questions About Feed Transition
What age do I stop feeding chick starter?
Most chicken keepers stop chick starter between 6 and 8 weeks of age. Layer breeds typically transition at 6 to 7 weeks, while dual-purpose breeds may benefit from starter until 8 weeks. The key indicator is body weight: chicks should reach approximately 1.5 to 2 pounds before switching. Some experts, including Purina Mills, recommend keeping birds on starter until 18 weeks, skipping the grower phase entirely.
How many weeks can chickens eat grower feed?
Chickens should eat grower feed from 6 to 8 weeks until 16 to 20 weeks of age. This means they will be on this diet for about 10 to 14 weeks. You will switch from grower to layer feed when birds begin laying eggs or reach 16 to 20 weeks, whichever comes first.
Can I mix starter and grower feed together?
Yes! Mixing is the best way to switch. Start with mostly starter feed and add a little grower. Over the course of a week, add more grower and less starter until you are only feeding grower. This prevents stomach aches for your birds.
How do I know if I am doing this right?
Trust your observations. Healthy pullets during the grower phase should be:
Active and alert, with bright eyes
Producing firm, well-formed droppings (not watery or bloody)
Showing steady weight gain week to week
Developing full, glossy feathers
Exhibiting normal flock behaviors (pecking, scratching, dust bathing)
If you see these signs, you are doing great. Any sudden changes in behavior, appetite, or droppings warrant a check with a poultry veterinarian.
What happens if I accidentally feed grower to baby chicks?
If it happens once, do not panic. But long-term, grower feed does not have enough protein (16%) to support the explosive growth a 2-week old chick needs. They may develop slowly, have poor feathering, or have weak immune systems. Switch back to starter immediately.
Can I skip grower feed and just use “All-Flock” feed?
Yes, you can. “All-Flock” or “Flock Raiser” feeds usually have 20% protein and can be fed to chicks, ducks, and turkeys of all ages. However, this is often more expensive than grower feed. If you have a mixed flock of ducks and chickens, All-Flock is actually the best option because it simplifies your life. For more details on feeding different age groups, consult our comprehensive chicken feeding guide covering all life stages.
My store does not sell “Grower,” only “Starter/Grower.” What do I do?
Many brands now sell a combined “Starter/Grower” feed (usually 18%). University of Georgia Extension’s management guide confirms that combined rations are formulated for this use. If you are using one, you do not need to switch anything until you see the first egg.
How should I store my chicken feed to keep it fresh and rodent-free?
Always store feed in metal containers or heavy-duty plastic bins with airtight gamma seal lids. According to VEVOR, “Metal bins are ideal because rats cannot gnaw through them. Avoid plastic bins, as determined rodents can chew holes in them.” Keep containers elevated off the ground in a cool, dry location. Never store feed inside the coop. A quality feed storage container prevents contamination and keeps feed fresh for 4 to 6 weeks.
Are there soy-free grower feeds available?
Yes. Brands like New Country Organics, Scratch and Peck, and Leland Mills offer soy-free grower options. These use alternative protein sources like peas, fish meal, and flaxseed. Expect to pay 2 to 3x more than conventional feeds, but this may be worth it if you want eggs free of soy residues.
What is a treadle feeder and should I get one?
A treadle feeder is a rodent-proof feeding solution where the lid only opens when a chicken steps on a platform. According to ChickenGuard, “When a chicken steps on the metal plate in front of the feeder, the metal lid raises, and the hen has access to the food. When they are not eating, the lid will remain closed.” They cost $50 to $150 but pay for themselves through reduced feed waste and eliminated rodent problems.
Summary Checklist
Transitioning your flock from starter to grower feed is one of your first big management decisions. It feels complicated, but it is actually simple if you follow the bird’s lead.
The Summary Checklist:
- Wait until 6 to 8 weeks of age (or follow manufacturer guidelines)
- Check that birds are fully feathered and active
- Buy a 16 to 18% protein Grower feed
- Mix the old and new feed gradually over 7 to 10 days
- Store feed in rodent-proof metal containers with airtight lids
- Use treadle feeders or cover feeders at night to prevent rodent access
- Watch for healthy droppings and energy
- Switch to Layer feed only after the first egg or around 16 to 20 weeks
By following this guide, you ensure your chickens grow at a healthy pace, saving you money on feed costs while protecting their long-term health. Happy chickens mean healthy eggs later! Once you have mastered the transition, your next step is to establish a consistent daily feeding schedule for your chickens to keep egg production steady.
About the Author: This guide was written by the ChickenStarter team, with over eight years of hands-on experience raising backyard poultry across multiple breeds including Rhode Island Reds, Barred Rocks, and heritage layers. Our feeding recommendations are based on documented results from our own flocks combined with guidance from university extension services and poultry nutrition research.
Disclaimer: This guide provides educational information based on current poultry nutrition research and established feeding practices. Individual bird requirements may vary by breed, climate, and health status. For specific health concerns, consult a licensed poultry veterinarian or contact your local agricultural extension service. Feed manufacturers’ guidelines on packaging should be followed for products you purchase. The author is not a licensed veterinarian and cannot diagnose or treat poultry diseases.

Oladepo Babatunde is the founder of ChickenStarter.com. He is a backyard chicken keeper and educator who specializes in helping beginners raise healthy flocks, particularly in warm climates. His expertise comes from years of hands-on experience building coops, treating common chicken ailments, and solving flock management issues. His own happy hens are a testament to his methods, laying 25-30 eggs weekly.