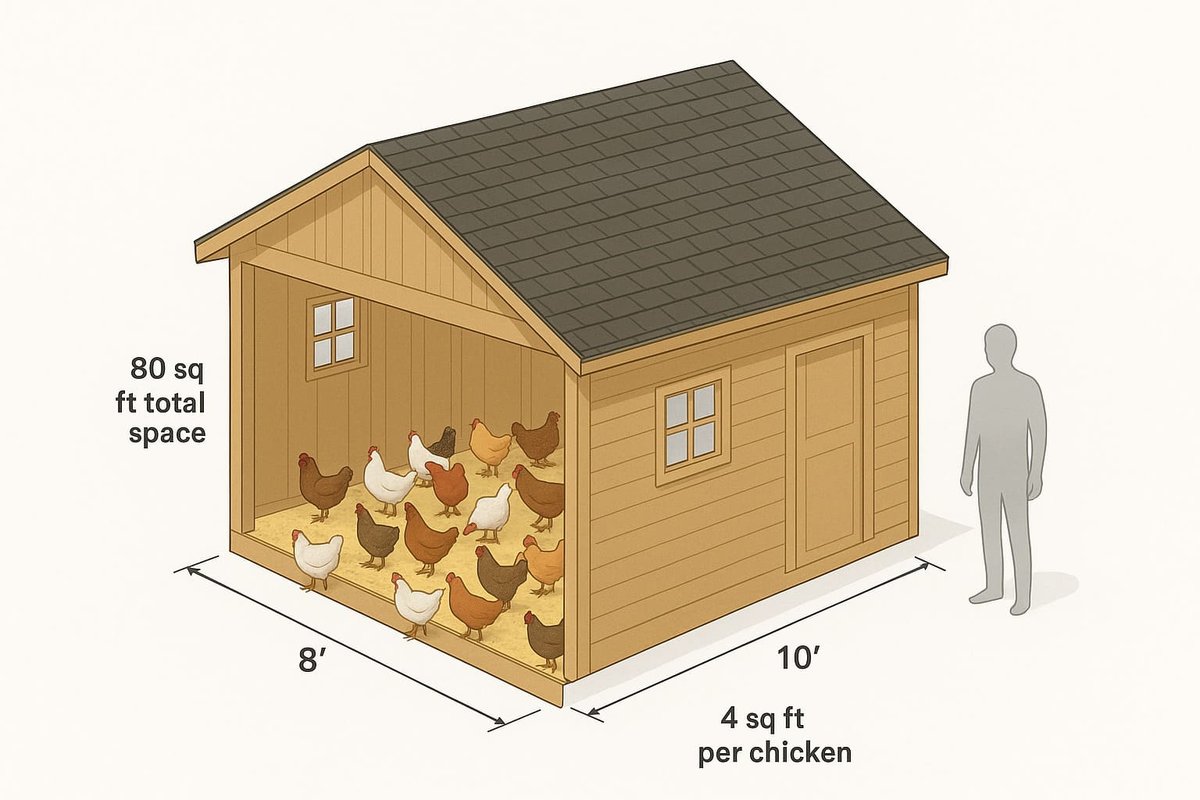
For 20 standard-size chickens, you need an 80-square-foot coop (8×10 or 8×12 dimensions) plus a minimum 200-square-foot run. This guide provides free chicken coop plans for 20 chickens with complete material lists, step-by-step instructions, and expert tips from years of hands-on experience.
So, you’re ready to jump into the wonderful world of backyard chickens and go big with a flock of 20? That’s awesome! I’ve been there, standing in my yard, dreaming of a constant supply of fresh, golden-yolked eggs. But here’s the first thing I learned the hard way: a happy, healthy flock starts with the right home. Finding good, solid plans that don’t cost a fortune can feel like a wild goose chase… or, well, a wild chicken chase.
This guide is everything I wish I had when I started. We’re cutting through the fluff to give you free chicken coop plans for 20 chickens, complete with material lists, step-by-step instructions, and all the little tips and tricks that make a huge difference. Whether you’re a seasoned builder or this is your first big DIY project, you’ll find what you need to build a perfect, safe, and comfortable home for your feathered friends.
What Size Coop Do I Need for 20 Chickens?
Quick Answer: Minimum Coop Size for 20 Chickens
- Indoor coop: 80 square feet (e.g., 8×10 or 8×12)
- Outdoor run: 200 square feet minimum
- Nesting boxes: 4-5 boxes
- Roosting bars: 17-20 feet total length
Alright, let’s cut to the chase. No fluff. According to Penn State Extension’s poultry housing guidelines, standard laying hens require 3-4 square feet of indoor space per bird. For 20 standard-size chickens, like prolific layers such as Rhode Island Reds, Leghorns, or Orpingtons, you need an 80-square-foot coop. That’s non-negotiable.
This is reinforced by the Poultry Extension collaborative, which recommends laying hens receive a minimum of 3-4 square feet per hen indoors and 10 square feet per hen in outdoor runs. You can read more about how much space chickens really need to understand why this is so crucial. Think of it as a small shed, like an 8×10 or 8×12. On top of that, they need a 200-square-foot run to stretch their legs, forage, dust bathe, and not drive each other crazy.
Here’s a quick-and-dirty guide to get you started:
| Flock Size | Minimum Coop Size | My Recommended Size | Minimum Run Size |
|---|---|---|---|
| 10 chickens | 30-40 sq ft | 40-50 sq ft | 100 sq ft |
| 20 chickens | 60-80 sq ft | 80-100 sq ft | 200 sq ft |
| 25 chickens | 75-100 sq ft | 100-125 sq ft | 250 sq ft |
Remember, bigger birds need more room. Little bantam chickens are fine with 2 square feet each, but if you’ve got big, fluffy Brahmas or Jersey Giants, you better give them at least 4-5 square feet apiece.
Here are the two magic dimensions for a 20-bird flock:
- 8×10 chicken coop plans = 80 square feet (The sweet spot for 20-25 chickens)
- 8×12 chicken coop plans = 96 square feet (Gives you comfortable growing room)
Pro tip: Trust me on this one. Build bigger than you think you need. “Chicken math” is a real phenomenon where 6 chickens somehow turn into 20. You’ll thank me later when you have room to grow your flock without having to build a whole new coop.
Why Space Matters: The Risks of Overcrowding
It’s tempting to squeeze a few extra birds in, I get it. But it’s a terrible idea. When chickens get cramped, they get mean and sick. Overcrowding is the root of almost all flock problems. You’ll suddenly have a coop full of:
- Health Issues: That signature “ammonia” smell will hit you like a ton of bricks. It’s a sign of poor ventilation and a breeding ground for respiratory diseases. A proper setup is key to keeping a chicken coop from smelling. Plus, parasites like mites and lice have a field day in crowded coops.
- Behavioral Problems: Stress from being crammed together is the #1 cause of feather pecking, bullying, and, yes, even cannibalism. It’s a direct result of chickens not being able to get away from each other and can lead to serious pecking order problems.
- Fewer Eggs: Stressed-out, unhealthy hens just don’t lay well. Their bodies are too busy dealing with the stress to focus on egg production.
Planning for the Run
The run is your flock’s safe space to be chickens—scratching, dust bathing, and chasing bugs. For 20 chickens, a 10×20 foot run is the absolute minimum. Make sure it’s fully enclosed—top included!—with hardware cloth. A hawk can spot a free lunch from a mile away. Consider adding some simple enrichment to the run, like a few logs or branches for perching, to keep them entertained.
Getting the size right is the first and most important step. Once you have the dimensions locked in, the next step is to make sure the interior is perfectly designed for the flock’s needs.
Essential Features Every 20-Chicken Coop Needs
A good coop is more than just four walls and a roof. It’s a functional home that keeps chickens safe, comfortable, and productive. Here’s the deal on the things you absolutely can’t skimp on.
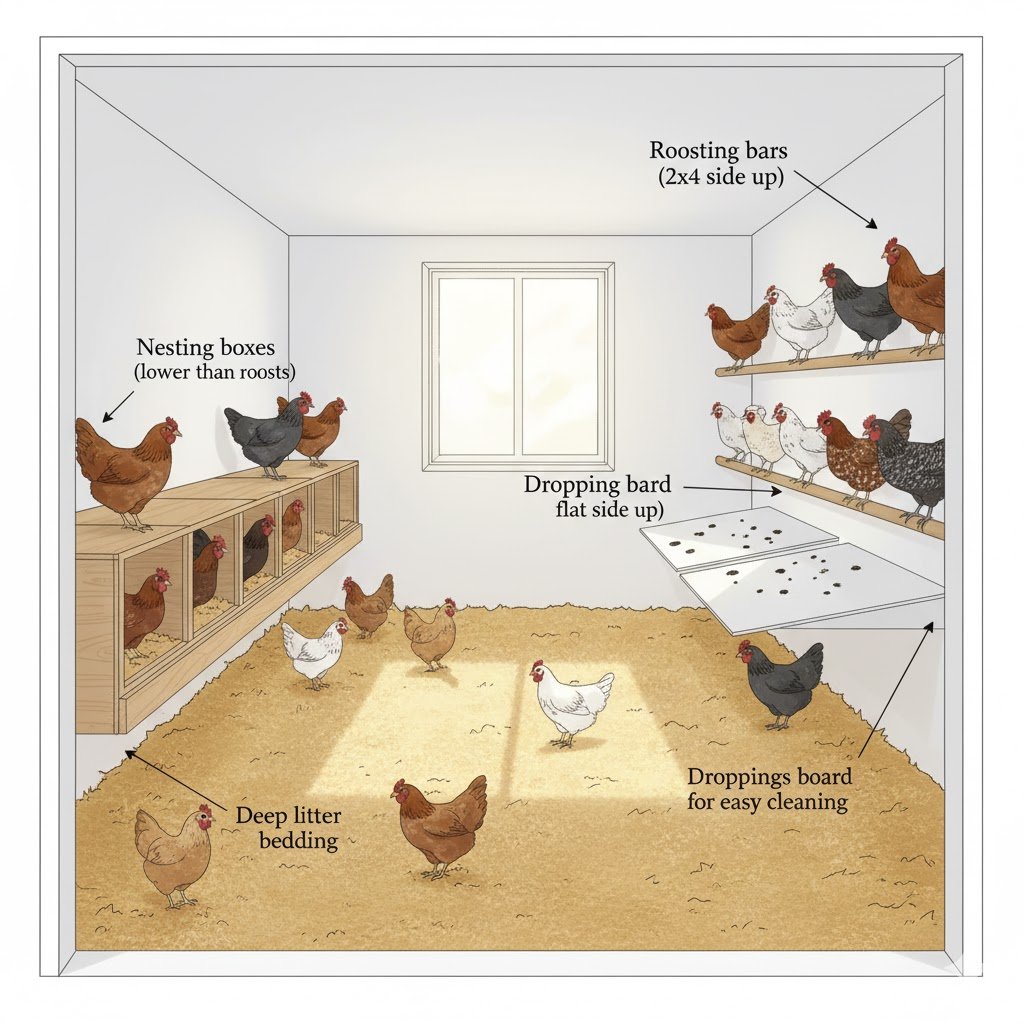
Nesting Boxes for 20 Chickens
The golden rule is one nesting box for every 4-5 hens. For your 20 chickens, that means you need 4-5 nesting boxes. A simple 12x12x12 inch box is perfect for most breeds. For a deep dive, check out the ultimate guide to chicken nesting boxes.
- Placement: Here’s a trick: always place the nesting boxes lower than the roosting bars. If they’re the highest point in the coop, your chickens will sleep—and poop—in them. No one wants that.
- Bedding: Keep them cozy with a thick 4 to 6-inch layer of clean pine shavings or straw.
- Accessibility: I highly recommend building your nesting boxes with an exterior access door. It makes collecting eggs a 30-second job and you won’t have to wade into the coop and disturb the whole flock.
- Pro Tip: Build the nesting boxes with a sloped roof on the inside of the coop to prevent chickens from sitting on top of them.
Roosting Bars
Chickens sleep on elevated perches. It’s their natural instinct to get off the ground at night to avoid predators. You’ll need 10-12 inches of roost space per chicken, which means you need 17-20 feet of total roosting bar length for 20 birds. Knowing how high roosting bars should be is key to their comfort.
- Material: Use 2×4 lumber with the wide, 4-inch side facing up. This lets them roost with their feet flat, which is more comfortable and protects them from frostbite in the winter. Never use plastic, round metal dowels, or thin branches; they can cause foot problems like bumblefoot and get dangerously cold.
- Placement: Install them 2-4 feet off the floor. If you’re using multiple roosts, stagger them like a ladder, about 12-15 inches apart horizontally and vertically. This gives the chickens on the lower bars enough headroom and prevents the ones on top from pooping on their flock mates.
Ventilation Requirements
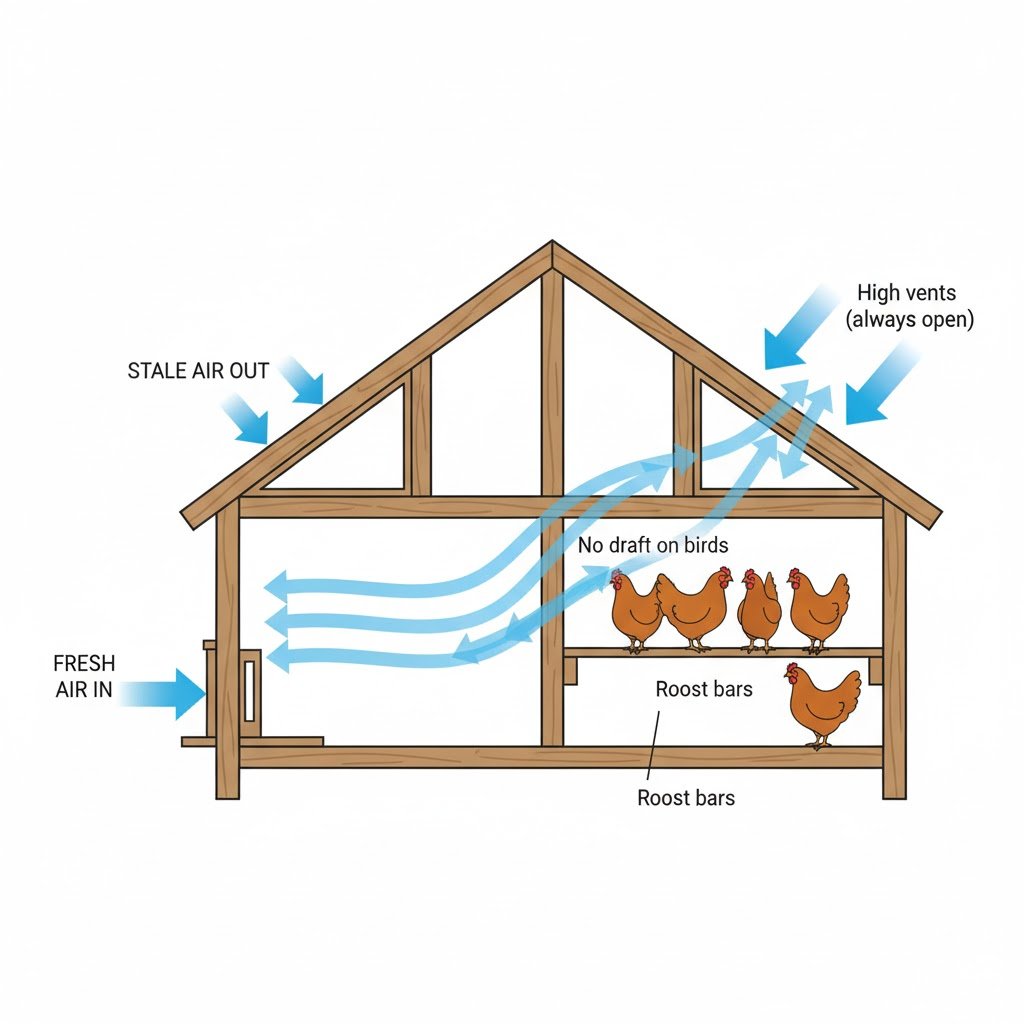
This is the most critical and most often overlooked feature. Ventilation is not a draft. A draft is a cold wind blowing on your chickens. Ventilation is air exchange that happens high above their heads. Understanding exactly how much ventilation a chicken coop needs is vital for flock health. You need constant airflow to remove ammonia and moisture, which prevents respiratory disease and frostbite. Virginia Cooperative Extension emphasizes that ‘ample air movement without a draft is essential’ and that dampness and ammonia buildup indicate insufficient ventilation. Learning about common ventilation mistakes can save your flock from overheating.
- Placement: Vents MUST be high up, near the roofline, above the chickens’ heads when they’re roosting. This lets the warm, moist, ammonia-filled air escape without creating a cold wind.
- Types: Gable vents, ridge vents, or even just some windows you can crack open (covered with hardware cloth) are all great for getting the air moving.
Predator-Proof Construction
Okay, let’s have a serious talk about predators. They’re smart, they’re relentless, and they think your chickens are a free buffet. Your job is to build a truly predator-proof chicken coop.
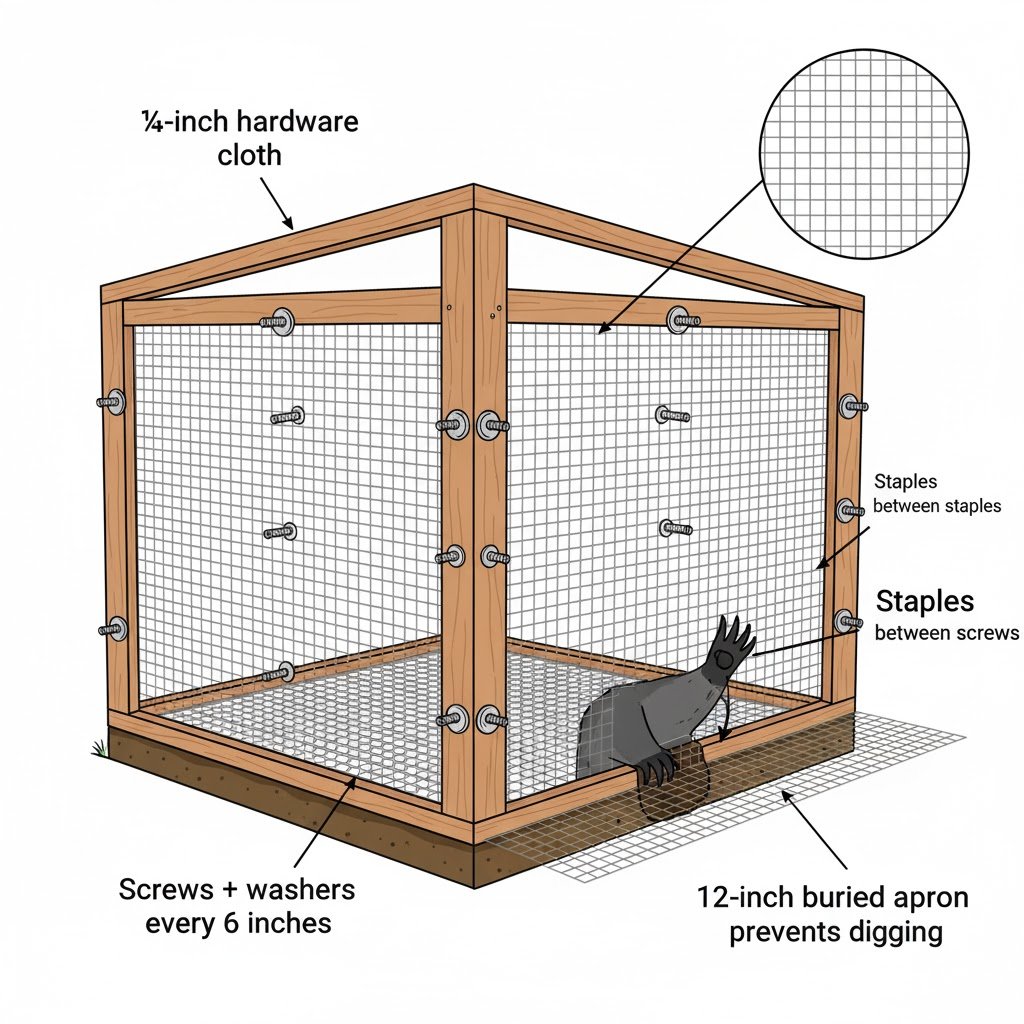
- Cover every single opening with ¼-inch hardware cloth. Not chicken wire. Ever. A raccoon will treat chicken wire like wet paper.
- Use two-step, complex locks on all doors. Wildlife management resources confirm that raccoons have dexterous paws and can easily open simple latches, making two-step locks essential.
- Bury a 12-inch “apron” of hardware cloth around the entire perimeter of the coop and run. This stops digging predators like foxes and weasels right in their tracks.
Walk-In Human Access
Trust me, you want a walk-in coop. A door you can walk through without hitting your head will make your life infinitely easier. It turns cleaning from a back-breaking chore into a quick task.
Flooring and Bedding
The floor takes a beating. A solid ¾-inch plywood floor is a good start, but here’s a pro-tip: go to a hardware store and buy a cheap roll of vinyl flooring. It makes a full clean-out incredibly easy—you can just scrape or even hose it down. Choosing the best flooring for a chicken coop can make a huge difference in maintenance.
For bedding, I’m a big fan of the deep litter method.
- How it works: Start with a 6-inch layer of pine shavings. Instead of cleaning it out, you just turn it over with a pitchfork every week or so and add a thin fresh layer on top. The chicken poop and shavings compost in place, creating a healthy, carbon-rich floor that’s teeming with beneficial microbes that out-compete bad bacteria.
- Benefits: It’s less work, generates its own heat in the winter, and gives you amazing compost for your garden in the spring. A properly managed deep litter has no ammonia smell.
With the essential features planned, you’re ready to find a design that brings it all together.
Free Chicken Coop Plans for 20 Chickens (Top 7 Designs)
Here are the best free and affordable chicken coop plans that are actually designed for 20+ chickens. Before you pick one, think about your climate, skill level, and budget. The “best” plan is the one you can actually finish and that will serve your flock well. For additional resources, NC State University’s Poultry Extension provides comprehensive resources for backyard flock housing, including dozens of construction plans for various flock sizes.
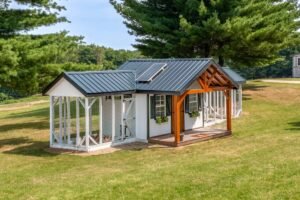
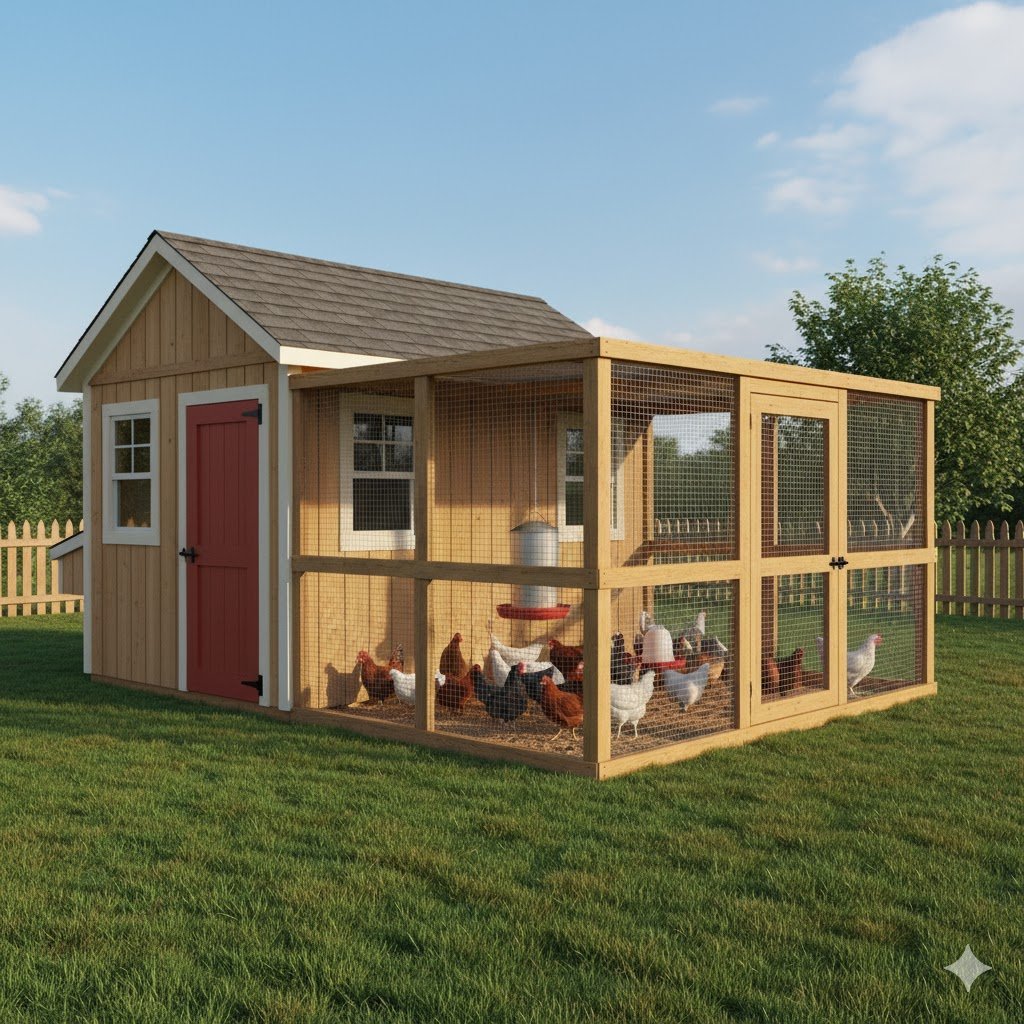
1. Free 8×10 Large Chicken Coop Plans: According to free plans available from MyOutdoorPlans.com, their 8×10 chicken coop provides 80 square feet, which comfortably houses 20-30 standard chickens. These plans include complete 3D diagrams and a full shopping list, featuring a classic gable roof, good-sized doors, and plenty of windows for ventilation.
2. 8×12 All-Weather Chicken Coop Plans: The 8×12 All-Weather Chicken Coop Plans from Easy Coops are engineered for predator resistance and designed to be well-insulated, making them ideal for colder climates. Their plans provide a full walk-in design with incredibly clear guides, which is a huge plus for beginner builders.
3. Walk-In Chicken Coop Plans with Large Shed Roof: For those wanting professional blueprints, the Walk-In Chicken Coop Plans with Large Shed Roof from an architect on Etsy offer a modern look. This 32-page plan features a shed roof, which is simpler to build than a gable roof, and includes a foundation plan and an editable material list.
4. Cluck Canyon Walk-In Chicken Coop: The Cluck Canyon Walk-In Chicken Coop, available from sources like The Farmer’s Cupboard on Etsy, is a massive 9×42 foot design that combines the coop and run into one impressive structure, giving your chickens tons of protected space.
5. The Poultry Barn Design: Available from established designers on Etsy, The Poultry Barn Design is an all-in-one structure that features an 8×6 foot storage area attached to the coop, keeping your feed secure and dry right where you need it.
6. Simple DIY Chicken Coop Plans for 20 Chickens
- Best for: First-time builders on a tight budget.
- Approach: Keep it simple. Start with a basic 8×10 or 8×12 rectangular frame. Build it at ground-level on skids, and go with a a single-slope shed roof—it has fewer complex cuts than a gable roof. One or two windows are plenty, and you can build simple plywood nesting boxes inside.
7. Extra Large Modular Chicken Coop Plans (25-30 Chickens)
- Best for: Those of us who know “chicken math” is real and we’ll probably have more chickens next year.
- Approach: Look for plans with a 10×12 or 12×12 footprint that are designed to be expandable. These often feature modular nesting box sections that you can add on later.
Comparison Summary Table
| Plan Name | Size | Capacity | Cost | Skill Level | Download Format | Best For |
|---|---|---|---|---|---|---|
| MyOutdoorPlans 8×10 | 80 sq ft | 20-30 chickens | Free | Intermediate | Classic, no-nonsense design | |
| Easy Coops 8×12 | 96 sq ft | 20 chickens | Premium ($50-$100) | Beginner | Digital | Cold climates & beginners |
| Walk-In Shed Roof | 8×32 ft | 20-24 chickens | ~$25 | Intermediate | Modern look, pro blueprints | |
| Cluck Canyon | 9×42 ft | 20 chickens | Premium/Varies | Intermediate | Huge integrated run space | |
| Poultry Barn | 80 sq ft+ | 16-20 chickens | Premium/Varies | Intermediate | Built-in feed/supply storage | |
| Summary | Varies | ~20 chickens | **$0 – $100+** | All Levels | Digital/PDF | Designs for every need |
Choosing a plan is exciting, but before you start buying materials, it’s crucial to think about where this new structure will live.
Where to Build: Site Selection and Preparation
Placing your coop in the wrong spot can lead to a world of problems. In fact, finding the best place to put your chicken coop is one of the most important first steps. The University of Georgia’s Poultry Extension provides detailed guidelines for proper site selection, emphasizing drainage, wind protection, and proximity considerations. Get it right the first time with this checklist.
Site Selection Checklist
- Drainage: Never build in a low spot where water pools. Chickens and mud are a recipe for disease. If your yard is flat, build up a 4-6 inch pad of gravel or packed dirt.
- Sun and Shade: Chickens need both. Morning sun helps warm the coop in winter. Afternoon shade is non-negotiable in the summer to prevent overheating. A big deciduous tree is a perfect coop companion.
- Convenience: Don’t stick it in the farthest corner of your yard. You’ll be trekking out there twice a day, every day, rain or shine. Think about the path you’ll take carrying 50-pound bags of feed.
- Proximity to Neighbors: Be a good neighbor. Check local rules for how far a coop needs to be from property lines. Position doors and windows away from your neighbor’s house to minimize noise and potential smells.
- Protection from Wind: A solid fence, a wall of your garage, or a line of shrubs can act as a great windbreak, making a huge difference in winter.
Preparing the Ground
Once you’ve found the perfect spot, level it. A level foundation is key to a structure that doesn’t rack and twist over time. Clear away all the grass, too, because it will just rot and attract rodents under your coop. Before you dig, call 811 to have underground utility lines marked.
Safety Disclaimer
Disclaimer: Always check local building codes and zoning regulations before starting construction. This guide provides general information based on common practices but may not reflect specific requirements in your area. Consult with a licensed contractor if you’re unsure about structural requirements.
DIY Chicken Coop Plans for 20 Chickens: Step-by-Step Building Guide
I know a big project can feel daunting, but it’s really just a series of small, manageable steps. For further guidance, Oregon State University Extension offers comprehensive guidance on coop construction using various materials including wood, plastic, and recycled components. You’ll need some basic carpentry tools, including a circular saw or miter saw for accurate cuts, a good drill, a level, and a tape measure. Here’s a general overview of how it will come together.
Phase 1: Planning and Preparation First, go get your permit if you need one. Then, read your chosen plans from start to finish. Then read them again. Create a detailed shopping list and a cut list. Knowing what’s coming next is half the battle.
Phase 2: Building the Foundation and Floor Frame This is the most important step. Get your foundation—whether it’s skids on concrete blocks or a slab—perfectly level. Use a string level for accuracy. Build your floor frame with 2×6 joists and attach your ¾-inch plywood floor. Put a coat of exterior paint on the plywood before you go any further.
Phase 3: Framing the Walls Build each of the four walls flat on the floor deck. It’s much easier than trying to build them upright. Most plans call for studs placed “16 inches on center.” Frame out your openings for doors and windows, using double headers (two 2x4s with a ½-inch plywood spacer) above them for extra strength.
Phase 4: Wall Assembly Time to raise the walls! Grab a helper for this part. Stand the walls up, make sure they are perfectly plumb (vertically straight) with a spirit level, and screw them down into the floor and to each other at the corners. Use temporary braces to hold them in place.
Phase 5: Installing Siding Attach your T1-11 or other siding to the exterior. T1-11 is popular because it acts as both the sheathing and the final siding in one step, saving time.
Phase 6: Roof Construction Build and install your roof rafters with a 6-12 inch overhang to keep rain off the siding. Add a drip edge, roll out your roofing underlayment, and then install your metal roofing or shingles. Don’t skimp here; a leaky roof is a coop-killer.
Phase 7: Finishing Touches and Interior Now for the fun part. Install your nesting boxes and roosting bars. Paint the interior a bright white; it makes the space brighter and helps you spot any pesky mites or lice. A “droppings board”—a simple shelf of plywood under the roosts—is a great addition that makes daily cleaning a 30-second scrape job.
Phase 8: Run Construction Build the frame for your run using pressure-treated lumber for any parts that will touch the ground. Then comes the tedious part: cover the entire thing—sides and top—with that ¼-inch hardware cloth.
Predator-Proofing Your 20-Chicken Coop: An In-Depth Guide
A coop isn’t just a house; it’s a fortress. Your flock is counting on you for protection. Common predators vary by region, so identifying what lives in your area is the first step to effective defense. For more ideas, check out these easy fixes for a safer coop.
- Northeast/Midwest: Raccoons, foxes, weasels, hawks
- South: Raccoons, opossums, snakes, hawks
- West: Coyotes, bobcats, hawks, owls
- All regions: Domestic dogs and cats
Identify your local predators and reinforce accordingly. For example, if you have digging predators like foxes or coyotes, the buried hardware cloth apron is non-negotiable. Don’t forget smaller pests, either; it’s important to know how to keep rats out of the chicken coop.
The Unseen Gaps
According to the Internet Center for Wildlife Damage Management, a weasel can squeeze through any opening its skull can pass through, often just 1-inch in diameter. After you think you’re done, go inside the coop, close the door, and look for any slivers of daylight. If you see light, a predator can get in. Seal those gaps with wood, caulk, or hardware cloth.
Hardware Cloth is Non-Negotiable
- Why ¼-inch? Snakes, mice, and weasels can get through ½-inch openings. Raccoon hands can tear through anything larger.
- Secure it properly: Use heavy-duty staples every few inches, but then go back and add screws with large washers every foot. A determined raccoon can peel back wire that’s only held on by staples.
- The Apron: This is a pro-move. Lay a 12-inch flap of hardware cloth flat on the ground all around the outside of your run and stake it down. When a predator tries to dig, they’ll hit the wire and give up.
Lock It Down
Raccoons have ridiculously clever hands. A simple hook-and-eye latch is an open invitation. Use locking carabiner clips, deadbolts, or gate latches that require two distinct actions to open. Put one on every single door and lid.
Automation and Time-Saving Ideas
You don’t need a high-tech setup to make your life easier.
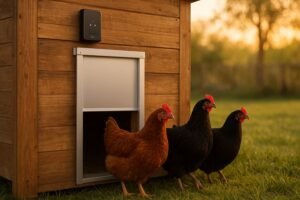
Automatic Chicken Coop Door
This is the single best investment you can make. An automatic door on a timer or light sensor opens the coop at sunrise and securely locks it at dusk. It means you can go out for dinner or sleep in on a weekend without worrying.
Large-Capacity Feeders and Waterers
- Feeders: A 50-pound hanging feeder or a DIY gravity feeder made from PVC pipe can hold a week’s worth of food, keeping it clean and dry.
- Waterers: A 5-gallon bucket with horizontal water nipples is a game-changer. The nipples keep the water perfectly clean because chickens drink from them directly, preventing bedding and poop from contaminating the water source. This is a huge factor in flock health.
Maintaining Your Chicken Coop for Long-Term Use
Protect that investment with a simple maintenance routine.
- Daily (5 minutes): A quick scoop of the poop, check food and water, and collect eggs. Do a quick visual health check of the flock.
- Weekly (20 minutes): Turn over the deep litter bedding and add a fresh layer. Double-check that all locks and latches are working properly.
- Monthly (1 hour): Scrape the roosts clean. Give the waterers a good scrub with a vinegar solution.
- Seasonally (2-3 hours): Give the coop a full deep clean. In the spring, check for any damage. In the fall, seal up any drafts. Every few years, give the exterior a fresh coat of paint or sealant.
Common Questions About Chicken Coop Plans for 20 Chickens
Q: How much does it really cost to build a coop for 20 chickens?
A: If you’re buying all new materials in 2025, you should budget between $800-$1,500. This is just for the build; remember to factor in the total cost to raise chickens for the first year. Prices can vary significantly based on your location and the materials you choose, but here’s a general breakdown for an 8×10 coop:
Lumber & Plywood: $400 – $700
Hardware Cloth (¼-inch): $100 – $200
Roofing Materials (metal or shingles): $100 – $200
Hardware & Fasteners (screws, hinges, locks): $50 – $100
Doors & Windows: $150 – $300
Total Estimated Cost: $800 – $1,500 If you can salvage materials like windows, roofing, and lumber, you can definitely get that cost down to the $400-$600 range.
Q: Do I need a building permit for a chicken coop?
A: It depends entirely on where you live. Some towns don’t care about anything under 200 square feet; others want a permit for anything bigger than a dog house. Make the call to your local city/county building department before you buy any materials. It’ll save you a huge headache.
Q: How long does it take to build a 20-chicken coop?
A: For a first-time builder working with a good set of plans, a standard 8×10 or 8×12 coop will likely take two to four full weekends to complete. This can vary based on your skill level and if you have a helper. An experienced builder might finish it in a single weekend.
Q: What’s the easiest chicken coop design for beginners?
A: The easiest design for a beginner is a simple shed-style coop with a single-slope roof. This design minimizes complex angle cuts. Look for plans that are built on a skid foundation, as this is much simpler than pouring concrete. The “Simple DIY Chicken Coop” approach mentioned above is a great starting point for a budget-friendly, easy build.
Q: What kind of foundation should I use?
A: The easiest is a “floating” foundation: setting the coop on pressure-treated skids that rest on level concrete deck blocks. It’s stable and not considered a permanent structure in most places. A full concrete slab is the gold standard for being predator-proof, but it’s a lot more work and money.
Q: Should I insulate my chicken coop?
A: Probably not. As many veterinary and poultry science sources note, chickens are remarkably cold-hardy due to their feathers and ability to huddle. In 9 out of 10 climates, good ventilation is way more important than insulation, as a poorly insulated coop can trap moisture, which leads to frostbite. A comprehensive winterizing guide can help you prepare for the cold, including how to prevent and treat frostbite. Only consider insulating if you live somewhere that sees weeks of below-zero temperatures.
Q: How many nesting boxes do I really need?
A: You need 4 or 5 boxes. Here’s the funny thing: you’ll provide five beautiful, clean nesting boxes, and all 20 of your hens will fight over the same exact one. It’s just what they do. But you still need to provide the extra options to prevent stress and egg-breaking.
Q: What if I have 25 chickens instead?
A: For 25 chickens, you’ll need to scale up. Aim for 100-125 square feet of coop space (a 10×12 coop is ideal) and a 250 square foot run. You will also need at least 5-6 nesting boxes. The 8×12 plans mentioned in this guide would be at the absolute minimum end for 25 chickens, but a larger footprint is recommended.
Q: Can I modify these plans for bantam chickens?
A: Absolutely! Bantam chickens are much smaller and only require about 2 square feet of coop space per bird. You could either build an 8×10 coop and comfortably house up to 40 bantams, or you could scale down the dimensions of a plan for a smaller flock. Some bantams, like Silkies, have their own unique needs, which you can read about in a bantam vs standard Silkie guide. Roosting bars can be slightly smaller (e.g., a 2×3 instead of a 2×4) and placed lower to the ground.
Q: What if I want to add more chickens later?
A: This is a very common scenario, often called “chicken math.” The best strategy is to plan for expansion from the beginning. Build a larger coop than you currently need—an 8×12 for a starting flock of 15, for example. Alternatively, choose a modular coop design that allows you to easily add on another section or more nesting boxes in the future. It is significantly easier to build bigger upfront than to try and expand a small coop later.
Conclusion
Building that first big coop is a huge milestone. It’s more than just a weekend project; you’re creating a safe, bustling home that will protect your flock for years to come. The bottom line is this: give them enough space (an 8×10 or 8×12 is a great start), make it Fort Knox against predators, and ensure it has plenty of fresh air. Everything else is just details.
So grab a set of plans, fire up that saw, and get ready. In just a few weekends, you’ll be able to lean against your finished coop, watch your happy flock scratching in the yard, and know that you built them the best home you possibly could. The daily fresh eggs are just the bonus. Once you have a steady supply, you might even want to learn how to legally sell your backyard chicken eggs.

Oladepo Babatunde is the founder of ChickenStarter.com. He is a backyard chicken keeper and educator who specializes in helping beginners raise healthy flocks, particularly in warm climates. His expertise comes from years of hands-on experience building coops, treating common chicken ailments, and solving flock management issues. His own happy hens are a testament to his methods, laying 25-30 eggs weekly.