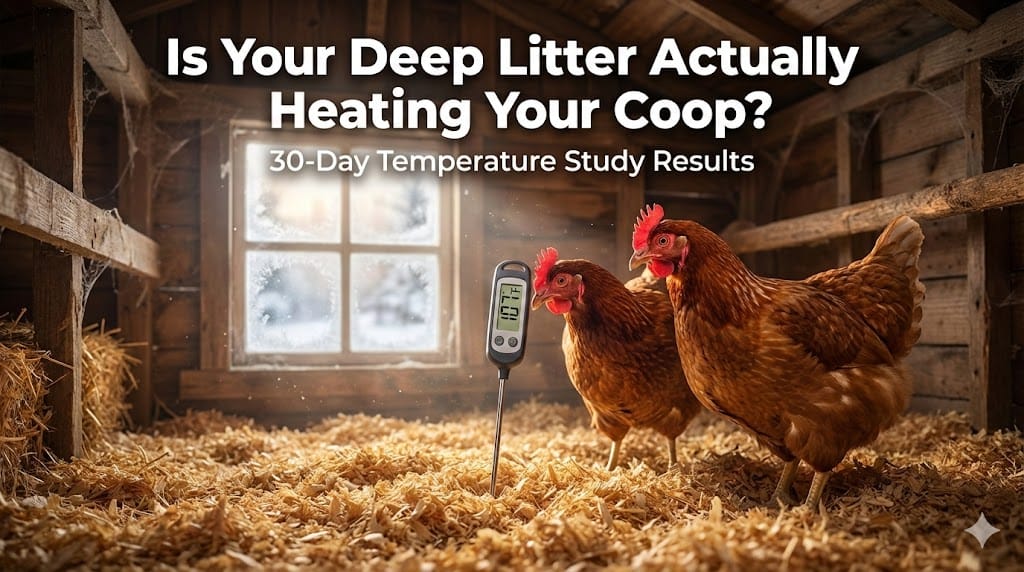
At 4 inches deep, my coop floor hit 107°F (41.6°C) while the air outside sat at a freezing 18°F (-7.7°C).
I stared at the receiver for my wireless thermal probes and tapped the screen, sure it was a glitch. It wasn’t. That was the moment I realized the “compost heat” everyone talks about wasn’t just folklore; it was physics in action.
I keep a mixed flock of 15 birds (mostly Rhode Island Reds and Easter Eggers) in Zone 5. I’ve always relied on the deep litter method in winter to manage manure, but I never knew if it was actually doing anything to keep my birds warm, or if I was just saving time on cleaning.
So, I decided to stop guessing. I bought three industrial-grade soil thermal probes, buried them at different depths in my coop bedding, and ran a deep litter method temperature study for a full month in January to test the heat generation and identify the best material for deep litter method success.
Here is exactly what I found, the mistakes I made, and the data that proves what’s happening under your chickens’ feet.
What Is the Deep Litter Method? (Quick Primer Before We Get to Data)
Before we dive into my charts, here’s what’s actually happening on your coop floor.
The deep litter method (sometimes called the built-up litter system) is basically an in-coop compost pile. Instead of scooping out the soiled bedding every week, you let the chicken manure and carbon-based bedding (like pine shavings) build up on the floor.
It sounds messy, but it’s actually a science experiment. When you mix the nitrogen from the droppings with the carbon from the shavings, add a little oxygen (by stirring), and keep the moisture right, beneficial microbial activity starts to break down the waste.
For this to work efficiently, the chemistry matters. The ideal carbon-to-nitrogen (C/N) ratio for heat generation falls between 25:1 and 35:1, which is roughly 1 part manure to 25-30 parts bedding by weight. If you have too much bedding or too few birds, you won’t generate the heat I recorded.
This process does two amazing things:
- It creates heat. As microbes break down the poop, they release thermal energy.
- It creates nutrition. This isn’t a new idea. Back in the 1940s, poultry researchers Kennard and Chamberlin (at the Ohio Agricultural Experiment Station) discovered that chickens on built-up litter were healthier.
According to research documented by the Food and Agriculture Organization (FAO) of the United Nations, the microflora (good bacteria) in deep litter produces growth factors including Vitamin B12 and natural antibiotic substances that help control pathogen levels. This science holds up globally; research from diverse agricultural zones, including Ludhiana, India and Holy Cross Voivodeship, Poland, confirms that deep litter systems consistently improve thermal comfort and welfare parameters.
The Microbial Shift: The microbial workforce changes as temperatures rise. Thermophilic fungi typically appear after 5-10 days, followed by actinomycetes (beneficial decomposing bacteria). As temperatures climb past 104°F (40°C), the original mesophilic microbes are killed off, replaced by heat-loving species that accelerate decomposition.
The Hidden Health Benefit
Beyond heat, established deep litter may protect against disease. According to Canadian Poultry Magazine, one U.S. study found the highest mortality from necrotic enteritis (NE) occurred in birds on clean shavings with early pathogen exposure. This suggests that mature deep litter’s microbial ecosystem provides protective benefits that fresh bedding cannot.
However, a safety note: While competitive exclusion helps, backyard systems rarely reach the uniform thermal death point (typically 131-140°F) required for complete sterilization of all pathogens throughout the entire pile. Good hygiene remains important.
So, you’re not just avoiding work; you are culturing a probiotic heating pad for your flock.
Before you rush to build this system, realize that heat generation comes with a biological byproduct: exhaust. If you don’t manage the exhaust, you risk your flock’s respiratory health.
Is the Deep Litter Method Safe? Balancing Heat Against Respiratory Risks
Before you start building your litter, you need to know the risks. While my chickens were warmer, is the deep litter method for chickens safe overall? Yes, but you have to respect the biology. While proper deep litter effectively reduces volatile fatty acids (VFAs), compounds often responsible for strong manure odors, it also significantly lowers Ammonia-N (NH₃-N) and methane (CH₄) concentrations compared to wet systems—provided you maintain aerobic conditions.
The Real Disadvantages of Deep Litter Method Nobody Talks About
It isn’t a “set it and forget it” system.
- Moisture = Frostbite: This sounds weird, but high humidity causes frostbite faster than cold air does. If your litter is wet and warm, it releases moisture into the air. If you don’t have good ventilation (and avoid common ventilation mistakes), that moisture settles on combs and wattles and freezes, requiring frostbite prevention efforts you wouldn’t otherwise need.
- Respiratory Issues: If ammonia builds up, it burns the chickens’ lungs and eyes. You must monitor this to prevent respiratory infection symptoms or more serious illness.
- No Diatomaceous Earth (DE): You cannot use DE in a deep litter coop. While many use Diatomaceous Earth for mite control, here it kills the beneficial microbes and insects that make the composting work. If you use DE, you kill your heat source.
Note: If you see your birds gasping or wheezing, consult a poultry veterinarian immediately.
With those safety guardrails in mind, here is the exact equipment and layout I used to capture accurate data without putting my birds at risk.
My Deep Litter Method Temperature Study: Setup and Methodology
If you want to try this, you need to know exactly how I set it up so you can compare your results.
- Coop Size: 8×10 foot shed conversion with a plywood floor (see best flooring options for pros and cons).
- Ventilation: Ridge vents open 24/7 (crucial for proper coop ventilation).
- The Flock: 15 hens.
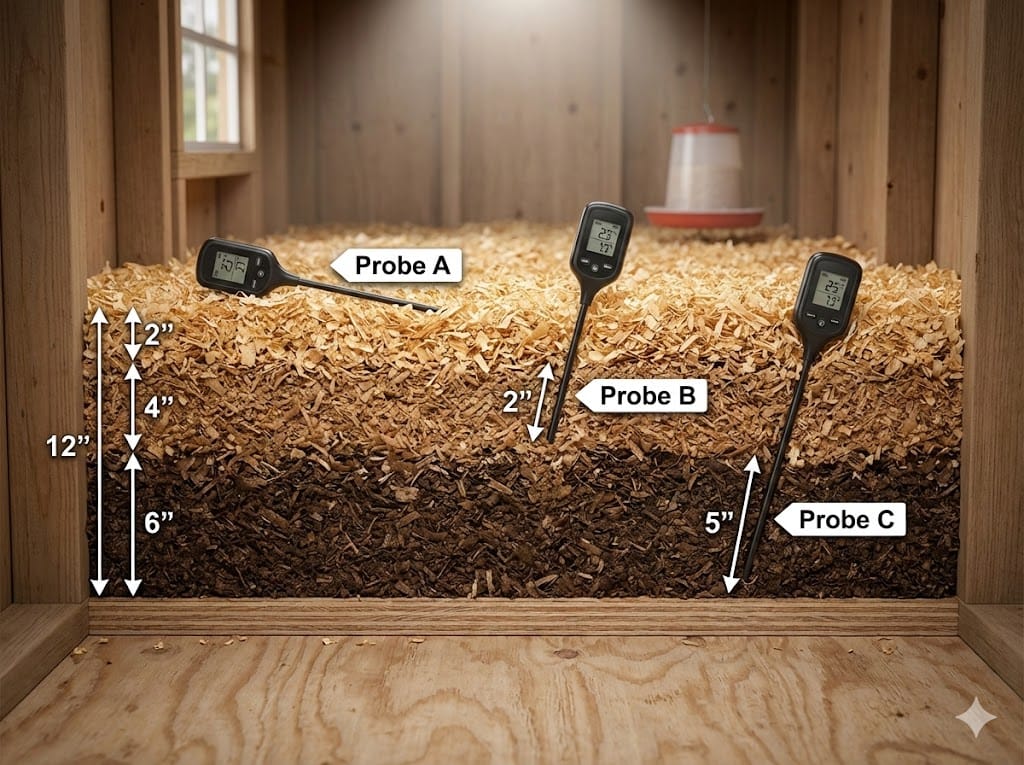
- Bedding: Started with 6 inches of kiln-dried shavings, built up to roughly 12 inches by the time of the study. According to regenerative agriculture expert Joel Salatin of Polyface Farm, deep litter requires minimally 8 inches depth, but preferably more than 12 inches, to support active microbial populations.
- Equipment: I used wireless waterproof soil sensors typically used for gardening, plus a standard ambient thermometer for the “air temp.” This equipment choice mirrors the data-driven approach I used in my winter coop insulation temperature sensor data study.
The Probe Placement:
- Probe A: Resting on the surface of the litter.
- Probe B: Buried 2 inches (5 cm) down (the transition zone).
- Probe C: Buried 4-5 inches (12 cm) down (the “active” zone).
My Big Mistake: In the first two days, I placed Probe C right under the roosting bars. This was a bad idea. The concentration of fresh wet manure threw off the readings and actually cooled the spot down because it was too wet to compost properly. This validated research from China Agricultural University, which confirms that moisture content, even more than carbon supply, is the most critical factor affecting composting temperature in deep litter systems. I moved the probes to the center of the coop floor for the rest of the study.
Location Matters More Than You Think
Research from the University of Agriculture in Krakow found that litter temperature varies dramatically by location within the structure. The sidewall zone (within 1.5 meters of exterior walls) ran up to 10°C cooler than the inner zone near the center. This explains why I moved my probes to the center of the coop floor because measurements near walls would have shown significantly lower temperatures.
The Compaction Factor: One variable I didn’t fully account for is litter compaction. Research notes that loose bedding compresses significantly over time, meaning sensors can shift depth throughout a study. I checked my probe depths weekly and found roughly 1 inch of settling by week 4.
Once the sensors were properly positioned away from the roosts, the numbers stabilized. The morning readings told a clear story about what was happening below the surface.
Daily Temperature Logs: What the Numbers Actually Showed
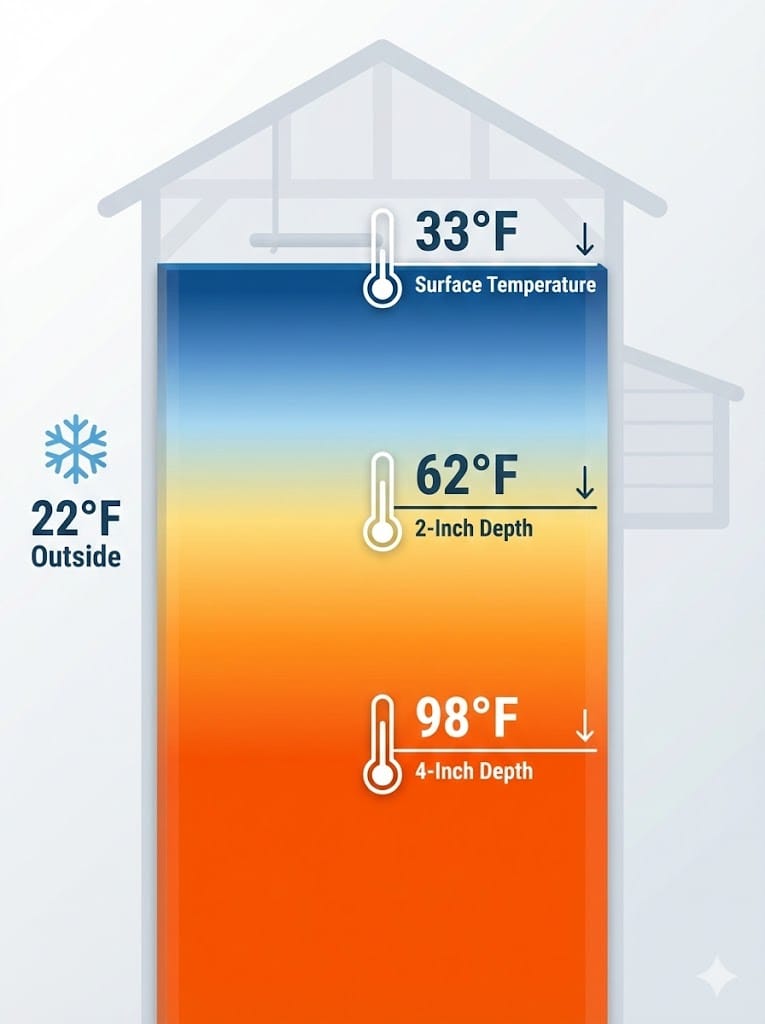
I tracked these numbers every morning at 6:00 AM, usually the coldest part of the day.
Surface Temperature Readings
The surface of the litter didn’t hold much heat. My readings showed the surface was usually only 2-3 degrees warmer than the air temperature inside the coop. This makes sense; the surface is exposed to the cold air.
Mid-Depth Readings (2-3 Inches)
This is where things got interesting. This “transition zone” consistently stayed around 60°F to 64°F (15°C – 17°C). This falls within the mesophilic temperature range, where moderate-temperature microbes thrive. This aligns with what other practitioners observe. It’s warm enough that the chickens love to dig shallow holes to sit in, but not hot enough to cook anything.
Deep Readings (4-5 Inches and Below)
This is where the real action happens. Once I got past the 4-inch mark, the heat spiked. During the coldest week, when outside temps averaged 18°F (-7°C), my deep probe averaged 102°F (38.8°C), peaking at 107°F (41.6°C). My coldest readings occurred at 18°F (-7.7°C), while research conditions documented temperatures dropping even lower to -13°C (8.6°F).
There are documented cases in agricultural field studies of deep litter reaching 109°F (43°C) at similar depths, so my numbers were right on target. This proves that decomposition heat, driven by heat-loving thermophilic bacteria, is real and significant.
Why Deep Readings Stay Stable
My surface probe showed temperature swings of 5-8°F throughout the day, tracking ambient air changes. But the 4-inch probe? Rock steady. Research confirms this pattern: shallow sensors detect daily temperature fluctuations while deeper sensors maintain consistent readings. This thermal stability is what makes deep litter valuable; the warmth is reliable, not just occasional.
The 10-Degree Claim: Did It Hold Up?
You will often hear people say, “Deep litter adds 10 degrees to your coop.” My verdict: True, but with a catch.
My coop air temperature was consistently 8°F to 12°F warmer than the outside air. This finding aligns with research from dairy barn studies, which showed that when animals were present, litter surface temperatures increased by approximately 5-8°C (9-14°F), with differences reaching up to 10°C in resting areas depending on location.
However, that heat isn’t just from the litter. Body heat from 15 chickens plays a huge role. But the litter acted like a massive thermal battery, supplementing that body heat to prevent the coop from freezing solid overnight. My Rhode Island Reds and Easter Eggers (both cold-hardy American breeds) adapted well to the deep litter environment, spending more time on the warm floor than on roosts during the coldest nights.
Why Some Keepers Report No Heat
Not everyone measures significant heat from deep litter. Farmer John Suscovich documented only a 4-6°F difference using thermal imaging in his coop. The key difference? His bedding stayed dry. As he noted, “there’s no real good decomposition and breakdown of this matter to generate that heat because it’s dry and it needs to be moist.” This reinforces why moisture management, not just depth, determines whether your deep litter becomes a biological heater or just a thick mat of shavings.
My 30-Day Snapshot:
| Location | Avg Temp (°F) | Avg Temp (°C) | Note |
|---|---|---|---|
| Outside Air | 22°F | -5.5°C | Cold January |
| Coop Air | 31°F | -0.5°C | Just below freezing |
| Litter Surface | 33°F | 0.5°C | Soft, unfrozen |
| 4-inch Depth | 98°F | 36.6°C | Active composting |
The Stabilization Phase: What Happens After the Peak?
After the initial composting spike, research indicates that deep litter temperatures typically stabilize between 75°F and 86°F (24-30°C) in the later stages of decomposition. My readings showed a similar pattern: the 107°F peak occurred around week 3, then gradually settled to the mid-80s by week 4. This plateau occurs because the heat loss rate to the surrounding cold environment eventually balances with the steady metabolic heat produced by the microbial colony.
While depth matters, the fuel you use matters more. I wanted to see if premium hemp bedding could match the heat output of cheap pine shavings.
Pine Shavings vs. Hemp Bedding: Which Created More Compost Heat?
Midway through the winter, I ran a side-experiment. I partitioned a corner of the coop and used hemp bedding (see my full bedding material comparison for more options) to see if the material mattered for the best material for deep litter method. The kiln-dried pine shavings I purchased from Tractor Supply Company (a common source for US backyard keepers) worked better than the premium hemp bedding from Small Pet Select.
Pine Shavings (Fine/Medium flake):
- Heat: Heated up fast. The carbon breaks down quicker because the pieces are smaller.
- Texture: Fluffy, but can get packed down if not stirred.
Hemp Bedding:
- Heat: Generated slightly less heat initially (about 5 degrees cooler at depth).
- Moisture: Hemp is incredibly absorbent, maintaining a higher dry matter content at the surface. It stayed drier.
The Oxygen Factor: The porous texture of certain bedding materials improves breathability and oxygen concentration, which directly affects fermentation temperature. This may explain why my fine pine shavings—with more surface area for oxygen exchange—outperformed the denser hemp bedding.
The Winner? For heat, pine shavings won in my study. The nitrogen-carbon ratio seemed to balance faster with pine. However, hemp lasted longer before needing a turn. If your main goal is heat, standard kiln-dried shavings or a mix of shavings and dried leaves seem to kickstart the composting process best.
Choosing the right material is step one, but timing is step two. If you wait until the first frost to build your pile, you’ve already failed.
Deep Litter Method in Winter: When Heat Generation Actually Matters
Here is the trick: You cannot start this in December. While deep litter is a key part of preparing your coop for winter, it relies on a bacterial colony that needs time to grow. If you throw 12 inches of shavings into a frozen coop in January, it will just be a pile of cold shavings.
My Experience: I started building my litter in late August. By November, the “culture” was active. The thick layer of organic material insulates the coop floor from the frozen ground. This is a strategy often used in dedicated cold weather coop designs. Poultry keepers in Canada, dealing with -25°C, report that while the air is freezing, the floor remains soft. This protects the chickens’ feet from frostbite and encourages them to be active.
Regarding timeline, research indicates that deep litter requires approximately 7 days to reach functional temperatures (around 59°F/15°C at mid-depth) before providing meaningful heat. In my experience, the litter showed measurable heat generation within 10 days of establishing proper moisture levels and regular stirring.
Climate Zone Warning
My results apply to USDA Zone 5. If you live in Zones 2-4 (northern states, Canada, Alaska), your results may differ significantly. Anecdotal reports from practitioners in extreme cold climates suggest that decomposition may slow significantly or halt entirely when temperatures remain below -22°F (-30°C) for extended periods.
Even with the perfect start date, things can go wrong. Your nose is your first line of defense—here is how to interpret what you’re smelling.
Does the Deep Litter Method Smell? What My Ammonia Readings Showed
This is the number one question: Does the deep litter method smell? (For general tips, see my guide on keeping your coop from smelling). If you do it right: No. It should smell like a forest floor or rich earth. If you do it wrong: Yes, and it smells like ammonia.
The Ammonia Alert: I used ammonia test strips (available at farm stores) during my study.
- Weeks 1-3: 0 ppm (Parts Per Million). No smell.
- Week 4: Readings hit 10 ppm. I could smell a faint “sharpness” in the air.
Research indicates that deep litter pH ranges from 6.90 to 9.09, generally increasing as the composting process advances. It’s important to note that a higher pH correlates with increased ammonia production, which explains why managing moisture and carbon levels is critical to keep that pH in balance.
The Cause: I had let the litter get too wet under the waterer. Wet litter shifts the process from aerobic decomposition (oxygen-rich, odorless) to anaerobic decomposition (oxygen-starved, smelly). That is when ammonia happens.
The Fix: I tossed some fresh dry corn into the litter. The chickens stirred it up trying to find the corn, which introduced oxygen. Within 24 hours, the smell was gone and the reading dropped back to 0 ppm.
Fixing smells is easy (add carbon), but preventing them is better. A simple maintenance routine keeps the ammonia at zero.
How Often Should You Clean Your Coop with the Deep Litter Method?
During my study, I did not remove any manure. That is the point.
My Schedule:
- Daily: I check for wet spots (spilled water) and remove wet clumps if necessary.
- Weekly: I toss a handful of scratch grains or black oil sunflower seeds onto the bedding. The chickens scratch for it, which turns the pile for me.
- Yearly: I do one massive cleanout in early Spring. I leave about 2 inches of the old stuff on the floor to “seed” the new batch with good bacteria.
A Note on Aeration Frequency: Agricultural research protocols turn deep litter every two days at about 12 inches depth to maintain oxygen levels. commercial operations often use mechanical windrowing to aerate long piles, but for backyard flocks, my less-intensive approach (weekly via chicken scratching) works well.
So, to answer how often should you clean your coop with deep litter method: Fully clean it once a year. Maintain it weekly.
This low-maintenance routine is a dream for chicken keepers, but don’t assume it translates perfectly to every bird in the barnyard.
What Animals Benefit from Deep Litter? (Beyond Chickens)
While my study focused on chickens, this method applies elsewhere.
- Guinea Fowl: They do well on deep litter, though they scratch less than chickens, so you have to turn the bedding yourself.
- Ducks/Waterfowl: Warning. Ducks are messy and wet. It is very hard to keep deep litter dry enough with ducks. It usually turns into a sludge (anaerobic) mess. I do not recommend it for waterfowl unless you have a massive space.
Regardless of the bird, every deep litter system has a lifespan before it needs to be harvested.
How Long Does a Deep Litter System Last?
One cycle typically lasts about 6 months to a year. In my coop, the material breaks down into a beautiful, dark garden compost by spring. This produces nutrient-rich compost suitable for gardens (rich in nitrogen and beneficial microbes).
Timeline:
- Fall: Build up phase.
- Winter: Heating phase.
- Spring: Harvest phase (clean out for the garden).
- Summer: Light bedding (keep it thin to keep birds cool).
Summer Warning: Research from dairy barn studies documented indoor air temperatures exceeding safe levels by up to 12°C (22°F) during summer months with deep litter systems. This is why I reduce my litter to 2-3 inches maximum from May through September because the heat generation that saves your flock in January can stress them in July.
You don’t have to take my word for it. If you have $30 for a probe thermometer, you can replicate this study in your own backyard this weekend.
Step-by-Step: How to Replicate This Temperature Study in Your Coop
Want to see if your coop is generating heat? Here is how to do your own investigation.
- Get the Gear: You need a thermometer with a probe on a wire, or a wireless soil thermometer (like an Inkbird or Reotemp compost probe). Do not use glass thermometers (they break). For advanced monitoring, a digital pH meter helps track acidity levels.
- Place the Probes:
- Place one sensor 4 inches deep in the center of the coop (away from waterers).
- Place one sensor at hen-head height for air temp.
- Wait 24 Hours: Let the disturbed litter settle before taking the first reading.
- Record at Dawn: Check the temps right before the sun comes up. This is when the difference between the “compost heat” and the outside air will be most obvious.
- Control Variables: Do not add fresh bedding right before measuring, as cold shavings will skew the data for a few hours.
Bottom Line
Is the deep litter method worth it? Based on my data, yes. Seeing a steady 100°F+ reading under the bedding while the world was freezing outside changed how I view my coop. It is a free, biological heater that improves flock health, if you manage the moisture.
My advice? Start today by stopping the weekly clean-out. Add fresh shavings, toss in some corn, and let the microbes do the work for you.
Disclaimer
This article is for informational purposes only and does not constitute veterinary, engineering, or professional agricultural advice. The temperature data presented comes from a specific field study in USDA Zone 5; individual results will vary based on climate, flock size, coop construction, and management practices. Improperly managed deep litter can result in dangerous ammonia levels or respiratory issues. Always consult a qualified poultry veterinarian regarding flock health concerns and ensure your coop ventilation meets safety standards.

Oladepo Babatunde is the founder of ChickenStarter.com. He is a backyard chicken keeper and educator who specializes in helping beginners raise healthy flocks, particularly in warm climates. His expertise comes from years of hands-on experience building coops, treating common chicken ailments, and solving flock management issues. His own happy hens are a testament to his methods, laying 25-30 eggs weekly.