If you’re a backyard chicken keeper in the UK, you know the feeling. The Met Office’s 2025 winter forecast hints at another season of rain, and your first thought is, “the poor hens.” Winter in the UK often means less snow and more endless, seeping damp. It’s the rain in Manchester, the coastal drizzle in Cornwall, and the soggy ground in Scotland that turns our chicken runs into muddy messes.
A few years ago, after a relentless downpour in my own London garden, I found water seeping into the corner of the coop. The hens were huddled on the roost, looking miserable. It was a panic! That’s when I learned that a damp coop is far more dangerous than a cold one.
If you’re wondering how to keep a chicken coop dry through a damp British winter, you are in the right place. A wet hen house leads to frostbite, respiratory problems, and ammonia buildup. This guide is here to help. We’ll cover everything from drainage and bedding to the new rules from DEFRA. This is all about keeping your flock healthy and saving you money on vet bills.
First Things First – What Are the New Rules for Keeping Chickens in the UK?
Before we get to the muddy bits, let’s cover a major update. You might be asking, “What are the new rules for keeping chickens in the UK?”
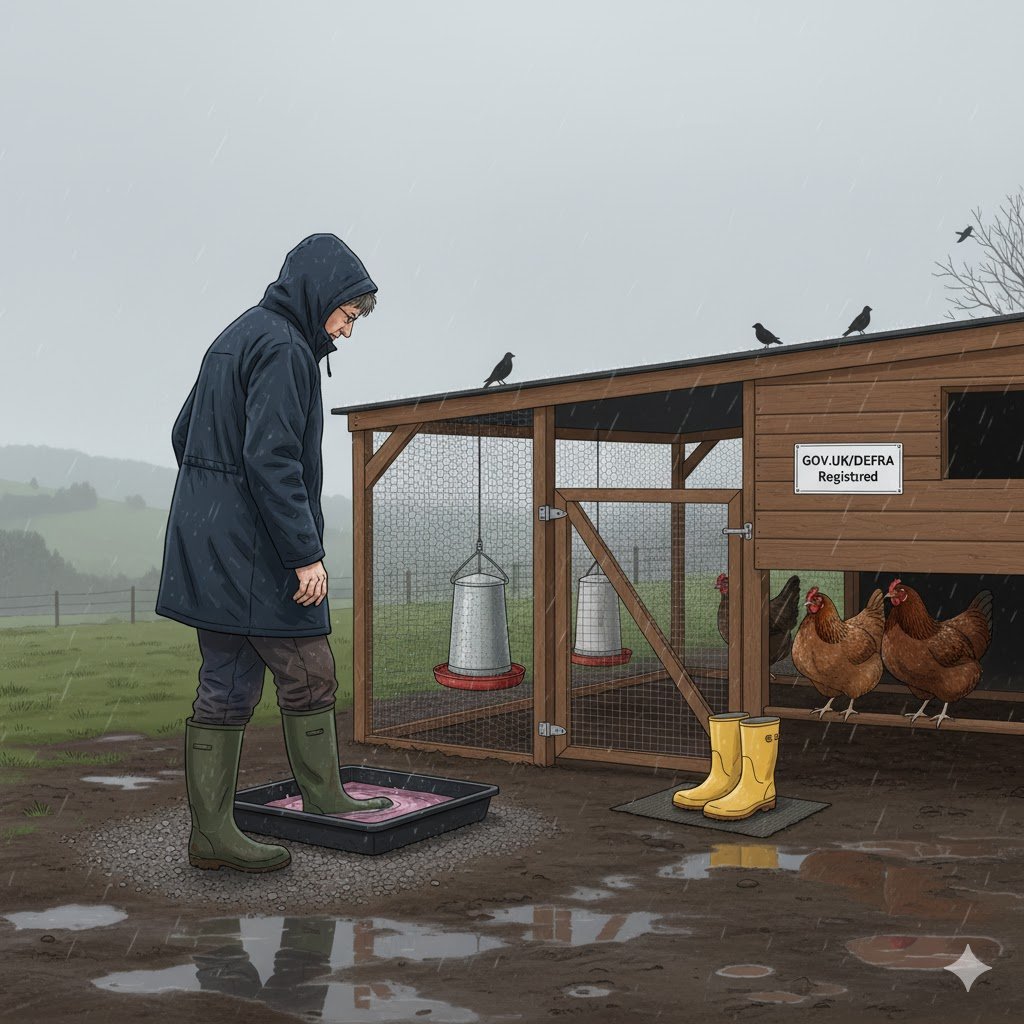
The biggest change happened on October 1, 2024. Now, all poultry keepers in Great Britain must register their birds with DEFRA (the Department for Environment, Food & Rural Affairs).
- Does this apply to me? Yes. It doesn’t matter if you have 50 hens or just one pet bantam in your garden. Everyone needs to register.
- Why? It’s all about biosecurity. When there’s an outbreak, this registration is a key part of avian flu prevention 2025 measures. DEFRA and the APHA (Animal and Plant Health Agency) need to know where the birds are so they can alert owners quickly. It’s to protect your flock and everyone else’s.
- How do I register? It’s free and you can do it online on the GOV.UK website.
- What about Avian Flu housing orders? As of right now (fact-checked October 2025), the mandatory housing order from last winter was lifted. However, we all know this can change fast. Registering means you’ll get the official alerts.
Following these biosecurity rules and maintaining good poultry welfare standards is your first step in winter care. Keeping your details up-to-date helps keep all our poultry safe.
Why Biosecurity is Even More Important in Winter
Biosecurity just means “keeping germs away.” In winter, this is extra hard.
- Damp Ground: Mud and soggy ground are a perfect breeding place for nasty bacteria and parasites.
- Wild Birds: Hungry wild birds are more likely to visit your chicken run, potentially carrying diseases.
- Less Sunshine: Sunlight is a brilliant natural disinfectant. In winter, we have less of it, so germs can survive longer.
What Does Good Winter Biosecurity Look Like?
It’s easy! These simple steps, recommended by bodies like the BHWT (British Hen Welfare Trust) and official government guidance on housing birds safely, make a huge difference:
- Foot Dip: Place a shallow tray with a government-approved disinfectant (like Virkon S) at the entrance to your run. Dip your boots every time you go in and out. This stops you from treading in diseases.
- Clean Feeders & Drinkers: Keep feeders and drinkers under cover. This stops wild birds from landing on them and contaminating them.
- Separate Your Gear: Use different wellies or footwear for “inside” the run and “outside.”
What About Neighbours and Council Rules?
The DEFRA registration is national, but don’t forget your local responsibilities.
- Check Your Deeds: Before you even get chickens, check the “covenants” on your property deeds. Some new-build estates or ex-council houses have rules banning poultry.
- Council By-Laws: Most councils are fine with a few hens, but they are not fine with cockerels in built-up areas due to the noise.
- Keep Neighbours Happy: Winter damp can mean more smell. Managing your run (with woodchips) and using droppings boards (see below!) will prevent smells and rats, keeping your neighbours onside.
Now that you’re compliant with the rules and keeping the neighbours happy, let’s get to the physical work of protecting the coop itself.
How to Winter Proof Your Chicken Coop?
Right, with the paperwork sorted, let’s get our hands dirty. “How to winter proof your chicken coop?” is about stopping the wet from getting in and the warmth from getting out. Think of it like sorting out your own house before winter.
- Roof Check: Get up on a ladder (safely!) on a dry day. Look for any cracked felt, loose tiles, or nail holes. On felt roofs, check the seams and edges. A tiny drip can soak a whole coop over a rainy weekend. A tube of black, bitumen-based roofing sealant from a DIY shop is perfect for quick repairs.
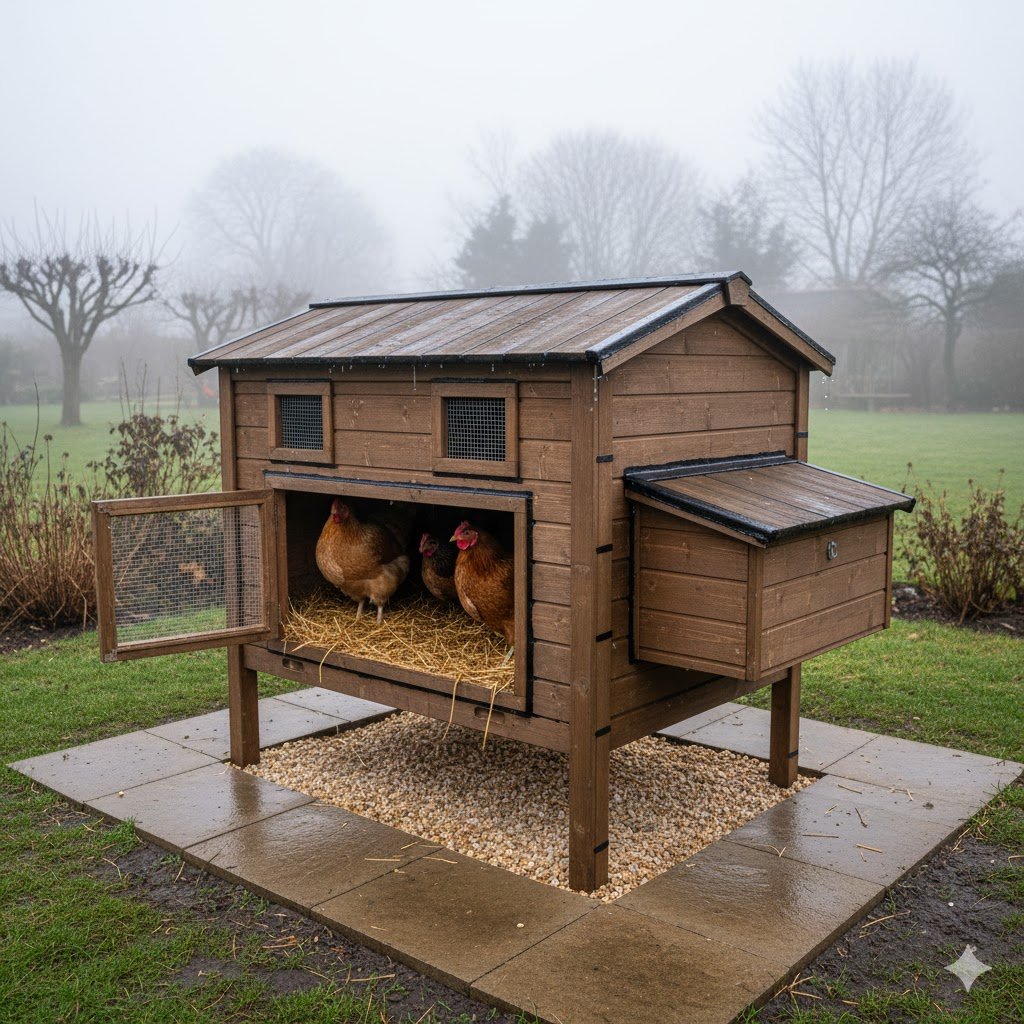
- Raise It Up: If your coop is sitting flat on the ground, it’s a magnet for damp. Rain will splash up from the ground and soak into the wood. If you can, raise your coop onto concrete blocks or patio slabs. Even just 6-8 inches off the ground makes a huge difference. This stops the floor from rotting and keeps it much drier. As a bonus, it also stops rats from nesting underneath.
- Find the Drafts (and the Vents!): This is the most important part. You need to know the difference between a draft and ventilation.
- A draft is an unwanted blast of cold air, usually at hen-level. This is bad. It chills the birds when they are roosting.
- Ventilation is the planned flow of air, usually high up near the roof. This is essential for a dry coop.
Feel around the coop for drafts, especially near the roosting perches. A good trick is to use a candle or an incense stick on a breezy day (with the hens out, of course!). Watch where the smoke wavers. Plug any holes at this level with wood, sealant, or even insulation boards.
How to Keep My Chicken Coop Warm
Now, let’s talk about “How to keep my chicken coop warm.”
A common mistake is to try and make the coop airtight. Please don’t! You’ll trap moisture, and a damp, 5°C coop is more dangerous than a dry, -2°C coop. Chickens are amazing. They have their own down jackets. A healthy adult hen can be perfectly happy in freezing temperatures as long as she is dry and out of a draft.
Here’s how you really keep them warm:
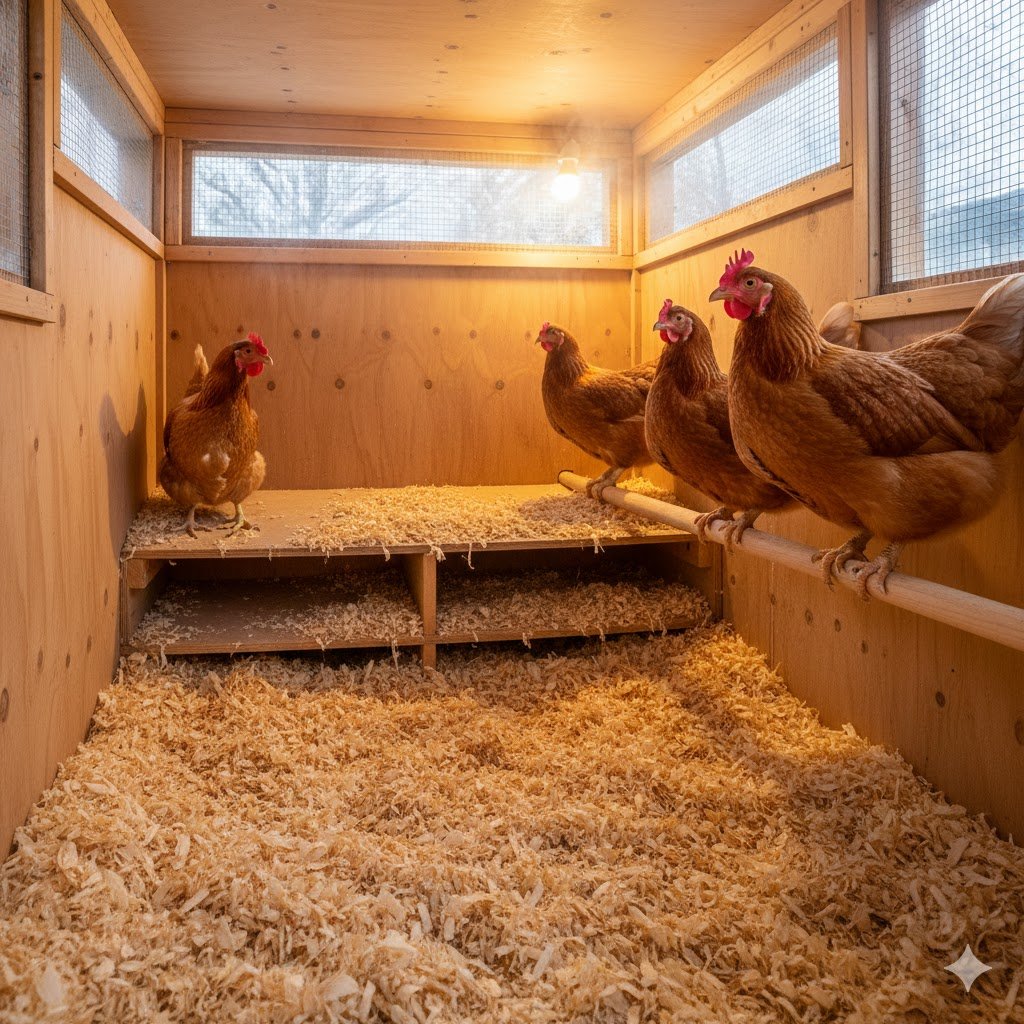
- The Deep Litter Method: This is the best, cheapest, and easiest way to create a warm and dry hen house.
- How it works: Start in autumn with a clean coop. Add a deep layer (about 4-6 inches) of dry bedding (like pine shavings).
- Instead of cleaning the coop out completely every week, you just rake over the poos and add a fresh, thin layer of dry bedding on top.
- The droppings and old bedding underneath start to compost, very slowly. This natural composting process generates a gentle, safe heat from below. It’s like a natural heated floor for your hens!
- Just turn the whole lot over with a fork every few weeks to mix it up and add more fresh bedding on top. You only need to do a full clear-out in the spring.
- Block Drafts, Not Vents: As we said above, make sure their roosting perches are not in a cold wind.
- Extra Corn: Give your hens a small handful of mixed corn (a “scratch feed”) about an-hour before they go to bed. Digesting this overnight acts like an internal hot water bottle, keeping them warm as they sleep.
- A Note on Heat Lamps: Please, please avoid heat lamps. Every year, keepers lose their coops and their flocks to fires started by heat lamps. They are a massive fire risk, especially with dry bedding and wooden coops. The deep litter method is much safer and more effective for damp poultry housing in the UK.
Can I Insulate My Chicken Coop?
This is a very common question. Yes, you can, but you MUST do it safely.
- What to Use: Rigid foam insulation boards (like Celotex or Kingspan) or even wool insulation are effective.
- THE GOLDEN RULE: You MUST cover the insulation completely. Hens will peck at insulation foam or fibres. This is toxic and can kill them.
- How to Cover: Fix the insulation boards between the wall studs of the coop, then cover them with a sheet of thin plywood. This creates a safe, insulated “sandwich” wall that hens can’t destroy.
- Don’t Block Vents! Never, ever cover your ventilation holes with insulation.
Honestly, for most UK winters, fully insulated chicken shelters are overkill. A dry, draft-free coop with the deep litter method is more than enough.
Plastic vs. Wooden Coops in a Damp Winter
This is a key consideration. Neither is perfect, and they have different damp problems.
- Wooden Coops:
- Pros: Better natural insulation. Less condensation.
- Cons: Can absorb damp from the ground if not raised. Can rot if not treated. Can harbour red mites (though mites are less of a problem in winter, you can learn more about getting rid of red mites in a wooden coop).
- Plastic Coops (e.g., Omlet Eglu, Nestera):
- Pros: Won’t rot, super easy to clean, no hiding places for mites.
- Cons: Condensation. Plastic is not breathable. If your ventilation isn’t excellent, you will get condensation running down the walls, making the bedding wet. Most modern plastic coops (like an Omlet Eglu Cube) have good, built-in, draft-free vents, but you must keep them clear.
The Verdict: Both are fine, but you must manage their weaknesses. A wooden coop must be kept dry from the outside-in. A plastic coop must be kept dry from the inside-out.
Your coop’s structure is now secure, draft-free, and ready. The next battle is the one that happens inside: managing the moisture your hens produce every night.
The Damp Problem – Keeping the Inside Dry
This is the main battle of the British winter. You’re asking “How to keep a chicken coop dry during winter?” and “How to keep moisture down in a chicken coop?”
The enemy isn’t just rain getting in. The enemy is moisture being created inside the coop.
Where does it come from?
- Their Breath: Just like your windows steam up, so does the coop from the hens breathing all night.
- Their Droppings: Chicken droppings are about 85% water.
- Spilled Water: A knocked-over drinker inside the coop can be a disaster. Rule 1: Keep drinkers in the run, not in the coop.
If this damp, warm air has no way to escape, it settles on the walls and bedding. This is how to keep humidity out of a chicken coop: VENTILATION.
What’s the Best Setup for Coop Ventilation?
We covered this, but it’s so important we’ll give it its own section. (We also have a whole guide on how much ventilation a chicken coop needs).
- You MUST have vents.
- High and Low (Ideally): The best setup is to have vents high up, near the roof, above the hens’ heads. Hot, damp air rises and escapes. Ideally, you’d also have smaller, baffled vents lower down (but not at perch level) to draw in fresh, dry air.
- Cross-Ventilation: Vents on opposite walls are brilliant for creating a gentle airflow that swaps the air without being a draft.
- What if I have no vents? If you have a sealed plastic coop or a homemade shed, you must add them. Get a 2-inch hole-saw drill bit and drill several holes high up near the roofline.
- Cover Them! Every vent, no matter how small, MUST be covered in 1/2-inch hardware cloth (weld mesh) to keep rats and stoats out.
What Soaks Up Water in a Chicken Coop?
This is your second line of defence. The right bedding is key. You ask, “What is the best thing to put in the bottom of a chicken coop?” (Hint: it’s also related to what’s the best flooring for a chicken coop).
Here’s a breakdown of your absorbent bedding for coops options. Pine shavings and hemp are your best allies. Straw is a poor choice for a damp winter as it holds moisture and can grow mold.
Winter Bedding Options: At a Glance
| Bedding Type | Absorbency | Insulation | Cost (UK) | Notes |
|---|---|---|---|---|
| Pine Shavings | High | Good | ££ (Approx. £10-£15 / bale) | Best all-rounder. Great for deep litter method. |
| Hemp Bedding | Very High | Good | £££ (Approx. £15-£20 / bale) | Super absorbent, less dust. Composts fast. |
| Straw | Very Low | Poor (when wet) | £ | Not recommended for winter. Gets soggy, mats, and grows mold. |
| Sand | Drains (not absorbs) | Very Low | ££ | Not recommended. Holds the cold and can freeze solid if it gets wet. |
The answer to “What soaks up water in a chicken coop?” is simple: deep, dry, absorbent bedding like pine shavings or hemp.
Should I Use Droppings Boards?
YES! This is one of my top tips for keeping a coop dry in winter.
- What is it? It’s a simple board (wood or a sheet of plastic) that you slide in under the main roosting perches.
- How it works: Hens produce about 80% of their droppings at night while they roost. These droppings fall onto the board, not into your nice deep bedding.
- The 60-Second Fix: Every morning, you just take a scraper (an old wallpaper scraper is perfect) and scrape the night’s droppings off the board and into a bucket.
- The Benefit: You remove the vast majority of the moisture and ammonia from the coop in one go, every single day. This keeps your deep litter bedding drier for much, much longer and is a key part of how to keep a chicken coop from smelling.
Keeping the coop dry is your best defence. But what if you get a leak, or a storm finds a way in? Here’s the emergency plan to dry out a wet coop fast.
Emergency! How to Dry Out a Wet Chicken Coop
Okay, so the worst has happened. You’ve had a leak or a storm, and the coop is wet. What now?
First, don’t panic. You need to act fast.
- Get the Hens Out: Move them to a safe, temporary spot. A shed, a garage (with ventilation!), or even a large dog crate in a sheltered spot will do for a few hours.
- Remove EVERYTHING: Shovel out all the wet bedding. All of it. Get it straight into the compost bin or a wheelbarrow.
- Dry the Structure: Use old towels or rags to wipe down the floor, walls, and roosts. If you can safely get power to the coop, a fan can help dry the wood out.
- Sanitise & Dry: This is an important step.
- Agricultural Lime: A light sprinkle of agricultural lime (read our guide on how to use barn lime in a chicken coop safely) on the damp floor can help absorb the last of the damp and neutralise smells.
- Safer Alternatives: Products like ‘Diatomaceous Earth’ (DE) or ‘First Saturday Lime’ are even safer. They are food-grade and brilliant at absorbing moisture. Dust a thin layer over the floor.
- Warning: If you use hydrated lime, it is caustic. You must let it sit and then cover it completely with bedding before the hens return. I prefer the safer options.
- Re-bed: Put in a deep layer (at least 4-6 inches) of fresh, bone-dry bedding. Make it fluffy and inviting.
- Find and Fix the Leak: Don’t put the hens back until you’ve found out how the water got in and fixed it.
What Happens If a Chicken Coop Has Too Much Moisture?
This isn’t just about comfort. A damp coop is a serious health hazard, and as the RSPCA notes in their guide to chicken environments, a dry, well-ventilated coop is essential to prevent these issues.
- Respiratory Infections: Hens breathing in damp, ammonia-filled air (from wet droppings) will get sick. This is a common and serious respiratory health in wet coops issue.
- Listen for: Sneezing, coughing, or a “gurgle” when they breathe.
- Frostbite: This is the big one. Damp + Cold = Frostbite. A hen’s feathers keep her warm by trapping dry air. If her feathers get wet, she can’t stay warm. The tips of her comb and wattles can freeze, turn black, and even fall off. This is very painful.
- Ammonia Buildup: These are the classic ammonia buildup risks. That sharp, eye-watering smell from wet droppings is ammonia. It burns your hens’ eyes, throats, and lungs.
- The Test: If you put your head in the coop (at hen level) and your eyes sting, the ammonia level is already dangerously high.
- Mold and Fungus: Wet bedding grows mold, which can cause lung infections (Aspergillosis) in your birds.
- Bumblefoot: Standing on soggy, dirty bedding can cause cuts on their footpads, which then get infected (a condition known as bumblefoot).
- Look for: Limping, swelling, or a distinct black scab on the bottom of the foot.
A dry coop is a healthy coop.
How to Prevent This Happening Again
- Be a Leak Detective: Check that roof and those walls again.
- Improve Ground Drainage: Is water pooling around the coop? Dig a small “French drain” (a trench filled with gravel) around the base of the coop to channel rainwater away.
- Install Guttering: This is a brilliant, cheap fix. Install mini-guttering on your coop roof. Direct all that water into a water butt (for your garden!) instead of letting it pour onto the ground right next to the coop.
With the coop itself sorted, our focus moves to the ground outside. There’s no point having a dry coop if it’s surrounded by a sea of mud.
The Battle of the Mud
Now for the outside. Wondering what to put down in a muddy chicken run or “how to prevent chicken coop from getting muddy in the UK?” It’s the million-pound question for British keepers! That muddy, boggy run is horrible for your hens and a nightmare to walk through (though we have many ways to fix a muddy chicken run).
Chickens hate wet feet. It can lead to problems like bumblefoot (infections in their foot pads).
Here are the best muddy run solutions Britain has to offer.
What Is the Best Ground Cover for a Muddy Chicken Run?
You need to create a surface that drains. Forget grass, it’ll be gone in a week.
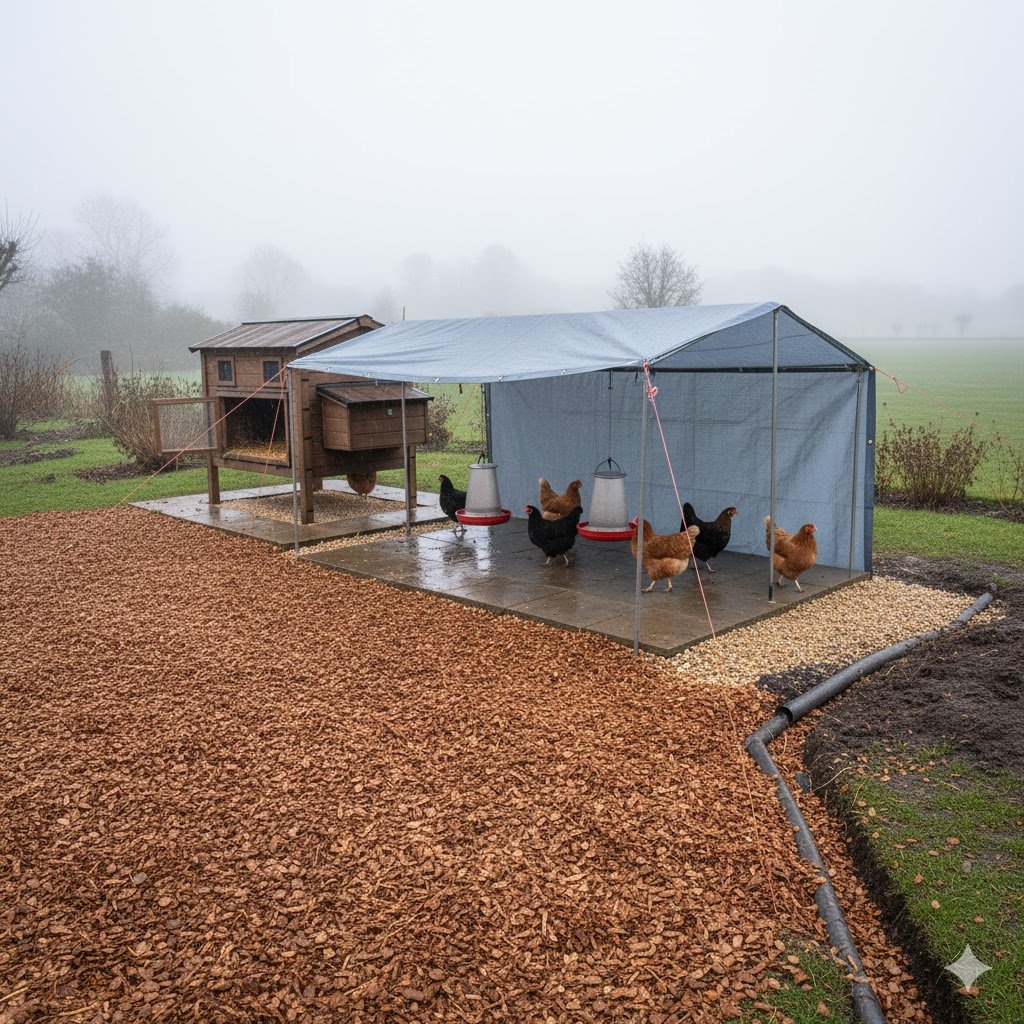
- Hardwood Wood Chips: This is the number one solution. Not bark mulch (that just turns to mush and can grow mold), but proper, chunky hardwood wood chips.
- Why? They “knit” together to form a stable surface and don’t break down into compost as fast as bark. The water drains right through.
- A “walk-on” or “playground” grade is perfect. You’ll need a deep layer (4-6 inches) and may need to top it up once a year.
- Sand: A deep layer (6 inches) of coarse sand (like construction sand or river sand, NOT fine play sand) can also work. It drains well, and the poop is easy to rake off.
- Gravel: Some people put down a layer of pea gravel as a permanent drainage base. You can then put wood chips or sand on top of it.
- Rubber Chippings: The type used in playgrounds. This is a more expensive, permanent option, but it drains perfectly and is easy to hose clean.
What to Put Down in a Muddy Chicken Run (Right Now!)
If you have a mud-pit right now and need some affordable muddy run fixes for UK gardens, here are some quick solutions:
- Straw (Very Temporary): A thick bale of straw thrown over the worst of the mud can give them a temporary surface. Be warned: it will rot down into a horrible, smelly sludge within weeks, and you’ll have to remove it all.
- Cover It Up: This is the most effective fix. Get a clear tarpaulin and stretch it over part or all of the run. This is the simplest way to stop the rain from turning the ground to soup. Just make sure it’s secure so it doesn’t flap or blow away.
- Pallets: Old wooden pallets laid on the ground can create raised walkways for your hens (and you!).
- Patio Slabs: Lay down a few old patio slabs. At the very least, put the feeder and drinker on them to create a clean, dry “dining area.”
Improving UK Chicken Run Drainage (The Long-Term Fix)
- Guttering on the Coop: As mentioned in Section 4, guttering on the coop roof is a game-changer.
- Slope the Run: If you’re building a new run, “grade” the ground first so it has a very gentle slope. This stops water from ever pooling.
- Dig a Sump: In the lowest, soggiest corner of the run, dig a hole about 2 feet deep. Fill it with coarse gravel. This acts as a “sump” or “soakaway” for excess water to drain into.
Got your own affordable muddy run fixes for UK gardens that work? Share your muddy run hacks in the comments below!
A dry run and coop are the foundation of winter health. But even with the best setup, you need to be vigilant for common winter illnesses.
Your Winter Health Checklist: Spotting Problems Early
This is a new, critical section. In winter, you need to check your flock’s health daily (and follow our regular chicken health check guide). A small problem in summer can become a big problem very quickly in the damp and cold. You should always have a chicken first-aid kit handy.
How to Spot and Treat Frostbite
We’ve mentioned it, but let’s get specific (or get the full guide to prevent and treat frostbite on chicken combs). Frostbite happens when damp and cold combine. Large-combed breeds like Leghorns are most at risk.
- What it Looks Like:
- Stage 1: The tips of the comb or wattles go pale, white, or greyish.
- Stage 2: The tissue swells and may look waxy.
- Stage 3: The tissue turns black, dies, and will eventually fall off. This is very painful.
- First Aid (What to do):
- DO NOT rub the area. This breaks the delicate ice crystals in the tissue and causes more damage.
- DO NOT use direct heat (like a hairdryer).
- DO move the hen to a cool (not warm) place, like a shed, to thaw out slowly.
- Gently apply a non-scented moisturiser or aloe vera gel to the area.
- Isolate her from other hens who might peck at the damaged comb.
- Prevention: The best “treatment” is prevention. A dry, well-ventilated coop is the number one way to prevent frostbite in hens.
Spotting Respiratory Infections
This is the number one killer of chickens in damp coops. It’s often caused by high ammonia levels. (Learn more about how to treat a chicken respiratory infection).
- What it Looks Like:
- The Sound: This is the key. Listen for a “rattle” or “gurgle” when they breathe.
- The Signs: Sneezing, coughing, watery discharge from the nostrils, and sometimes bubbles in the corner of the eye.
- Behaviour: The hen will be fluffed up, lethargic, and won’t want to eat.
- First Aid (What to do):
- ISOLATE the sick hen immediately to stop it from spreading.
- CLEAN the coop. Do an emergency “Section 4” cleanout. The ammonia is likely the cause.
- CHECK VENTS. Your ventilation is not working. Improve it.
- Keep the sick hen somewhere warm and dry, and tempt her to eat and drink.
- Call a vet. Respiratory infections (like Mycoplasma) often need antibiotics, and only a vet can provide them.
A healthy hen is a hungry hen. What you feed them in winter is just as important as how you house them.
Winter Feeding and Egg Laying
(See our comprehensive guide to feeding chickens)
Many keepers are surprised when their feed bill goes up and their egg count goes down. This is normal, and here’s why.
How to Adjust Your Chickens’ Feed in Winter
- Don’t Change the Basics: Your hens still need access to their high-quality layers pellets (16-17% protein) all day. This is their main, balanced meal. (We have reviews of the best UK poultry feed brands).
- The Corn Treat: As we mentioned in Section 2, a small handful of mixed corn or cracked maize per hen about 30-60 minutes before bedtime is fantastic. It’s high in carbohydrates, and digesting it overnight creates metabolic heat, acting like a little internal hot water bottle.
- Don’t Overdo “Treats”: It’s tempting to give them lots of what you think are treats to “cheer them up.” Be careful. Too many treats (like bread or pasta) will fill them up, and they’ll eat their balanced pellets, leading to health problems.
- Suet Blocks: A “peck block” or a bird suet block can be a good source of extra calories and fat, but make it a treat, not a main meal.
Why Have My Hens Stopped Laying in Winter?
It’s almost certainly NOT the cold. It’s the LIGHT.
- A hen’s egg-laying cycle is triggered by daylight. She needs about 14-16 hours of light per day to stimulate her hormones to produce an egg.
- In the UK, a winter day can be less than 8 hours long.
- When the days shorten, her body naturally says, “Time to take a break, moult (lose feathers), and rest for winter.” This is perfectly normal and healthy.
- What to do? Nothing. Let her rest. Forcing them to lay with artificial light is possible (commercial farms do it), but for a backyard flock, it’s much kinder to let them have a natural holiday. They will start laying again in the spring.
With their health and nutrition sorted, there’s one last problem: boredom. A bored, cooped-up chicken is often a naughty one!
Boredom Busters for Cooped-Up Hens
When your flock can’t forage in a muddy run, they get bored. Boredom leads to bad habits like feather-pecking and egg-eating. Here’s how to keep them busy.
Safe and Fun Treats (The “Cabbage Tetherball”)
- Hang a Cabbage: Get a whole cabbage, drill a hole through the middle, and hang it on a string from the roof of the run so it dangles just at head height. They will spend hours jumping at it.
- Corn on the Cob: Do the same with a whole corn on the cob. (A DIY chicken treat dispenser can also work well).
- Peck Blocks: Buy or make a “peck block” with seeds, corn, and suet. This gives them a foraging target.
Enriching Their Run (The “Jungle Gym”)
- Add Perches: Chickens love to be up high. Add extra perches, logs, and “ladders” at different heights inside their covered run. An old wooden stepladder can be a great “jungle gym.”
- A Pile of Leaves: On a dry-ish day, rake up a big pile of dry autumn leaves (from a “safe” part of the garden, not covered in chemicals) and throw it in the run. This encourages natural foraging.
- A “Duff” Bale: A bale of straw or hay that’s got a little bit damp (but not moldy) is perfect. Put the whole bale in the run and let them tear it apart.
Keeping them happy and busy is a key part of warmth. But what about when the temperature really plummets? Let’s look at the specifics of warmth and different hen types.
Warmth, Air, and Bantams
Let’s circle back to warmth, because it’s tied so closely to a dry coop.
Do Chicken Coops Need Ventilation in Winter?
YES. 100%. I know it feels wrong to have a “hole” in the coop in winter, but this is the most important lesson. Without ventilation, you cannot have a dry coop. A sealed coop traps moisture. A damp coop is deadly. A ventilated, dry coop is healthy. Just make sure the vents are high up, and the roosts are draft-free.
How to Keep Chickens Warm During Winter
To recap, you’re not heating the coop. You’re helping the hens stay warm themselves.
- DRY bedding (Deep Litter Method).
- DRAFT-FREE roosts.
- VENTILATED air (to remove moisture).
- Extra food (a p.m. corn snack).
- Company (hens huddle on the roost to share body heat).
Do Chickens Need to Be Kept Warm in Winter?
Healthy, adult, full-sized hens? No. They are incredibly tough. As long as they are dry and out of the wind, they are fine. They’ll fluff up their feathers and be perfectly cosy.
How to Keep Bantams Warm in Winter
This is a good question, as winter care for bantams (bantam winter care tips) is slightly different. Because they are smaller, bantams have less body mass to stay warm. (This is also true for Silkie bantams vs. standard Silkies).
They are still hardy, but they will appreciate a little extra help. For specific advice on your breed, it’s always worth checking resources from The Poultry Club of Great Britain. As a key part of your bantam winter care tips, remember that bantams in damp poultry housing need extra checks for wet feet and to ensure their lower feathers aren’t getting soggy from damp bedding, as they are closer to the ground.
- A Smaller Coop: If you only have bantams, a massive, airy coop can be too cold. A smaller, cosier (but still ventilated!) coop is better.
- Extra Deep Bedding: Give them a really deep, fluffy layer of shavings to snuggle into.
- Check on Them: They are more at risk from frostbite, so check their combs and feet on very cold mornings. Dryness is key.
What About New Chicks or Ex-Battery Hens in Winter?
- Chicks: Any chicks under 8-10 weeks old are not ready for a cold winter. They must be kept under a brooder plate or heat lamp in a protected area until they are fully feathered. (See our guide on bringing chicks home).
- Ex-Battery Hens: This is a special case. As the British Hen Welfare Trust (BHWT) will tell you, hens from cages have not developed proper feathers and are often underweight. They will need extra help.
- Make sure they are in a very well-insulated, smaller coop.
- Provide lots of deep, clean bedding.
- Ensure they have other hens to snuggle with.
- In this one case, a safe, flat-panel radiant heater (designed for coops) might be necessary for their first winter as they acclimatise.
Your hens are warm, dry, and entertained. But they can’t survive without water. Let’s tackle that daily challenge: the frozen drinker.
The Freezing Water Problem
Ah, the daily winter chore: the frozen water drinker. Finding safe anti-freeze methods for poultry water is a top priority.
Is There Anything I Can Put in My Chicken’s Water to Keep It from Freezing?
Yes, but you also need to know what not to add.
What NOT to Add (DANGEROUS):
- “Does adding rubbing alcohol to water keep it from freezing?” NO! NEVER DO THIS. Rubbing alcohol (isopropyl alcohol) is highly toxic to chickens. The RSPCA specifically warns against adding any chemicals or non-prescribed substances to your hens’ water.
- Salt: Don’t add salt. It will dehydrate them and can be harmful in large doses.
- Sugar/Honey/Glycerine: These won’t stop it freezing, will just encourage bacteria, and aren’t good for the hens.
What TO Add (Safe & Helpful):
- Apple Cider Vinegar: A tiny splash (with the ‘mother’) is a good health tonic (learn how to use apple cider vinegar for chickens correctly), but it only lowers the freezing point by a tiny, tiny amount. It’s not really an anti-freeze.
- “Will ping pong balls keep water from freezing?” Yes, this is a great tip! A couple of ping pong balls floating in the water will get pushed around by the wind or the hens. This constant (or regular) agitation breaks up the surface ice as it tries to form, keeping the water liquid for longer.
Other Tips (The “How-To”):
- The Double-Drinker Swap: The easiest way is to have two water drinkers. Keep one inside your house overnight. In the morning, take the fresh one out and bring the frozen one in to thaw.
- Black Rubber Tubs: Black rubber absorbs heat from the sun (even weak winter sun). These are flexible, so you can often “pop” the ice out easily.
- Heated Waterers: You can buy special heated bases or all-in-one heated drinkers. They use a very low wattage and are a life-saver if you work all day.
- Safety: Only use heaters designed for poultry. Always plug them into an outdoor-safe socket protected by an RCD (Residual Current Device). Run the cable safely so hens can’t peck it.
Clever Tricks & Non-Electric Water Heaters for Birds
These are effectively non-electric water heaters for birds that work by trapping heat or slowing down freezing:
- Insulate the Drinker: Wrap the outside of the water drinker in a thick layer of bubble wrap or an old woolly jumper. Secure it with duct tape. Leave the drinking nipples or trough clear.
- The “Tyre Trick”: Find an old car tyre. Place the water drinker in the central “well” of the tyre. Fill the well with straw or shavings. This insulates the drinker from the cold ground and wind.
- Move It: On sunny days, put the drinker in the sun. On frosty nights, bring it inside the coop (if it’s a non-sill drinker) where it’s slightly warmer than outside.
Your flock is now safe from the elements. The final step is to make sure they are safe from those seeking a winter meal.
Winter Dangers – Predators
When winter comes and food gets scarce, predators get bolder. Your biosecurity isn’t just for flu; it’s for foxes. (Read our full predator proofing 101 guide).
How to Deter Predators from Chicken Coop & How to Keep Chickens Safe from Predators
This is about building a fortress. A predator attack is devastating, so prevention is everything. Here’s a step-by-step plan for a true predator-proof chicken coop.
Step 1: Secure All Openings (The “Weld Mesh Rule”)
- The Problem: Chicken wire is designed to keep chickens in, not to keep a fox, badger, or stoat out. They can tear right through it or squeeze through the gaps.
- The Fix: Go over every inch of your coop and run. Any hole, vent, or window MUST be covered with strong ½-inch weld mesh (also called hardware cloth).
- How-To: Don’t use a simple staple gun. Fix the mesh securely with screws and large washers, or at least U-shaped fencing staples hammered in deep. A fox will pull at anything loose.
Step 2: Stop Diggers (The “Anti-Fox Skirt”)
- The Problem: Foxes and badgers will try to dig under your run.
- The Fix: Create a mesh “skirt” around the outside of your run.
- How-To: Lay a 12 to 18-inch-wide strip of weld mesh flat on the grass, right up against the base of your run. Peg it down firmly with tent pegs or wire. When the fox tries to dig at the fence line, its paws hit the mesh, and it can’t get any purchase. It will give up. This is far easier than trying to bury mesh vertically.
Step 3: Use “Fort Knox” Locks
- The Problem: A fox is clever. It can use its nose and paws to flip simple latches, hooks, and swivel handles.
- The Fix: Use proper, two-step locks that require “human” dexterity.
- How-To: The best and cheapest are carabiner clips. They are easy for you to open but impossible for a fox. A good old-fashioned sliding bolt with a hole for a padlock or carabiner is also perfect.
Step 4: The Ultimate Defence (Electric Fencing)
- The Problem: You have a very persistent fox, or your hens free-range in a large area.
- The Fix: Electric poultry netting. This is the gold standard of UK predator-proof fencing. (Check out our review of the best electric fencing kits in the UK).
- How-To: You need a kit, which includes the netting, posts, an energiser, and a ground spike.
- Cost: A starter kit with a 25-metre net and a battery-powered energiser typically costs between £120 and £200.
- How it Works: The energiser sends a short, sharp (but safe) pulse through the horizontal metal strands in the net. When Mr. Fox touches it with his wet nose, he gets a shock he won’t forget and will quickly decide your hens aren’t worth the hassle.
- Maintenance: You MUST keep the bottom line of the net clear of long grass, or it will “short out” the fence and drain the battery.
Step 5: Good Housekeeping (Deterring Rats & Foxes)
- Remove Food & Damp: This is key for rats (here’s how to keep rats out of your chicken coop). Don’t leave any feed out overnight. This is the number one attractant. Damp, soggy ground and wet, spilled feed also attract rats and other vermin, so keeping your run dry is a key part of predator control. Store all your dry feed in a solid metal bin.
- Motion-Activated Lights: A sudden bright light (solar-powered ones are great) can scare a fox away, especially in an urban garden.
- Lock-Up Time: Be extra strict about locking your hens up before dusk. An automatic chicken coop door can be a lifesaver here, ensuring they are secure even if you’re late home. A fox’s main hunting times are dawn and dusk.
How to Tell What Killed My Chickens UK
This is a horrible topic, but it’s important to know what you’re dealing with. Finding a dead bird is heartbreaking. The signs of fox attack on poultry are usually clear, and resources like Poultry Keeper’s predator guide can help you identify the culprit.
- Fox: This is the most common predator. A fox will often leave a pile of feathers. If it kills a bird and leaves it, it will often have bites to the neck and chest. Often, the fox will just take the whole bird, leaving nothing behind. (A fox-proof chicken coop is your best defence).
- Stoat or Weasel: These are vicious and small enough to get through tiny gaps (like 1-inch chicken wire). A stoat will often kill multiple birds, which seem untouched apart from a small, neat bite mark on the neck or head.
- Mink: Similar to a stoat but larger. They are known for “surplus killing” – killing many birds in a frenzy and often lining them up, but not eating them.
- Rat: A rat will usually only attack small chicks or very sick, weak birds. They can also steal eggs. They will often leave gnaw marks.
- Bird of Prey (Hawk, Buzzard): This is less common in a secure run, but if your birds free-range, it’s a risk. They strike from above during the day, and you may find a bird with its chest and organs eaten.
- Badger: Very strong. They can break into wooden coops with their claws. A badger will often eat the bird starting at the chest and may leave the rest.
- Domestic Dog: Sadly, a common problem. It’s often a frenzied attack, with many feathers and multiple birds injured or killed but not necessarily eaten.
Knowing the culprit helps you plan your defence. A fox or badger, for example, will be stopped by the measures above, especially robust UK predator-proof fencing like electric netting.
Your flock is now safe from the elements and from predators. This solid foundation means you’re ready for anything the winter throws at you.
Conclusion: A Dry Coop is a Happy Coop
Phew! That was a lot of information. But if you’ve made it this far, you now have a complete plan.
Remember, the secret to how to keep a chicken coop dry through a damp British winter isn’t about expensive heaters or complicated tech. It’s about getting the basics right:
- Stop rain getting in (roof and wall checks).
- Stop damp getting up (raise the coop).
- Let moisture get out (good ventilation).
- Soak up what’s left (deep, absorbent bedding).
- Battle the mud (wood chips and drainage).
- Keep them healthy (daily checks and boredom busters).
Your hens are tough birds. You give them a dry, draft-free home with food and fresh water, and they will sail through the winter just fine. They will thank you with fresh eggs on a cold morning! What are your non-negotiable winter tips? Share them in the comments!
Disclaimer: All advice in this guide is for general information. This advice is general—consult a UK vet for your flock’s specific health needs.
Frequently Asked Questions (FAQ)
Q: What is the best thing to put in the bottom of a chicken coop in winter?
A: The best choice is a deep layer (4-6 inches) of absorbent pine shavings. This allows you to use the “Deep Litter Method,” where the composting lower layers generate natural, safe warmth for the coop.
Q: Do chicken coops need ventilation in winter?
A: Yes, absolutely. This is the most important rule. A sealed coop traps moisture from droppings and breathing, leading to dampness, frostbite, and respiratory disease. You must have vents (high up, above the roosts) to let this damp air escape. Just make sure the roosts themselves are not in a cold draft.
Q: What is the best ground cover for a muddy chicken run in the UK?
A: Hardwood wood chips are the best solution. They drain water away, stop mud from forming, and give your hens a clean surface to scratch on. Coarse sand is another good option. Covering part of the run with a clear tarpaulin also works wonders to stop the rain from hitting the ground.
Q: Is there anything I can put in my chicken’s water to keep It from freezing?
A: A few ping pong balls floating in the water will be moved by the wind and hens, which helps break up ice. You can also use black rubber tubs (which absorb sun) or swap the water drinker with a fresh one from your house twice a day. NEVER add salt, antifreeze, or rubbing alcohol, as they are toxic to chickens.

Oladepo Babatunde is the founder of ChickenStarter.com. He is a backyard chicken keeper and educator who specializes in helping beginners raise healthy flocks, particularly in warm climates. His expertise comes from years of hands-on experience building coops, treating common chicken ailments, and solving flock management issues. His own happy hens are a testament to his methods, laying 25-30 eggs weekly.