If you keep chickens, dealing with internal parasites is a matter of “when,” not “if.” I’ll never forget the morning my favorite Buff Orpington looked listless and pale. Her usual happy clucking was replaced by a concerning silence, and she just wasn’t herself, which was my first real scare with a heavy worm burden.
You’re worried about your birds’ health, the safety of their eggs, and the cost of treatment. This guide will teach you how to treat internal parasites, from identification to both medical and natural treatments.
Statistics from poultry extension services show that nearly 80% of backyard flocks have some level of parasite load, which can devastate egg production and lead to serious health issues if left unchecked.
Disclaimer: This guide provides educational information based on current veterinary science and should not replace professional veterinary diagnosis and treatment. Always consult a licensed veterinarian before administering any medications to your flock. Dosages and withdrawal periods can vary with specific products and formulations.
Understanding Internal Parasites in Chickens: What Are the Most Common Internal Parasites in Chickens?
Before you can treat a problem, you have to understand it. Internal parasites, or worms, are organisms that live inside a chicken’s digestive tract, stealing nutrients and causing internal damage.
They also make your chickens vulnerable to other diseases, and since they spread through droppings, a clean coop is your first line of defense.
Types of worms affecting poultry
Chickens can host several types of worms, but a few are incredibly common in backyard flocks. Knowing the difference helps determine the best course of action.
- Roundworms (Ascaridia galli): The most common parasite. These look like spaghetti and can grow up to 4 inches long, while a heavy infestation can lead to a physical blockage in the intestines—a condition called impaction—which is often fatal.
- Cecal Worms (Heterakis gallinarum): Small worms that live in the ceca. They don’t cause much harm on their own, but they can carry the organism that causes Blackhead disease, which is deadly to turkeys.
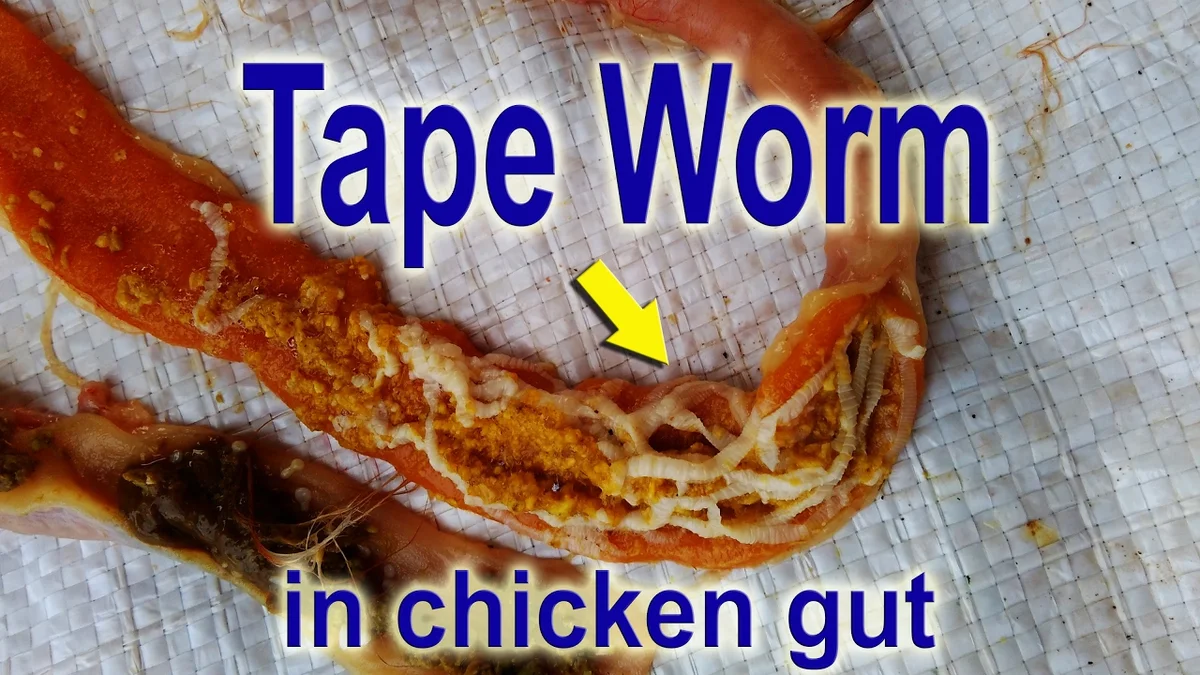
- Tapeworms (Cestodes): Flat, segmented worms that attach to the intestinal wall. They need an intermediate host, like a beetle, slug, or grasshopper, to complete their life cycle.
- Gapeworms (Syngamus trachea): These worms live in the chicken’s windpipe, causing them to gasp for air or “gape” with a characteristic “snick” or hissing sound, which is a medical emergency.
- Capillary Worms (Capillaria): Tiny, hair-like worms that can cause severe inflammation and damage to the intestines, leading to rapid weight loss and wasting.
Life cycles and transmission methods
Most worms have a simple life cycle. An infected chicken passes microscopic eggs in its droppings, and when another chicken eats contaminated food or water, the eggs hatch inside the new host.
Some parasites, like tapeworms, require an intermediate host such as an insect, which means managing the environment is just as crucial as treating the birds.
The prepatent period—the time from infection to when the worm can produce new eggs—is typically 14-21 days, and this is key for treatment and pasture rotation.
What is a “Parasite Load”?
You’ll often hear the term “parasite load” or “worm burden.” Virtually all chickens living on the ground have some worms, but a healthy chicken’s immune system can easily manage a small parasite load.
Problems arise when that load becomes too heavy for the chicken’s system to handle. Our goal isn’t to create a sterile, worm-free environment, but to manage the load to a very low, harmless level.
How Parasites Affect Your Flock’s Health and Your Wallet
A parasite problem isn’t just a health issue; it’s an economic one. Chickens will eat more feed but gain less weight because worms are stealing the nutrients, and hens with a high worm burden will often stop laying or lay smaller, poor-quality eggs, which is often the first sign owners notice.
Internal damage caused by parasites weakens the immune system, which makes the chicken more susceptible to other diseases.
Veterinary bills, medication, and supplements all add up, making prevention the most cost-effective strategy.
Comparison of Common Chicken Worms
| Worm Type | Scientific Name | Location in Chicken | How It Spreads |
|---|---|---|---|
| Roundworm | Ascaridia galli | Small Intestine | Direct (fecal-oral) |
| Cecal Worm | Heterakis gallinarum | Ceca | Direct (fecal-oral) |
| Tapeworm | Cestodes | Intestines | Indirect (via insects) |
| Gapeworm | Syngamus trachea | Trachea | Direct or via earthworms |
| Capillary Worms | Capillaria | Intestines, Crop | Direct (fecal-oral) |
Now that you know what these parasites are and how they operate, the next critical step is learning to spot the subtle signs of an invasion in your own flock, since understanding their behavior is key to catching problems early.
Identifying Parasite Infections – How Do I Know If My Chickens Have Internal Parasites?
Chickens are experts at hiding illness, which means the earliest signs are often subtle changes in behavior, and you need to be a good observer to catch a worm problem before it gets out of hand.
Early warning signs of worm infection in poultry
Look for these red flags during your daily flock checks:
- Lethargy: The chicken is less active, stands hunched over with ruffled feathers, or separates itself from the flock.
- Pale Comb and Wattles: A pale, pinkish comb often signals anemia from parasites feeding on blood or causing internal bleeding.
- Weight Loss: The chicken may feel “light” or bony when you pick it up, even if its crop is full.
- Diarrhea or Abnormal Droppings: Look for foamy yellow diarrhea. You may see actual spaghetti-like roundworms in the poop.
- Reduced Egg Production: A sudden and unexplained drop in egg-laying, or soft-shelled or misshapen eggs, is a classic sign something is wrong internally.
- Dirty, Ruffled Feathers: An ill chicken stops preening and taking care of its feathers, and a messy vent area is a clear sign of digestive upset.
How chickens act if they have worms
A chicken with a heavy parasite load just acts sick, since it won’t be interested in foraging, dust bathing, or interacting with its flock mates.
With gapeworm, the signs are more dramatic. The chicken will stretch its neck, gasp for air, and make a strange coughing or hissing sound, which requires immediate action.
After trying different approaches to monitoring my flock, I found that a quick daily visual check combined with a weekly “health audit” works best.
Advanced Signs of a Severe Infestation
If a worm problem is left untreated, you may see more severe signs. Visible wasting is when the chicken becomes extremely thin, with its keel bone feeling sharp like a knife blade.
You may also find worms in droppings, and in rare cases, a roundworm can even end up inside an egg. Gasping for air is the key sign of gapeworm and requires immediate action.
A Visual Guide: What to Look for in Droppings
While I can’t provide pictures, here is what to look for when you’re checking your chicken’s droppings for visible signs of a worm infestation:
- Roundworms: These look like small pieces of cooked spaghetti, ranging from an inch to several inches long. They will be white, tan, or yellowish and may be coiled or straight, and finding even one is a strong indicator of a heavy load.
- Tapeworms: These appear as small, flat, white segments that resemble grains of rice or sesame seeds.
- Cecal Worms: These are very small, tiny white worms (about ¼ to ½ inch long) and are rarely seen in droppings.
- Gapeworms: You will not find gapeworms in droppings, as they live in the trachea, and their presence is indicated by the “snicking” and gasping sounds from the bird.
- Capillary Worms: These are so thin and hair-like they are almost impossible to see with the naked eye and are best identified with a fecal float test.
Visual examination techniques
When you do your weekly check, here’s what to look for:
- Check the Comb and Wattles: Are they pale, shrunken, or bluish?
- Examine the Eyes: Are they bright and clear, or dull, bubbly, and sunken?
- Feel the Keel Bone: This is the bone running down their chest. In a healthy bird, it should feel like a well-muscled part of the breast, not a sharp, prominent ridge.
- Inspect the Vent: Look for cleanliness. A messy, dirty vent is a sign of diarrhea. While you’re there, check for external parasites like mites and lice.
- Watch their Breathing: Is it regular and quiet, or labored and gaspy? Listen for any clicks, sneezes, or gurgles.
Recognizing the symptoms is the first battle, but winning the war requires a definitive diagnosis. Let’s explore how to confirm exactly what you’re dealing with so you can choose the right weapon for the fight.
Diagnostic Methods: Professional Diagnosis vs. Home Assessment
While your observations are important, a professional diagnosis is the only way to be 100% sure about a parasite infection. Guessing can lead to using the wrong treatment, which contributes to resistance management issues, and it’s a risk most guides won’t mention.
Fecal float testing procedures
A fecal float test is the gold standard for diagnosis. A veterinarian will mix a fresh fecal sample with a solution that makes microscopic eggs float, then examine it under a microscope.
Research shows that different dewormers target different types of worms, so the fecal test is crucial for identifying the specific type of worm eggs present. You can even learn to do these at home with a basic microscope, but a vet’s interpretation is invaluable.
The entire goal of testing is to ensure the correct treatment is used, a point emphasized by poultry health experts at the Alabama Cooperative Extension System.
“A proper diagnosis is crucial so the right treatment and control program can be created for your flock.”
This expert guidance confirms that a fecal test isn’t an unnecessary expense; it’s the foundational step for effective and responsible treatment.
What the Veterinarian Looks for Under the Microscope
When a veterinarian examines the fecal float slide, they look for microscopic eggs with very specific characteristics. While I can’t provide a live microscopic image, I can describe what the vet sees.
Roundworm Eggs are large, oval, and have a thick, smooth, dark-colored shell. They typically measure between 80−85×45−50 micrometers (µm) in size, and the internal embryo is often visible inside.
Cecal Worms Eggs are a bit smaller and more narrow. They are oval, thick-shelled, and often have a visible embryo inside. Their size ranges from 65−80×35−46 micrometers (µm).
This detail allows the vet to precisely identify the parasites and recommend the most effective treatment.
How to Collect a Good Fecal Sample
For accurate results, the sample quality matters.
- Get it Fresh: The best sample is one that is less than 4 hours old. Collect droppings from the board first thing in the morning.
- Get a Composite Sample: Collect small amounts of droppings from several different birds in different areas of the coop to get a good overview of the whole flock’s health.
- Keep it Clean: Avoid getting a lot of bedding, dirt, or grass in the sample.
- Store it Properly: Place about 2 tablespoons of the sample in a sealed plastic bag or container and keep it cool (refrigerate, do not freeze) until you can get it to the vet, preferably within 24 hours.
Step-by-Step Diagnostic Process:
- Observe: Notice the signs and symptoms listed in Section 2.
- Collect a Sample: Gather a fresh, composite dropping sample.
- Contact a Vet: Take the sample to a poultry veterinarian for a fecal float test.
- Get a Diagnosis: The vet will identify the specific parasite(s) and recommend the right antiparasitic medication.
- Treat Accordingly: Administer the correct dewormer at the proper dose.
When to consult a veterinarian
You should always consult a veterinarian if:
- A chicken is severely ill or multiple birds get sick at once.
- You suspect gapeworm, as it can be fatal quickly.
- Your treatments don’t seem to be working.
- You are new to chickens and unsure what you’re seeing.
A poultry vet can save you time, money, and heartache in the long run. With a clear diagnosis in hand, you’re ready to move from assessment to action. In the next section, we’ll dive into the most effective medical treatments to reclaim your flock’s health and get them back to their happy, healthy selves.
Medical Treatment Options: What Is the Best Parasite Medicine for Chickens?
When it comes to effectiveness, FDA-approved medications (or dewormers) are the most reliable option. For a confirmed, heavy infestation, a targeted medical treatment is often the kindest and most effective route.
There is a lot of debate about this in the chicken community, but for a heavy infestation, medical treatment is usually the best option.
What Kills Internal Parasites in Chickens?
For a proven, effective treatment, you must use a targeted medical dewormer. These medications are designed to kill worms at different stages of their life cycle.
The most common dewormers include: Fenbendazole, Hygromycin B, and Levamisole. Using these medications, especially after a fecal test, is the most reliable way to restore your flock’s health.
Important Warnings About Drug Use
Laws regarding animal medications vary by state. Always check with your state’s Department of Agriculture to ensure you are in compliance with all regulations.
It is absolutely essential to follow the recommended egg and meat withdrawal periods on the product label. If a product has no established withdrawal period, do not consume the eggs or meat from treated birds.
FDA-approved dewormers for poultry
Currently, only a few dewormers are officially approved by the FDA for use in laying hens in the USA. Using an approved product is important because it means there are established withdrawal periods for eggs and meat.
- Fenbendazole (Brand Name: Safe-Guard, Panacur): A broad-spectrum dewormer effective against roundworms, cecal worms, and gapeworms. It’s available in several forms. The liquid goat dewormer is a popular choice for backyard keepers. Pricing for a 125g tube of liquid starts at around $12-$18, while medicated crumbles are available in larger bags for approximately $25-$35.
- Hygromycin B: As of 2025, products containing this medication, such as Durvet’s Strike 3, have become very difficult to find and are often listed as discontinued.
Dosage and Withdrawal Period Table
| Medication (Brand) | Target Worms | Common Dosage | Egg Withdrawal | Meat Withdrawal | FDA Approval Status | Available Forms | Effectiveness Rating | Cost Range per Treatment |
|---|---|---|---|---|---|---|---|---|
| Fenbendazole (Safe-Guard) | Round, Cecal, Gape | Follow package directions | 0 days (for on-label use) | 0 days (for on-label use) | Approved for some animals (off-label for chickens) | Pellets, liquid, paste | Excellent | Moderate to High |
| Hygromycin B (Strike 3) | Round, Cecal | Follow package directions | 0 days (for on-label use) | 0 days (for on-label use) | Discontinued/Limited Availability in 2025 | Medicated feed/pellets | Excellent | N/A |
| Levamisole | Round, Cecal | Vet’s directions | Varies (vet-directed) | Varies (vet-directed) | Not approved for poultry | Liquid, oral drench | Excellent | Low |
Note: Always double-check the product label for specific withdrawal periods. Consult your veterinarian for guidance on any off-label use.
Levamisole for Roundworm and Cecal Worm Control
Levamisole is a potent dewormer that is highly effective against both roundworms and cecal worms. However, it is not FDA-approved for poultry and requires a prescription from a vet.
The most critical factor to consider is the lack of a published withdrawal period for eggs and meat, and since there is no established safety data, eggs from treated birds cannot be safely consumed.
For this reason, Levamisole should only be used under the direct supervision of a veterinarian, who can provide guidance on the necessary food discard period.
Can ivermectin treat worms in chickens safely?
Ivermectin is a powerful antiparasitic, but it is not FDA-approved for use in chickens. While some keepers use it, there are no scientifically established guidelines for how long the drug remains in the eggs or meat.
This means there is a significant risk of the drug being passed to humans who consume these products, so given these serious food safety concerns, it is strongly advised to avoid using Ivermectin on your flock.
Instead, rely on proven, FDA-approved medications with established safety data.
Understanding and Preventing Dewormer Resistance
Dewormer resistance happens when parasites survive treatment and pass their genes to the next generation, making medications less effective.
The Genetic Basis for Resistance
Resistance is not an intentional adaptation by the worms. It is a process of genetic selection. As the U.S. Food & Drug Administration (FDA) defines it:
“Antiparasitic resistance is the genetic ability of parasites to survive treatment with an antiparasitic drug that was generally effective against those parasites in the past.”
When you use a dewormer, it kills the susceptible worms, but any individuals with random genetic mutations that make them less susceptible survive. Since they are the only ones left to reproduce, the next generation will be the offspring of these resistant survivors. Over time, the entire parasite population on your property can become predominantly resistant.
The Routine Deworming Debate
There is a significant debate among chicken keepers and even some veterinary professionals regarding the best approach to deworming. This is primarily centered on the goal of preventing drug resistance. While some older philosophies promoted routine, calendar-based deworming, the overwhelming consensus from modern veterinary experts is to treat only when necessary.
According to Gail Damerow, one of the most respected authors on poultry care, this point is clear in an interview with Murray McMurray Hatchery:
“By far, the best way to determine if you need to deworm your chickens, and what type of dewormer to use, is with a fecal test.”
This testing-based approach is also officially supported by government agencies. The U.S. Food and Drug Administration (FDA) advises that livestock owners should work with their veterinarian to monitor their flocks and use diagnostic tests to determine if a dewormer is effective and necessary.
Specific Rotation Protocols and the Refugia Concept
Preventing resistance is a lot like crop rotation—you have to think long-term. The key to preserving a dewormer’s effectiveness is a concept called refugia.
Refugia (from the Latin for “refuge”) refers to the small population of worms that are not exposed to the dewormer. This can include eggs in the soil, worms in untreated birds, or worms that survive a treatment. The goal is to maintain a large population of susceptible worms to “dilute” the resistant gene pool in the environment. This is a crucial concept that is often overlooked.
By only treating birds with a high parasite load, or by treating only a percentage of the flock, you create a refugia. This ensures that the worms that survive a treatment will still have to compete with a large population of susceptible worms that have a dominant gene.
Effective Rotation Protocols
1. Pasture Rotation: This is the most effective protocol for preventing parasite buildup and is a natural form of refugia.
- Divide your run or pasture into at least two sections.
- Rotate your flock to a new section every 2-4 weeks.
- Give the empty section a break for at least a few months, allowing the sun and heat to kill off any remaining eggs in the soil.
- A common practice is to have a three-section rotation, with your flock in one area, and two others being rested.
2. Strategic Deworming: If you need to use a dewormer, don’t treat your flock on a strict quarterly schedule.
- Only treat the entire flock after a positive fecal test confirms a significant worm burden.
- Use a different type of dewormer each time you treat, if possible.
- Only deworm the sick birds while leaving a few healthy birds untreated. This is a form of refugia that ensures susceptible parasites continue to exist in the population.
3. Environmental Refugia: Always ensure a portion of the parasite population is protected from the dewormer.
- Keep a clean and dry coop to reduce overall parasite numbers but don’t try to sterilize the environment completely. A small worm burden in the soil helps maintain a susceptible population.
- Focus on holistic flock health to boost your chickens’ natural immunity so they can fight off a low worm burden.
How to give chickens deworming medication properly
The easiest way is to use a medicated feed, but if you’re using a liquid or paste, you’ll need to administer it orally to each bird.
Carefully calculate the correct dose based on the chicken’s weight, since overdosing can be toxic.
Hold the chicken securely and use a syringe to gently squirt the medication into the side of its beak, but do not squirt straight down its throat.
If one bird has worms, you must treat the entire flock at the same time. Additionally, most treatments require a second dose 10-14 days later to kill any newly hatched worms.
What to Expect After Deworming
It’s common to see a large number of dead or paralyzed worms in the droppings for 1-3 days after treatment, so consider this a good sign that the medication is working!
Your chickens might be a little lethargic during treatment, so provide extra supportive care, which we’ll cover in Section 9.
While medical treatments are powerful, many keepers prefer a more natural, preventative approach for long-term flock management. Let’s look at how you can support your chickens’ health using remedies from nature and good old-fashioned husbandry.
Natural Treatment Alternatives – How to Get Rid of Parasites in chickens Naturally
Many chicken keepers prefer a natural approach, which is best for prevention or for very mild cases of worms. It’s crucial to understand that these remedies are generally not strong enough to clear a heavy, established infestation.
This distinction between prevention and treatment is critical. In her interview, Gail Damerow clarifies the role of popular natural supplements:
“You will hear about all kinds of natural worm control methods, such as feeding cabbage, garlic, and pumpkin. But unlike chemical dewormers, they do not directly affect helminths… These methods are therefore more suited to preventing worms than to eliminating an existing worm load.”
This expert experience highlights that while natural supplements are excellent for supporting overall health, they should not be relied upon as a “cure” for a confirmed parasite problem.
Natural Remedies for Parasite Prevention
- Apple Cider Vinegar (ACV): Does not kill worms directly, but adding a small amount to their water can help improve their gut health by making it slightly more acidic, which can be less hospitable for parasites.
- Pumpkin Seeds: Raw, ground pumpkin seeds contain an amino acid called cucurbitacin that can paralyze worms.
- Garlic: Crushed fresh garlic can help boost the immune system and may have some antiparasitic properties.
- Oregano Oil: A powerful natural antimicrobial that supports gut health. Excellent for prevention, but not for eliminating a heavy worm load.
- Diatomaceous Earth (DE): Food-grade DE has been shown to aid in eliminating worms by the Alabama Cooperative Extension. Be sure to use “food grade” and mix it into feed to avoid respiratory irritation.
- Red Pepper Flakes / Cayenne Pepper: There is no scientific evidence that the capsaicin in red peppers is an effective dewormer for poultry, so do not rely on it as a treatment.
A Sample Weekly Natural Prevention Routine
- Monday/Friday: Add 1 tablespoon of raw ACV per gallon of water.
- Wednesday: Mix ground raw pumpkin seeds into their feed.
- All Week: Keep a crushed clove of garlic in the waterer (replace every couple of days).
Creating a Supportive Diet for Parasite Resilience
A strong gut is a chicken’s best defense, which is why fermenting chicken feed unlocks more nutrients and provides natural probiotics.
Supplementing with probiotics also helps build a strong community of good gut bacteria, and if a chicken is recovering, offering high-protein snacks can help it regain lost weight and condition.
Natural supplements are a great tool, but true flock health comes from a robust prevention strategy that starts with the ground they walk on and the food they eat. Let’s build a fortress against parasites with smart environmental management.
Prevention Strategies – What to Feed Chickens to Prevent Parasites
Prevention is always better than cure, and a healthy diet is the foundation of a strong immune system.
- Probiotics: Fermented foods like yogurt or kefir, or commercial poultry probiotics, promote healthy gut bacteria that compete with parasites.
- Garlic and Onions: In moderation, these can help boost immunity.
- Herbs: Adding herbs like oregano, thyme, and parsley to their diet is great for overall health.
Environmental management techniques
You can’t have healthy chickens in a sick environment, since cleanliness is non-negotiable.
Keep the coop dry, because worm eggs thrive in wet conditions, so ensure good ventilation and use absorbent bedding.
Practice daily droppings removal and schedule a full coop clean-out at least twice a year. In addition, one of the most effective changes you can make is to elevate feeders and waterers to prevent contamination.
Muddy, wet runs are a breeding ground for parasites, so manage mud by adding sand, gravel, or wood chips to damp areas.
Rotation schedules and pasture management
If your chickens free-range, rotating their pasture is one of the most effective prevention methods.
By moving them to a fresh patch of ground every few weeks, you break the parasite life cycle, and a simple system involves rotating them every 2-4 weeks.
During the wet spring of 2024, I observed a huge drop in parasite issues after I implemented a strict pasture rotation system.
Seasonal Parasite Prevention
- Spring: This is peak parasite season due to wet, mild weather, so be extra vigilant with coop cleanliness. In southern states with year-round warmth, continuous monitoring is crucial.
- Summer: Hot, dry weather and direct sun can kill many parasite eggs in the soil.
- Fall: Now is the critical time for your semi-annual fecal testing before winter housing increases parasite transmission risk. As temperatures cool and rains return, a second, smaller parasite peak can occur, and this is another good time for a fecal test before winter.
- Winter: In freezing climates, the parasite cycle slows dramatically outdoors, so northern climates see reduced transmission during frozen months. Focus on keeping the coop clean and dry to prevent issues indoors.
Biosecurity: Stopping Parasites Before They Start
Quarantine new birds for at least 30 days, and consider a fecal test before introducing them to your flock.
Limit visitors to your coop or run, especially if they have chickens of their own.
Control wild birds and pests, since wild birds can introduce parasites, so use covered runs and feeders to discourage them.
Sample Preventive Care Calendar
- Daily: Fresh water, clean droppings board.
- Weekly: Handle each bird, check for signs of illness. Add probiotics to feed.
- Monthly: Rake and turn over the run. Do a mini coop clean.
- Quarterly: Full coop deep clean and bedding change. Consider sending a fecal sample for testing, especially in spring and fall.
- Annually: Evaluate your pasture rotation plan and biosecurity measures.
A solid prevention plan is your foundation, but a chicken’s needs change throughout its life. Let’s tailor our approach based on their age, from fragile chicks to resilient seniors, to provide the best care at every stage.
Age-Specific Considerations – At What Age Should I Deworm My Chickens?
You shouldn’t deworm chicks unless you have a confirmed problem, because their systems are still developing.
Most parasite issues begin once they are moved outside and start foraging.
Chick vs. adult treatment protocols
- Chicks (Under 16 weeks): Focus entirely on prevention. Keep their brooder impeccably clean. The biggest parasite threat to chicks is actually Coccidiosis, which is a protozoan, not a worm. Only treat for worms if a vet confirms an issue.
- Adults (Over 16 weeks): Begin a regular prevention and monitoring schedule. It’s a good practice to run a fecal test on your flock once or twice a year to see if treatment is even necessary.
The High-Risk Pullet Period (16-24 weeks)
The pullet period (16-24 weeks) is a period of high stress on young hens, and this stress can make them more vulnerable to parasites. You should pay extra close attention to your pullets as they approach point-of-lay and ensure their diet is excellent and their environment is clean.
Caring for an Older Flock
As chickens age, their immune systems can become less robust, so a senior hen might be more susceptible to a worm burden that a younger bird could handle.
For flocks with birds over 5 years old, an annual fecal test is a good investment in their health and longevity.
Age-Based Treatment Timeline
- 0-8 Weeks: Brooder hygiene is key. No treatment unless vet-directed.
- 8-16 Weeks: Monitor closely after they move to the main coop and are exposed to the ground.
- 16+ Weeks: Begin your preventative and monitoring program. Conduct a fecal test before their first winter.
We’ve covered a lot of ground, from prevention to treatment across all age groups, but you might still have some specific questions. This FAQ section is designed to give you quick, clear answers to the most common queries.
Economic Analysis: Prevention vs. Treatment
Choosing to prevent parasites rather than waiting to treat them is often the most cost-effective decision. Below is a breakdown of the typical costs involved.
Cost of Diagnosis and Treatment
- Fecal Test: A composite fecal float test for a small flock typically costs $20-$40 at a veterinary clinic. This is a one-time fee per test that confirms the problem.
- Fenbendazole Treatment: The cost of dewormer, such as Fenbendazole, for an average backyard flock of 10-20 birds is usually $15-$30. This cost can be slightly higher if you need a prescription for a different type of medication.
Lost Production Costs (per infected hen)
The most significant financial loss from parasites is often invisible: the eggs your hens don’t lay, because a heavily infected hen can drop her production by 50% or more.
Let’s look at a hypothetical scenario for a single hen:
- Average Production: A healthy hen lays 5 eggs per week.
- Price per Egg: Selling eggs for $0.50 each.
- Weekly Value: $2.50 per week.
- Lost Production: Due to parasites, the hen’s production drops to 2 eggs per week.
- Lost Weekly Value: $1.50 per week.
- Cumulative Cost: Over just one month, this single hen’s lost production costs you approximately $6.00.
This cost is compounded by every sick hen in your flock. A flock of 5 sick hens could result in a $30.00 loss in egg sales per month, which easily surpasses the cost of diagnosis and treatment combined.
The Economics of Prevention
Investing in a proper prevention strategy is much cheaper in the long run than paying for repeated treatments and recovering from lost production. A clean coop, rotational grazing, and a healthy diet are all low-cost, high-return strategies.
- Coop Supplies: The cost of coop bedding, cleaning supplies, and feed enhancements (like garlic or ACV) is minimal, often less than $5 per month.
- Rotational Grazing: This is a zero-cost strategy that simply requires planning and management.
- Regular Monitoring: This costs nothing but your time and attention.
The most effective and economical approach is to use prevention as your primary defense and a fecal test as your early warning system. By doing so, you save money on expensive treatments and preserve the long-term health and productivity of your flock.
Supportive Care and Recovery – How to Help Your Flock Bounce Back After Worms
Treating for worms is just the first step, while helping your flock recover their strength and condition is just as important. Since a heavy parasite load takes a toll on their bodies, providing supportive care can make a huge difference in their recovery speed.
Post-Treatment Nutritional Support
Add poultry vitamins & electrolytes to their water to help them rehydrate and replenish lost nutrients. Since deworming medication can be hard on the gut’s natural flora, it’s also crucial to re-establish a healthy gut by providing probiotics. Help them rebuild muscle and condition by offering extra protein treats like scrambled eggs or mealworms.
The Post-Treatment Coop Clean-Out
A thorough coop cleaning is essential after treatment to prevent re-infestation. The best time for this is 2-3 days after the first dose of dewormer, when chickens expel the most worms and eggs.
Remove all bedding and scrub all surfaces with a poultry-safe sanitizer. Let everything dry completely before adding a thick, fresh layer of clean bedding.
Monitoring for Success and Re-infestation
After you’ve completed the full course of treatment, your flock’s health should improve dramatically within a week or two. Look for a return to normal activity levels, brighter combs, and an improvement in droppings.
To ensure the treatment was successful, you can run a follow-up fecal test about 2-3 weeks after the final dose.
By providing excellent supportive care and breaking the parasite life cycle with a deep clean, you give your flock the best possible chance for a full recovery and a healthy, parasite-managed future.
FAQ Section
Q: How do I tell if my chicken has parasites?
A: Look for paleness in the comb, lethargy, weight loss, diarrhea, and a drop in egg production. The only way to be certain is with a fecal test from a vet.
Q: Can I eat eggs from a chicken that has worms?
A: If the chicken has worms but hasn’t been medicated, the eggs are generally safe to eat. The worms live in the digestive tract, and it’s extremely rare for one to end up in an egg. However, you must pay close attention to the “egg withdrawal period” on any medication you use, because during this period, the eggs must be discarded.
Q: What do chicken worm eggs look like?
A: You can’t see them. Worm eggs are microscopic and can only be seen with a microscope during a fecal float test. If you see something that looks like a grain of rice or a sesame seed moving in the droppings, that could be a tapeworm segment.
Q: How long do worm eggs survive in the soil?
A: This varies by species and climate, but some roundworm eggs can survive for a year or even longer in cool, moist soil, which is why pasture rotation is so important. Hot, dry, sunny conditions will kill them much faster.
Q: Should I deworm my whole flock if only one chicken is sick?
A: Yes. Internal parasites spread quickly through a flock via droppings. If one bird has a confirmed case, it’s safe to assume all birds have been exposed and should be treated simultaneously to prevent re-infestation.
Q: What’s the difference between a dewormer and a coccidiostat?
A: A dewormer (anthelmintic) kills or expels worms like roundworms and tapeworms. Coccidiosis, which is treated by a coccidiostat (like Corid/Amprolium), is an infection caused by a microscopic single-celled protozoan. They are not interchangeable.
Q: How often should I deworm my chickens?
A: You should only deworm when you have a confirmed problem from a fecal test. Deworming on a fixed schedule without a diagnosis is not recommended as it can lead to worms becoming resistant to the medication.
With these common questions answered, let’s focus on the final crucial step: helping your flock recover after treatment and ensuring they stay healthy for the long haul.
Zoonotic Risk: Can Chickens Pass Parasites to Humans?
A common question is whether you can catch parasites from your flock, and while the risk is generally very low, it is not zero.
Internal chicken parasites, like Ascaridia galli, are host-specific, which means they cannot survive or reproduce in the human digestive system.
However, there is a risk of contracting other diseases from poultry, which is why practicing good hygiene is crucial.
Handwashing is the single most important thing you can do, so always wash your hands after handling your chickens, their eggs, or their coop.
Prevent fecal contamination by avoiding touching your face or mouth after handling birds, and do not eat or drink while you are in the coop.
Use a dedicated pair of boots for chicken duty to avoid tracking droppings into your house, and educate children that they must wash their hands after touching the birds.
By following these simple hygiene practices, you can enjoy your flock while keeping yourself and your family safe.
Conclusion
By understanding the signs of a parasite infestation and the importance of a fecal test, you can make informed decisions for your flock. While treatment with appropriate dewormers is sometimes necessary, the most effective strategy for long-term flock health is consistent prevention. This includes strong biosecurity measures, environmental management, and providing excellent supportive care. By combining these approaches, you can effectively manage a parasite load, prevent dewormer resistance, and ensure your chickens lead a healthy and productive life.

Oladepo Babatunde is the founder of ChickenStarter.com. He is a backyard chicken keeper and educator who specializes in helping beginners raise healthy flocks, particularly in warm climates. His expertise comes from years of hands-on experience building coops, treating common chicken ailments, and solving flock management issues. His own happy hens are a testament to his methods, laying 25-30 eggs weekly.