The first time I set eggs in my incubator, I had no idea if any of them were actually fertile. I had a rooster, sure, but I’d seen him chase my hens around the yard without ever seeming to complete the deal. Seven days later, I found myself in my pantry at midnight with a flashlight, squinting at eggs, completely unsure what I was supposed to be looking for. That first hatching season, I threw away four perfectly good developing eggs because I couldn’t tell the difference between a shadow and an embryo.
That was three hatching seasons and over 200 candled eggs ago. Since then, I’ve learned exactly what fertile eggs look like at every stage, what the bullseye really looks like when you crack one open, what the blood vessels look like on Day 7, and which popular “fertility tests” are complete nonsense. If you’re wondering how to tell if an egg is fertile, whether before incubation or during it, this guide covers every method, every myth, and every hard-won lesson from my own flock.
Can You Really Tell If an Egg Is Fertile? The Honest Answer
Here’s the hard truth that many websites dance around: there is no way to tell if a fresh egg is fertile from the outside of the shell. When looking at the exterior shell of a chicken egg, there is no way to distinguish between a fertilized egg and an unfertilized one. A brown egg looks the same whether fertile or not. A white egg looks the same whether fertile or not. Size, shape, texture, weight, none of it tells you anything about what’s happening inside.
You have exactly two reliable methods:
Quick Answer: There is no way to tell if an egg is fertile from the outside of the shell. You have two reliable options: (1) Crack the egg and look for a “bullseye” pattern on the yolk (the blastoderm). This destroys the egg but gives an immediate answer. (2) Candle the egg after 7 days of incubation by shining a bright light through the shell to look for blood vessels and an embryo. The water float test does NOT tell you if an egg is fertile. A blood spot does NOT mean the egg is fertilized. On Day 1, even a fertile egg looks identical to an infertile egg when candled.
After three seasons of hatching, this is the single most important thing I’ve learned: you need patience. Everyone wants to know on Day 1. But the truth is, the egg won’t tell you anything useful until Day 4 at the absolute earliest, and even then, it’s unreliable. Day 7 is when the truth comes out. Save yourself the anxiety and the midnight closet sessions. Wait.
Method 1: The Cracking Method (Check Fertility Before Incubation)
This is the only way to determine fertility before incubation with certainty. It destroys the egg, so obviously you can’t use this on eggs you plan to hatch. But it is invaluable for confirming that your rooster is doing his job before you commit a whole batch to the incubator.
What to Look For: Blastodisc vs. Blastoderm
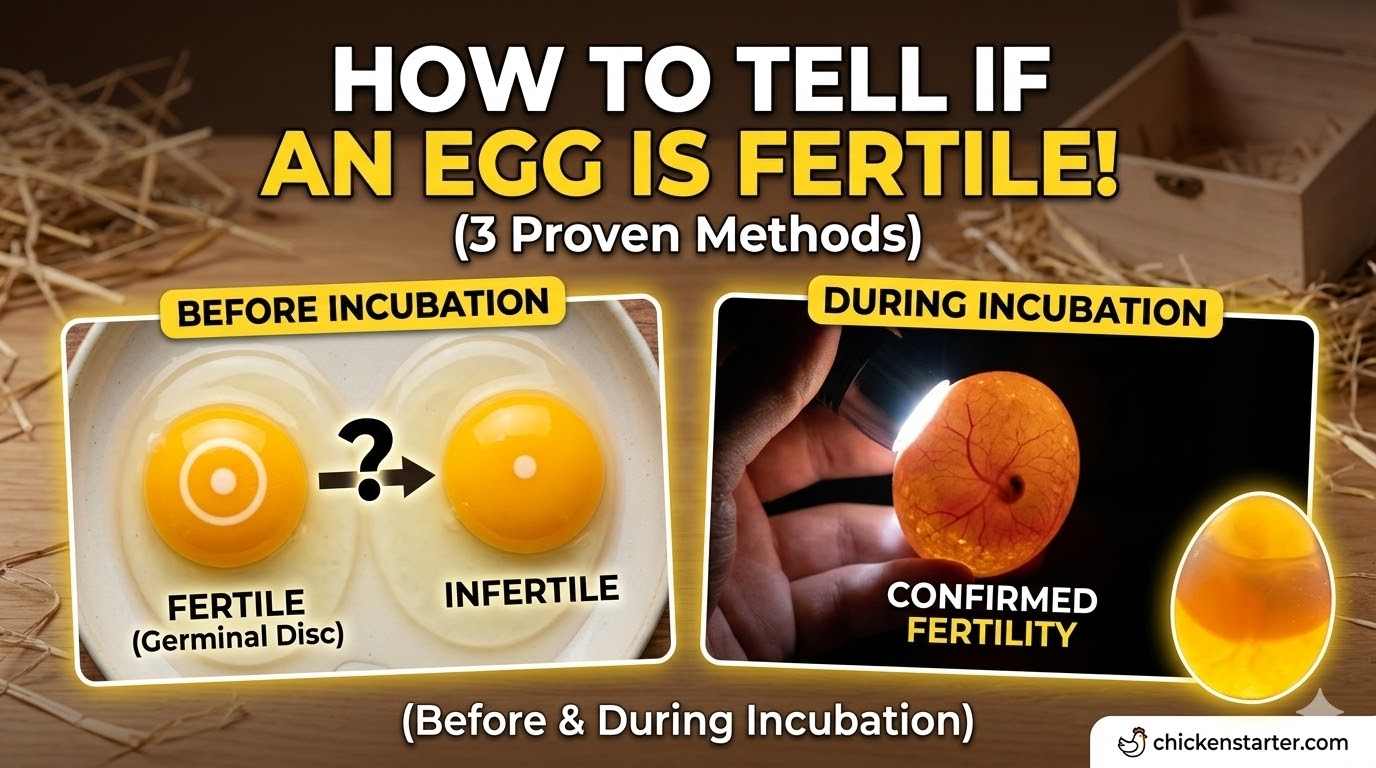
Every single egg your hen lays contains a small white spot on the surface of the yolk. This spot is called the germinal disc, and it’s present whether the egg is fertilized or not. The difference between a fertile and infertile egg comes down to what that white spot looks like.
According to information from Penn State Extension, the germ spot is the white spot on the yolk. The non-fertile germ spot contains only the female’s cells and looks like a solid white spot. In a fertile egg, the germ spot contains both the female and male cells. This allows cells to divide and the spot grows while the rest of the egg is being built in the female’s oviduct. Because of this growth, the fertile germ spot on the yolk looks like a circle with a somewhat clear center.
Here’s a clear comparison:
| Feature | Infertile Egg (Blastodisc) | Fertile Egg (Blastoderm) |
|---|---|---|
| White spot on yolk? | Yes, every egg has one | Yes, every egg has one |
| Shape of white spot | Small, solid, irregular borders | Bullseye pattern with concentric rings |
| Size | Tiny, about 2 to 2.5mm | Slightly larger, approximately 3 to 4mm |
| Border definition | Fuzzy, irregular edges | Clear, defined circular rings |
| Center appearance | Solid white throughout | Slightly translucent or clear center |
Research published in Scientific Reports confirms that the blastoderm in a fertilized egg is a symmetrical circular ring with approximately 3 to 4mm in diameter, while the blastodisc in unfertilized eggs can be seen as an asymmetrical solid spot with a smaller diameter of about 2.5mm.
The practical term most chicken keepers use is the “bullseye.” If you see a small white circle with a clear, lighter center surrounded by a defined white ring, like a tiny bullseye target, the egg is fertile. If it’s just a solid, irregularly shaped white dot, it is not.
How to Use This Method Practically
You don’t need to crack every egg in the batch. Crack 2 to 3 eggs from your flock over a few days. If all of them show the bullseye blastoderm, you can be reasonably confident the rest of the eggs from those same hens are also fertile.
I check every breakfast egg I crack for the bullseye now. It takes two seconds. Over the past year, about 95% of eggs from my flock have shown the clear bullseye pattern, which tells me my rooster is doing his job well. When I noticed the rate drop to about 70% last March, I watched my flock more closely and discovered my older Buff Orpington rooster was favoring only certain hens and ignoring others. That was my cue to evaluate the situation. For more on rooster behavior and whether you actually need one, check out my guide on do you need a rooster to get eggs.
Method 2: Candling (Check Fertility Without Cracking the Egg)
Candling is the method you use when you want to check if an egg is fertile without destroying it. It’s essential for anyone incubating eggs, and it’s easier than most beginners think.
Candling is a simple method used to check if an egg is fertile and developing properly. It involves shining a bright light through the egg to see what’s going on inside without cracking it open. The term “candling” comes from the old practice of using actual candles, but a strong LED flashlight works just fine today.
There is one critical caveat that must be understood before you start: you cannot determine fertility by candling a fresh, un-incubated egg. Candling only works after the egg has been incubating for several days and the embryo has started developing visible structures. On Day 0, a fertile egg and an infertile egg look absolutely identical under a light.
Candling Equipment
You don’t need anything expensive. Here’s what works:
- Dedicated egg candler (like the ones from Brinsea or similar brands): Designed specifically for this purpose, bright and steady, gives the best view
- Ultra-bright LED flashlight: Works great, especially if you can form a seal between the light and the egg
- iPhone or smartphone flashlight: Can work in a very dark room, though it’s not ideal
- DIY candler: A box with a small hole cut in the top and a strong light underneath
LED lights are ideal because they’re bright yet stay cool, preventing any risk of overheating the embryo during brief candling sessions. For detailed equipment recommendations, read my best egg candler guide.
Step-by-Step Candling Process
Step 1: Wash and dry your hands. Oil and bacteria from your fingers can clog the pores in the eggshell and prevent the embryo from getting the oxygen it needs.
Step 2: Go to a dark room. The darker the room, the better your visibility. A closet or pantry with the lights off works perfectly. I use my pantry every time.
Step 3: Hold the egg gently. Keep the large (blunt) end up. This is where the air sac is located.
Step 4: Place the large end against the light. Carefully hold the flashlight or candler under the rounded end of the egg. I make my hand into a loose fist, place the egg on top, and shine the flashlight up through my palm. The light penetrates through my hand and illuminates the egg beautifully.
Step 5: Slowly rotate the egg. Turn it gently until you get the best view of the interior contents.
Step 6: Look for signs of fertility. Blood vessels, a dark embryo spot, the air cell.
Step 7: Work quickly. Eggs can be out of the incubator for up to 30 minutes safely, but it’s best to put them back as soon as possible. I aim for under 5 minutes per egg.
Step 8: Return the egg. Place it back in the same position in the incubator or under the broody hen.
I number each egg with a pencil (never a pen or marker, as ink can penetrate the porous shell) and keep a notebook tracking what I see at each candling session. This documentation is what helped me go from a clueless first-timer to someone who can confidently sort fertile from infertile eggs in seconds.
For incubator recommendations to pair with your candling setup, check out my best chicken egg incubators for beginners and my Brinsea vs. Nurture comparison.
Day-by-Day Candling Guide: What Fertile Eggs Look Like at Each Stage
This is the section most websites skip, and it’s the one you actually need. Knowing when to candle and what you’re supposed to see at each stage is the difference between confidence and confusion.
| Day | What You See (Fertile Egg) | What You See (Infertile Egg) | What to Do |
|---|---|---|---|
| Day 1 | Clear, identical to infertile | Clear | DO NOT candle. Be patient. |
| Day 3 | Possibly a faint shadow, but unreliable | Clear | Too early for most people to tell |
| Day 4 to 5 | Some embryos show faint veins starting | Clear | Possible to see in light-shelled eggs only |
| Day 7 | Dark embryo spot + spider-like red veins + visible air sac | Clear, just the yolk floating, no veins | First reliable candling. Remove clear eggs. |
| Day 10 | Embryo larger, visible movement in some eggs, eye may appear as dark spot | Still clear if infertile | Confirm any doubtful Day 7 eggs |
| Day 14 | Egg mostly dark (chick fills most of the space), blood vessels still visible, chick shape visible | Should have been removed already | Second candling. Remove anything that hasn’t developed since Day 7. |
| Day 18 | Egg nearly completely dark except air cell. Chick in hatching position. | Should have been removed already | LOCKDOWN. Final check. Stop candling. Do not open incubator after this. |
| Day 21 | Pipping, peeping sounds, movement | N/A | Hatch day! |
What Day 7 Actually Looks Like
Day 7 is your first reliable candling day, and what you’re looking for is unmistakable once you’ve seen it. According to experienced hatching guides, a fertile egg at Day 7 will show a small dark spot (the embryo) with red veins branching out from it in a spider-like formation, plus a visible air sac at the blunt end. An infertile egg will look clear inside, with no veins and no dark spots, just the yolk shadow floating in the middle.
Why Day 1 Candling Shows Nothing
If you candle a fertile chicken egg right away without giving it time to incubate, it will look clear exactly like an infertile egg. Some embryos develop more quickly in the beginning and may be visible by Day 4, while others won’t be visible until Day 7. Because of this variation, Day 7 is recommended as the earliest reliable candling point when all fertile, viable eggs will show an embryo and blood vessels.
My Candling Schedule
A good rule of thumb is to candle at Days 7, 14, and 18. That’s my schedule, and I’d encourage every beginner to stick to it.
In my first hatching season, I candled every single day. I was obsessed. But I learned quickly that frequent handling risks hairline cracks and causes temperature drops every time you open the incubator. Now I limit myself to those three checks and my hatch rate has improved noticeably. The most critical period of incubation during the embryo’s development is during the first few days, so it is advisable not to disturb your eggs during that time. You aren’t missing anything exciting at that point anyway.
What to Look For: Fertile, Infertile, and Dead Embryos
Learning to distinguish between these three categories is essential for a successful hatch. Here’s what each one looks like when you candle:
Fertile and Developing (KEEP in incubator)
- Dark spot (embryo) with visible red veins spreading outward like a spider web
- Air cell visible at the blunt end of the egg, growing larger as incubation progresses
- At later stages, the chick takes up most of the egg space
- You may see movement when you hold the egg still under the light
Infertile: “Yolkers” (REMOVE)
When you candle a yolker, you won’t see a spot in the yolk, blood vessels, or a blood ring around the yolk. They are clear, easily illuminated, and have a visible yolk shadow in the center. They will not develop into a viable chick and should be removed from the incubator.
Early Death: “Quitters” (REMOVE)
Quitters are eggs that were originally fertile and started to develop into embryos, but died before hatching. The telltale sign is a blood ring, a reddish circle visible inside the egg when candling. This means the chick had started developing and then died. A common cause is a broody hen leaving the nest for too long, or temperature fluctuations in an incubator.
Why Removing Bad Eggs Matters
You should also remove non-viable eggs (infertile or early death) because they can become rotten. Rotten eggs can sometimes explode inside the incubator, contaminating fertile eggs with bacteria. If you’ve never smelled a rotten egg that’s been sitting at 100°F for two weeks, count yourself lucky. It is one of the worst smells you will ever encounter.
My biggest incubator disaster happened during my first season when I left a quitter egg in for 19 days because I wasn’t confident enough to remove it. It exploded at 2 AM, coating two viable eggs in bacteria. I lost those chicks. Now I’m ruthless about removing anything that doesn’t show clear development by Day 14. For more on maintaining healthy conditions for your flock, my chicken health check guide covers what to watch for.
Can You Tell If an Egg Is Fertile with Water? The Float Test Myth
No. The water float test does NOT determine fertility. This is one of the most common misconceptions I see in chicken keeping forums, and it needs to be put to rest.
The essence of the float test is simple: a newly laid egg will lay flat on the bottom of a glass of water, and a very old egg will float to the top. According to the University of Wisconsin Extension, this test really measures the size of the air cell inside the egg. As an egg ages, water evaporates through the shell, and the air cell gets larger. So determining if the egg floats mostly tests the age of the egg.
The assumption that floating eggs are spoiled is also unreliable. Eggs develop air pockets over time due to natural moisture loss, but this does not mean the egg has gone bad. Environmental factors like temperature and humidity can also influence air pocket size, making some perfectly good eggs float.
Here’s what the float test actually tells you, and what it doesn’t:
| Test Method | What It Tells You | Does It Test Fertility? |
|---|---|---|
| Water float test | Approximate age of the egg (air cell size) | ❌ NO |
| Cracking and checking yolk | Blastodisc vs. blastoderm | ✅ YES (destroys egg) |
| Candling after Day 7 | Whether an embryo is developing | ✅ YES (non-destructive) |
| Shell color or shape | Breed of hen | ❌ NO |
| Blood spot inside egg | Broken blood vessel during formation | ❌ NO |
I tried the float test once out of curiosity with 12 eggs. Six were from my rooster-present flock (confirmed fertile by cracking test eggs from the same hens), and six were store-bought. They all behaved the same in the water. The float test told me absolutely nothing about fertility.
Can You Tell If an Egg Is Fertile on Day 1 with a Flashlight?
No. A fertile egg on Day 1 looks exactly like an infertile egg when candled.
I know the temptation. You set your eggs in the incubator and within 24 hours you’re in the closet with a flashlight. I’ve been there, many times. On Day 1, I saw nothing. Just a clear egg with a yolk shadow. By Day 4, I thought I could see something, but I wasn’t sure. By Day 7, there was no question. The spider veins were unmistakable.
The embryo simply hasn’t developed enough visible structures in the first 24 to 72 hours for candling to detect anything meaningful. After a minimum of 4 days of incubation, a dark spot inside the yolk should be visible with veins extending out from it in a spider-like formation, as noted by experienced hatching experts. But for reliable, confident identification, wait until Day 7.
Special Note About Dark-Shelled Eggs
If you keep breeds that lay dark brown eggs like Marans, Welsummers, or Barnevelders, candling is significantly harder. The thick, pigmented shells block much of the light. You may need to wait until Day 10 or even Day 14 to see anything definitive in these eggs.
My Easter Egger eggs with their blue and green shells are a dream to candle. I can practically see the embryo moving at Day 7. My neighbor’s Marans eggs? She couldn’t see a thing until Day 12. If in doubt with dark eggs, mark them and put them back in the incubator. Give them until Day 14, and by then, even the darkest eggs will show obvious darkness filling the shell if a chick is developing. For more on these beautiful breeds, check out my Easter Egger complete guide and Ameraucana breed guide.
The Blood Spot Myth: Does a Blood Spot Mean the Egg Is Fertile?
No, it does not.
This is a misconception I hear constantly. People crack open an egg, see a small red or brown spot on the yolk, and assume the egg was fertilized. According to the University of Florida Institute of Food and Agricultural Sciences, the blood spots occur as the yolk is released from the ovary of the hen. If the ovarian sac ruptures slightly off its normal line (the stigma) as the yolk is released, a small blood vessel may leak a tiny amount of blood that is then incorporated into the egg.
Blood spots appear in both fertile and infertile eggs. They have nothing whatsoever to do with whether a rooster was involved. They are simply the result of a minor, random event during the egg’s formation inside the hen’s reproductive tract.
Eggs with blood spots are safe to eat. Just scoop out the spot with a spoon if it bothers you.
I get blood spots in about 1 in 20 eggs from my flock, regardless of whether my rooster has been active with that particular hen. My Australorp seems especially prone to them. They’re completely normal. For more on egg quality issues, read my guide on how to prevent blood spots in eggs.
Fertilized vs. Unfertilized Eggs: What’s Actually Different?
The answer is going to surprise a lot of people: almost nothing.
Other than having the potential for developing into a chick if incubated properly, there is no practical difference between a fertilized egg and an unfertilized egg. You can’t tell from the outside. You can’t tell from the taste. You can’t tell from the nutrition.
| Factor | Fertilized Egg | Unfertilized Egg |
|---|---|---|
| Requires a rooster? | ✅ Yes | ❌ No |
| Appearance (outside shell) | Identical | Identical |
| Appearance (cracked open) | Bullseye blastoderm on yolk | Solid white blastodisc on yolk |
| Taste | Identical | Identical |
| Nutritional value | Identical | Identical |
| Safe to eat? | ✅ Yes (if collected daily) | ✅ Yes |
| Can develop into a chick? | ✅ Yes (if incubated at ~100°F) | ❌ Never |
| Will develop on kitchen counter? | ❌ No (needs sustained 99 to 102°F) | ❌ No |
| Will develop in refrigerator? | ❌ No (cold stops all development) | ❌ No |
There is no scientific evidence that fertilized eggs are nutritionally superior to unfertilized ones. Fertilized eggs have remnants of the male’s sperm and a small cluster of cells that could form the embryo. The proportion of these to the total egg is so tiny that it is impossible to detect chemical differences between fertile and infertile eggs.
A fertilized egg that is never incubated will never contain an embryo and will never look like anything other than common breakfast food. For a fertilized egg to begin developing, it needs to be kept at the right conditions, generally around 99 to 102°F with approximately 60% humidity, for several hours. Putting the egg in the refrigerator will completely stop all development. So even if you have a rooster and your eggs are fertile, collecting them daily and refrigerating them means you’ll never encounter a developing embryo.
Commercial egg farms only keep female hens, so there is no chance of store-bought eggs being fertilized. For more on egg production from your own flock, read my guide on eggs from backyard chickens and what happens if you don’t collect eggs every day.
How Long Does a Fertile Egg Last Before Incubation?
Once a fertilized egg is laid, it remains viable for approximately 7 days when stored at the right conditions. After that, hatchability declines noticeably. After 14 days of storage, viability becomes very poor.
Ideal storage conditions for hatching eggs:
- Temperature: 50 to 65°F (10 to 18°C), which is cooler than room temperature but warmer than a refrigerator
- Humidity: Around 75%
- Position: Pointed end down in an egg carton
- Turning: Tilt the carton from one side to the other once a day to prevent the yolk from sticking to the membrane
I collect eggs for my incubator over 5 to 7 days, storing them pointed-end-down in an egg carton at around 60°F in my basement. I tilt the carton from one side to the other each day. My best hatch rates have consistently been with eggs stored 3 to 5 days before setting. Eggs held over 7 days have noticeably lower hatch rates in my experience.
How to Increase Your Chances of Getting Fertile Eggs
If you’re cracking test eggs and finding mostly blastodisc (no bullseye) instead of blastoderm, it’s time to troubleshoot. Here are the key factors that affect egg fertility in a backyard flock.
Rooster-to-Hen Ratio
One healthy, active rooster can easily mate with a dozen or more hens and fertilize all their eggs. The recommended ratio for backyard flocks is 1 rooster per 8 to 12 hens. Breeders who want maximum fertility sometimes pair one rooster with as few as 5 or 6 hens.
How Long After Mating Are Eggs Fertile?
Beginning the second day after you put a rooster and hen together, her eggs should be fertile. Hens generally start laying fertile eggs 24 to 48 hours after mating. The fertility from a single mating lasts approximately 10 to 14 days, with maximum fertility occurring in the first 3 to 4 days.
The Science of Sperm Storage
This is one of the most fascinating aspects of chicken reproduction. When a rooster mates with a hen, the sperm travel through her cloaca to structures called sperm storage tubules (SSTs), which are located at the junction of the hen’s uterus and vagina.
According to research from the Mississippi State University Extension Service, the rooster’s semen contains around 5 billion sperm per cc, about 40 times as much as that of a human. Once a rooster is mature and properly maintained, he manufactures about 35,000 sperm every second of his life.
The hen’s SSTs can store these sperm and keep them viable for up to 2 to 3 weeks in domestic chickens. Published research in the Journal of Reproduction and Development confirms that the biological basis of sustained fertility in chicken hens is their capacity for sperm to reside in these SSTs, with the mean number of SSTs in chickens being approximately 4,893.
Sperm do not break through the eggshell from the outside. Instead, they travel up the oviduct to the infundibulum (the first part of the oviduct) where they meet the egg yolk. Around 30 sperm must enter the egg near the germinal disc to ensure a 95% chance of fertilization.
Common Reasons Eggs Aren’t Fertile
- Rooster is too old or unhealthy (fertility declines with age)
- Rooster-to-hen ratio is too high (too many hens, not enough mating)
- Rooster is too heavy (common in meat breeds like Brahmas or Cochins, where the rooster can’t mount properly)
- Hen won’t submit (pecking order issues or hen avoidance)
- Season and daylight hours (fertility drops during short winter days)
- Poor nutrition (especially protein and zinc deficiency in the rooster)
I confirmed my rooster was mating by observing him directly. But just because a rooster mounts doesn’t mean there’s a successful “cloacal kiss” (the moment of actual sperm transfer). When I noticed a drop in fertility rate from my cracking tests, I watched more carefully and realized my heavy Buff Orpington rooster was falling off the hens before completing the mating. Trimming his vent feathers helped immediately. You can learn more about this breed in my Buff Orpington chicken guide.
Incubation Basics: Temperature, Humidity, and What Fertile Eggs Need to Develop
Once you’ve confirmed your eggs are fertile (through cracking test eggs) and set them in the incubator, here’s what those developing embryos need:
| Factor | Requirement |
|---|---|
| Temperature (forced air incubator) | 99.5°F |
| Temperature (still air incubator) | 101 to 102°F |
| DANGER zone | 103°F and above will kill embryos |
| Humidity (Days 1 to 18) | 45 to 50% |
| Humidity (Days 18 to 21, lockdown) | 65 to 70% |
| Egg turning | 3 to 5 times per day, stop at Day 18 |
| Total incubation period | 21 days for chicken eggs |
| Recommended candling days | Day 7, Day 14, Day 18 |
Temperature control is everything. A degree too high is far more dangerous than a degree too low. I use a secondary digital thermometer inside my incubator as a backup, because the built-in thermometers on budget incubators can be off by 2 to 3 degrees.
For detailed incubator comparisons and setup guides, check out my best egg incubators for beginners and my Brinsea vs. Nurture review. If you’re setting up a brooder for after the hatch, my automated brooder temperature controller guide will save you a lot of guesswork.
Frequently Asked Questions: How to Tell If an Egg Is Fertile
Can you tell if an egg is fertile without cracking it?
Not before incubation, no. There are two methods to check fertility: cracking the egg and looking for the bullseye blastoderm on the yolk (which destroys the egg), or candling the egg with a flashlight after at least 7 days of incubation to look for blood vessels and an embryo. You cannot determine fertility from the outside of an un-incubated egg.
What does a fertile egg look like on Day 3?
At Day 3, most fertile eggs still look clear when candled. Some very early developers may show a faint shadow, but it’s unreliable. Wait until Day 7 for your first reliable candling check.
Can you tell if an egg is fertile by floating it in water?
No. The float test only estimates the egg’s approximate age based on air cell size. It has nothing to do with fertility. A fresh fertile egg and a fresh infertile egg behave identically in water.
Does a blood spot mean the egg is fertile?
No. A blood spot is simply the result of a small blood vessel rupturing during the egg’s formation in the hen’s reproductive tract. It occurs in both fertile and infertile eggs and has no connection to whether a rooster was involved. These eggs are safe to eat.
How long after getting a rooster will my eggs be fertile?
Beginning the second day after you put a rooster and hen together, her eggs should be fertile. However, for maximum confidence, wait 7 to 10 days and then start cracking eggs to check for the bullseye blastoderm.
How long does a hen stay fertile after one mating?
Fertility from a single mating lasts approximately 10 to 14 days. A hen will have maximum fertility for about 3 to 4 days after one mating. After that, fertility declines gradually, which is why regular mating is important for consistent fertility throughout the flock.
Do fertile and infertile eggs taste different?
No. There is absolutely no flavor or texture difference between fertilized and unfertilized eggs. There is also no nutritional difference. The chemical differences are so minuscule that the fact that the egg was fertilized cannot be detected.
What does the “bullseye” look like on a fertile egg?
It’s a small white circle (approximately 3 to 4mm) on the surface of the yolk with distinct concentric rings and a slightly translucent center. It looks like a tiny target or bullseye. Compare this to the solid, irregular-bordered blastodisc in infertile eggs, which is just a small solid white dot.
Will a fertilized egg develop on my kitchen counter?
No. Development requires sustained temperatures of 99 to 102°F with proper humidity. Room temperature is far too low. A fertilized egg left on your counter will not begin to develop and will be indistinguishable from any other egg.
Can I hatch eggs from the grocery store?
Almost certainly not. Commercial egg farms only keep female hens, so there is no chance of those eggs being fertilized. Even if you found a specialty store selling fertile eggs, they’ve typically been refrigerated and stored too long for successful incubation.
Final Thoughts From My Incubator to Yours
After three hatching seasons and over 200 eggs candled, here are the three things I want every beginner to remember about checking egg fertility:
First, you cannot tell from the outside. Period. You need to either crack an egg and look for the bullseye blastoderm, or candle after Day 7 of incubation.
Second, patience is everything. Day 1 candling shows nothing. The water float test shows nothing related to fertility. Blood spots mean nothing related to fertility. Wait until Day 7, and the truth will be obvious.
Third, remove infertile eggs and quitters promptly. A rotten egg explosion in your incubator can ruin an entire hatch.
If this is your first time incubating, don’t be intimidated. Everyone starts where you are, staring at eggs in a dark closet wondering what they’re looking for. It gets easier with every hatch. And the moment you hear that first pip and peep from inside the shell on Day 21, every anxious midnight candling session will have been worth it.
Ready to start your hatching journey? Check out my guides to the best egg incubators for beginners and the best egg candlers. And once those chicks arrive, my bringing chicks home: 15 must-haves guide will make sure you’re prepared.
Happy hatching, and good luck with your flock.

Oladepo Babatunde is the founder of ChickenStarter.com. He is a backyard chicken keeper and educator who specializes in helping beginners raise healthy flocks, particularly in warm climates. His expertise comes from years of hands-on experience building coops, treating common chicken ailments, and solving flock management issues. His own happy hens are a testament to his methods, laying 25-30 eggs weekly.